3 A Tour of the Interface
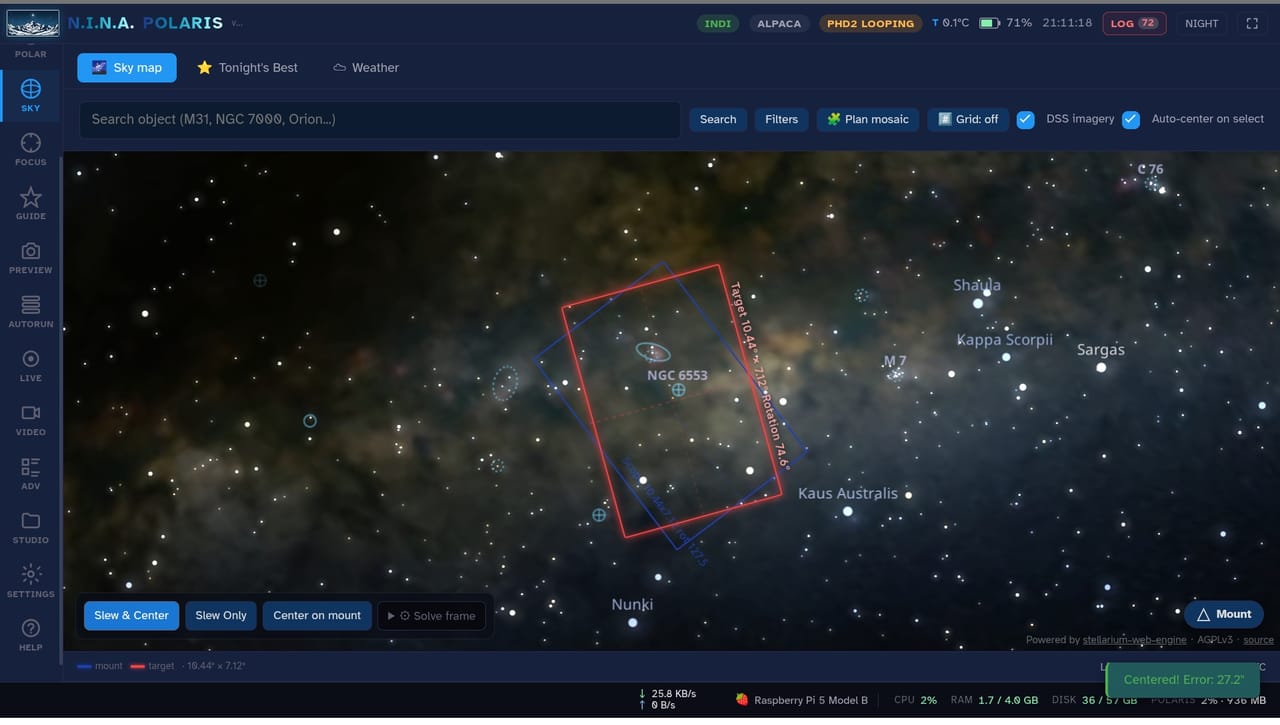
Everything in Polaris happens in one web page. The left edge of that page is a sidebar, the main navigation rail; each button on it opens one panel, and some panels add a row of pills or tabs across the top for sub-views. The sidebar is deliberately ordered like a real session, top to bottom: connect your equipment, pick a target, focus, guide, capture, watch, process. This chapter walks the rail once, shows what is always on screen regardless of the panel, and ends with a task index for the moments when you know what you want to do but not where it lives.
3.2 The HOME dashboard
HOME is the first thing a connecting browser sees. It shows a session summary: the active rig, the connection status of each device, and what Polaris is currently doing. Quick-navigation shortcuts jump straight into the panel you need next. A host-info card identifies the machine running Polaris: model, operating system, architecture, core count, and CPU. When something feels wrong mid-session, HOME is the one-glance answer to “what state is everything in?”.
3.3 Always on screen
A few UI elements are present no matter which panel is open.
The top status bar is the session’s instrument cluster. It carries connection badges for INDI, Alpaca, and PHD2, the camera temperature, the live-stack frame count, the battery level of the client device, the clock, and the guider’s dither and settle state (dithering nudges the mount slightly between frames so noise does not stack up in the same pixels; settling is the short wait for the mount to steady again afterwards). It also hosts a global sequence-abort button, the green Update badge that appears on .deb installs when a newer release exists (Chapter 28), and the LOG badge described below. Next to it, activity and transfer chips report live network throughput, in-flight uploads and downloads, and image-frame and exposure progress.
Toasts are the transient notifications that slide in when something completes or fails. They disappear on their own, but nothing is lost: every toast is captured in the debug log.
The LOG badge opens the debug log panel, which collects every server log line, HTTP request, toast, and browser error into one filterable stream, exportable as a JSONL file (a plain-text format with one log entry per line, easy for tools to read) for bug reports. When you file an issue, this is the attachment that makes it actionable; Chapter 28 covers it.
Two smaller conveniences round out the frame: multi-instance tabs let one browser manage several Polaris hosts side by side, and dismissable health chips surface host problems such as Raspberry Pi under-voltage warnings.
3.4 On a phone: Field Mode
Open Polaris on a phone and it changes shape. The full interface assumes a wide screen, so on a small one Polaris switches to Field Mode, a touch-first shell modelled on a handset controller like the ASIAIR. It turns on by itself when the shorter side of the screen is small enough, which catches a phone held either way and leaves tablets and desktops alone. Field Mode is not a separate app: it drives the same session as the full interface, so a change in one shows up in the other, and you can move between them mid-session without losing your place. A Full Mode button in the corner returns you to the full UI, and on a phone a Field mode pill brings you back here.
The image fills the screen. A menu at the top moves between the screens you use at the scope: Preview, Focus, Sky, Autorun, Live, and Video. Two icons beside it jump straight to Guide and Setup. Each screen shows only its own controls: exposure, gain, and binning as tap-to-expand steppers, a large shutter to start and stop, and, when a mount is connected, a movement pad with a slew-speed slider and Home, Park, and Sync buttons, each behind a confirmation.
Setup gets the rig online and covers the basics without leaving Field Mode. It lists your devices with a dropdown to choose each one and a single Connect all, a gear beside each device that opens that device’s full settings, and cards for the studio folder, display name, plate solving, WiFi, network storage, software updates, and power, plus a scale control that sizes the field interface on its own. Anything deeper, such as editing an INDI profile, sends you to the full UI. See Chapter 27 and Chapter 28 for those settings.
3.5 SETTINGS at a glance
The SETTINGS panel gathers everything that is global rather than per-panel. Expect to find:
- Profiles and location: the observer location (with a first-run setup modal), units, and app-wide preferences.
- Appearance: theme and font picker.
- Plate solving: solver choice and downsampling (shrinking the image before solving, for speed), plus a Colour calibration data card showing the status of the APASS star-brightness catalog, spectra, and sensor curves used by PCC and SPCC (Chapter 22).
- AI inference: settings for the ONNX AI models (ONNX is the file format the AI models come in) and the on-device model downloader (Chapter 23).
- Network mode: the ASIAIR-style hotspot-to-station WiFi panel (Chapter 27).
- Remote access: the relay for encrypted (TLS-tunneled) access from outside the LAN, HTTPS setup, and authentication (Chapter 27).
- Remote terminal: an embedded SSH terminal (a remote command line for the host machine) for managing a headless host, one with no monitor or keyboard, from the browser (Chapter 28).
- Clock sync: push the browser’s UTC time to a Pi without a real-time clock (Chapter 28).
- Equipment simulator: the built-in fake rig that renders real stars (Chapter 8).
- Benchmark: synthetic workloads to compare hardware, with a saved results history (Chapter 28).
- Power: host power actions, the self-update check, and the version rollback list (Chapter 28).
3.6 Getting help inside the app
The HELP panel is the built-in manual for the moments you do not have this book at hand. It contains step-by-step tutorials, from capture-to-export to specific workflows such as LRGB mono, planetary, and photometric color calibration, plus a guided first-night checklist (the same ground Chapter 4 covers) and a troubleshooting accordion with links into the full user guide. The Report a problem action opens a pre-filled GitHub issue or discussion with client and server diagnostics already attached, so a useful bug report is one click, not an archaeology session.
3.7 Where do I go to do X?
When you know the task but not the panel, this table is the map.
| Task | Go to | Notes |
|---|---|---|
| Connect my gear | RIGS | Pick each device, click Connect, save the combination as a rig |
| Set my location | SETTINGS | The first-run setup prompts for it; change it here later |
| Polar align | POLAR | Choose TPPA or Rudimentary and follow the steps |
| Find a target | SKY | Search or browse the map; drag the FOV box to set rotation and framing |
| See what is good tonight | SKY, Tonight pill | Altitude curves and ranked targets for your site and date |
| Check the weather | SKY, Weather pill | Current conditions and forecast |
| Go to and center a target | SKY | Slew-and-center slews, plate-solves, and re-centers |
| Snap a quick test shot | PREVIEW | Set exposure and gain, take one frame |
| Plate-solve the current frame | PREVIEW | The Plate solve button |
| Auto-focus | FOCUS | Runs the V-curve sweep and moves to best focus |
| Focus by hand | FOCUS | Watch HFR, or use the Bahtinov overlay |
| Start guiding | GUIDE | Connect PHD2 or the native guider, calibrate, guide; the graph shows RMS (the average guiding error) |
| Image one target unattended | AUTORUN | Set exposure, gain, filter, and count, then start |
| Image several targets in one night | PLAN | Targets with time windows and per-target frame lists |
| Live-stack (EAA) | LIVE | Start the loop and watch the stack grow; save as you go |
| Planetary or lucky imaging | VIDEO | High-fps capture, SER recording, stack the best frames |
| Take flats | AUTORUN, Flat Wizard | Automated flat acquisition |
| Complex conditional sequences | ADV | The tree-based Advanced Sequencer |
| Browse or open my files | STUDIO | The file browser; double-click or View opens the viewer |
| Pick the best subs and stack them | STUDIO | Add your light frames (the subs), grade them, integrate the keepers |
| Color calibrate | STUDIO | Color Cal (PCC) or SPCC on a plate-solved RGB master; re-solve via Solve if matches are low |
| Combine channels (LRGB / SHO) | STUDIO | The Combine tool |
| Background extraction, denoise, deconvolution, upscale | STUDIO | The AI tools, or the EDITOR’s AI section |
| Remove stars | STUDIO | Star removal, then blend back if wanted |
| Edit (stretch, curves, crop) | STUDIO, Editor | Opens on an image |
| Compare before and after | The comparator | Opens after a tool runs; keep the stretch toggle on Independent for color changes |
| Change the plate solver or downsample | SETTINGS, Plate solving | |
| Color-calibration data status | SETTINGS, Colour calibration data | APASS, spectra, and curve status |
| Network, remote access, HTTPS, relay | SETTINGS | See Chapter 27 |
| AI and ONNX model settings | SETTINGS | See Chapter 23 |
| Tutorials and troubleshooting | HELP | |
| Use Polaris from my phone | Field Mode | Turns on by itself on a phone; a top menu switches screens, Full Mode returns to the full UI |
3.8 If you are just lost
Start at HOME for status, then follow the sidebar top to bottom; it is ordered like a real session: RIGS to connect, SKY to pick a target, FOCUS, GUIDE, then AUTORUN or PLAN to capture, LIVE to watch, and STUDIO to process. HELP has a guided first-night checklist, and the next chapter (Chapter 4) walks that same path with you in half an hour.