12 Autoguiding
No mount tracks perfectly. Autoguiding watches a star through a guide camera and sends tiny corrections to the mount so the target stays put during long exposures. Polaris offers two ways to do this, selected per rig in RIGS → Guider driver (native versus phd2):
- The native guider (
NativeGuider), built into Polaris itself. It uses the same proven guiding math as PHD2 (Stark et al., n.d.), the free autoguiding program most amateur astrophotographers use, so it behaves like PHD2 without your having to install anything extra. It drives the rig’s guide camera and mount directly, with no external program to babysit. - The PHD2 integration, which runs the real PHD2 program alongside Polaris and manages it as a first-class device: Polaris controls it remotely over JSON-RPC1, and can even show PHD2’s own window inside the browser.
Whichever backend is active, the rest of Polaris treats it the same: dithering (small random pointing nudges between frames, covered below), settle-and-resume, and the status-bar guider badge all route through a common interface. The GUIDE tab in the sidebar is where you operate either one.
12.1 The native guider
The native guider carries PHD2’s proven algorithms into the Polaris server itself: single-star centroid tracking (following a star’s precise centre to a fraction of a pixel), calibration, the Hysteresis (RA) and Resist-Switch (Dec) correction algorithms (both explained under Guiding parameters below), Dec backlash compensation (taking up the slack in the mount’s gears when the Dec motor reverses), multi-star guiding, and pier-side handling. It corrects the mount with short timed pulses through the mount driver’s PulseGuide command (the software equivalent of the classic ST4 guide cable), so no external PHD2 process is needed.
Requirements
- A guide camera selected and connected on the RIGS Guide Camera card, through any supported driver: INDI (the Linux astronomy device framework), Alpaca (ASCOM’s network protocol), a vendor SDK (the manufacturer’s own driver library), or the built-in Simulator. It must differ from the imaging camera while that one is connected.
- A mount connected that supports pulse guiding (a GEM, German equatorial mount, or other equatorial mount with the PulseGuide command).
- A guider focal length set on the rig, which drives the reported pixel scale (how much sky each guide-camera pixel covers, in arcseconds; an arcsecond is 1/3600 of a degree).
No connect button is needed: the native guider auto-connects as soon as the guide camera is on and the GUIDE backend is native.
The control bar
The bottom bar holds only the capture and guide actions (Exp, Gain, and Bin sit inline and left-aligned); the settle and dither knobs live in the Dithering section of the Status pane on the right. The Status / Settings / Calibration side panel opens directly under the Built-In / External backend selector - there is no separate “PHD2 Native” tab, and there is no Disconnect button (the guider connection is managed from RIGS). The chart resizes with the window, and Clear History sits in its bottom-right corner.
| Control | Meaning |
|---|---|
| Exp (s) | Guide-camera exposure per frame, picked from a dropdown of presets (0.1, 0.2, 0.5, 1.0, 1.5, 2.0, 3.0, 5.0 s). Persists to the rig. |
| Gain | Guide-camera gain (native backend only), picked from a dropdown built from the camera’s reported min and max plus evenly spaced intermediate values. |
| Bin 2x2 | Bin the guide camera 2x2 (merge each 2x2 block of pixels into one) for a brighter, smaller frame. |
| Loop | Capture continuously without guiding, for framing or focusing the guide scope. |
| Start Guiding | Calibrate if needed, auto-select a star, then guide. |
| Auto-select Star | Pick the brightest suitable star. |
| Pause / Resume / Stop | Pause keeps the lock; Stop ends the loop and aborts an in-progress calibration. |
Settle and dither controls (in Status → Dithering):
| Control | Meaning |
|---|---|
| Settle px / s / Timeout s | Settle tolerance, minimum settled time, and hard timeout, applied after calibration starts and after a dither (guiding must hold the star within the tolerance for the settle time before imaging carries on). |
| Dither px / RA only | Dither amplitude and axis restriction. Automatic dithering is driven by the AUTORUN sequencer or the LIVE tab, described below. |
| ⤡ Dither now | Fire a one-shot dither immediately (guiding must be active). |
Calibration
Calibration measures how a pulse on each axis moves the star: the rate in pixels per millisecond and the camera-frame angle of each axis. With those numbers, guiding corrections can be converted to pulse durations. Start Guiding runs calibration automatically when no valid calibration exists; Recalibrate forces a fresh run.
Two per-rig settings shape calibration and correction:
- Calibration step (ms): the pulse length per calibration step. Larger steps finish faster but overshoot on short focal lengths; smaller steps are gentler.
- Max RA / Max DEC duration (ms): caps on the per-axis correction pulse during guiding, in the style of the ASIAIR (ZWO’s all-in-one imaging controller), so a large error cannot run the mount away.
During calibration the crosshair stays pinned at the start position while the star sweeps; the moving star is shown by its marker circle, and a banner reports the phase, step, and distance.
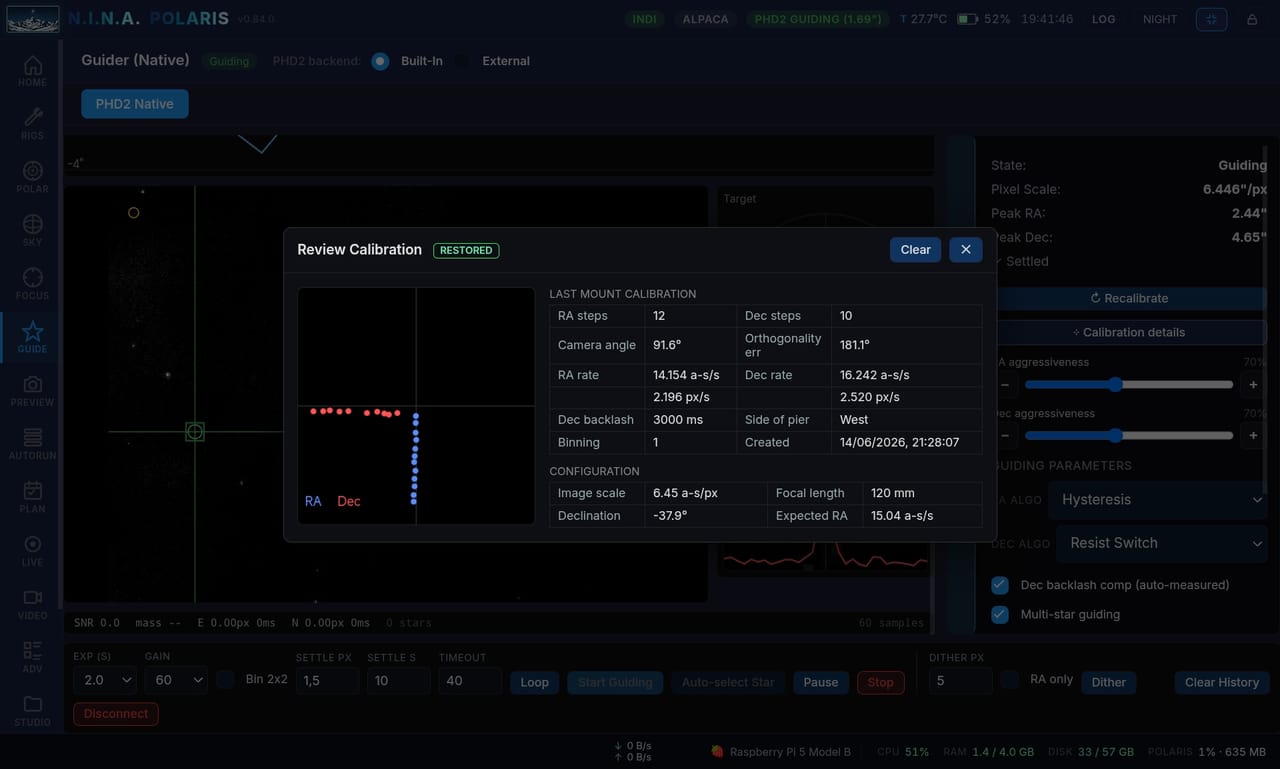
Calibration details opens a PHD2/ASIAIR-style review panel: the RA and Dec steps, camera angle, orthogonality error (how far the two measured axes are from perfectly perpendicular), rates in both px/s and arcsec/s, measured Dec backlash, binning, pier side (which side of the mount the telescope currently sits on), and a scatter plot of the RA (blue) and Dec (red) calibration moves. A RESTORED tag marks a calibration that was loaded from disk rather than freshly measured.
Calibration persistence and restore
Calibrations are saved per rig, keyed by the equipment signature: guide camera and driver, binning, guider focal length, and mount and driver. On connect, Polaris restores the calibration matching the gear currently fitted. You can therefore swap equipment, recalibrate, then swap the original gear back, and its old calibration is reused automatically. If no saved calibration matches the current equipment, none is applied (a stale calibration is never reused) and you are prompted to recalibrate. Clear removes only the current equipment’s calibration; other saved ones stay. A calibration saved before this feature existed has no equipment key and restores as a legacy single slot until you recalibrate once.
Guiding parameters
- RA algo / Dec algo: the rule that turns each measured error into a correction. Hysteresis blends each correction with recent history, so guiding does not chase the atmosphere’s shimmer; Lowpass and Lowpass2 follow only the slow trend of the error, ignoring rapid jitter; Resist-Switch is reluctant to reverse direction, which suits the backlash-prone Dec axis; Predictive (PE + drift) is described below; Identity applies the raw error with no smoothing. The defaults are Hysteresis for RA and Resist-Switch for Dec, matching PHD2’s defaults.
- Dec backlash comp (auto-measured): applies the slack take-up measured during calibration whenever the Dec direction reverses. Disabled if calibration did not measure a backlash.
- Multi-star guiding: tracks several stars and guides on their average, for a steadier centroid.
- On meridian flip: what to do with the calibration after a pier flip (the mount swinging the telescope to the other side of the pier as the target crosses the meridian, the north-south line through the point overhead). Mirror calibration reuses it, flipping RA by 180 degrees and optionally Dec; Recalibrate runs a fresh calibration; Do nothing keeps it as is. Reverse Dec after flip toggles the Dec-pulse reversal used by Mirror.
The Predictive (PE + drift) algorithm deserves its own note. It is a feed-forward algorithm, meaning it acts before the error shows up rather than only reacting afterwards: it learns the mount’s periodic error (a slow, repeating wobble caused by tiny imperfections in the worm gear that drives the RA axis) plus slow drift from the recent guiding history, and corrects ahead of the error instead of only chasing it, similar in spirit to PHD2’s Predictive PEC (periodic error correction). It is most useful on the RA axis, where worm PE dominates. When you pick it on either axis, a small panel appears:
- Worm period (s, 0 = auto): your mount’s worm period if you know it; leave at 0 to auto-estimate it from the guiding history.
- History (samples): how many recent frames feed the fit, about two worm periods; the default is 256.
- Feed-forward blend (0 to 1): how strongly the prediction is applied on top of the reactive baseline. The default is 0.7; lower is gentler.
Predictive always falls back to reactive guiding until the model locks on, so it never guides worse than the default. The guide graph overlays a dashed predicted curve (amber for RA, pale cyan for Dec) so you can see the model tracking the error.
Choosing the guide star
The star detector ships with defaults tuned for imaging frames, and a guide camera is a different instrument: a small chip, often binned, sometimes a bright sky, and stars only a few pixels across. When those defaults do not suit a rig the symptom is “no suitable guide star” over a frame you can plainly see stars in, and a hard-coded constant cannot be argued with. The Star selection group in the GUIDE sidebar therefore exposes the detector’s own knobs. Every field is stored per rig, blank means the default, and Reset to defaults clears the lot.
Method chooses between the two star-selection methods. Tuned for guiding, the default, is the one described here: a detector sized for a guide frame, saturation treated as a warning rather than a refusal, and a tap that locks the star within the tap radius of your finger. Classic is the behaviour from before 14 September 2026: the stock detector (5 pixels of area, 5 sigma, blobs up to 200 px), full scale read straight off the container depth so no star is ever treated as saturated, and a tap that locks the nearest star anywhere in the frame.
That September change made the guider read full scale from the frame data instead of from the container, and on a camera that under-reports its bit depth it marked the brightest star in every frame as saturated and refused to guide on it. The reading is fixed now, but the method stays selectable: a rig that guided better the old way can have the old way back without downgrading the application. The numeric fields below override whichever method is selected, and a blank field means that method’s own default.
Detection sigma (default 3.5) is how far above the frame’s noise floor a pixel has to be to count, in robust standard deviations (median plus n times the MAD, the median absolute deviation). Lowering it finds fainter stars and more noise, and it is the first knob to reach for when nothing is found at all. The imaging detector uses 5, which suits a long sub; a one-second guide exposure of a sparse field puts its stars a few sigma up, not five.
Min star size and Max star size are the smallest and largest blobs accepted as a star, counted in pixels of area (2 and 6000). The minimum matters more than it looks: a real star on a binned guide frame covers 2x2 pixels, so at the imaging detector’s 5 it is thrown away before anything else examines it, and a field with half a dozen stars you can see on screen detects none at all. Raise it to ignore hot pixels, which are a single pixel and excluded at 2 in any case. The maximum is far higher than the imaging detector’s on purpose: a bright guide star with a wide skirt is exactly what you want to guide on.
Max HFD (default 50 px) is the largest half-flux diameter accepted, so raise it for a soft or slightly defocused guide scope. Edge margin is how far from the frame edge a star has to be, and the guider never goes below the tracking window’s own size, so the search window always stays inside the frame. Tap radius (default 60 px) is how far your tap may land from a star and still be taken to mean that star: raise it on a phone, lower it in a crowded field.
The line under the group heading reports what the last selection saw, for example “14 found, 11 usable, 3 saturated”, so the tuning is not guesswork.
A saturated star has a flat-topped core, which costs centroid precision, so the guider prefers an unsaturated one when it has the choice, and that is all saturation is: a preference, never a refusal. Auto-select takes an unsaturated star when one is available and otherwise warns and uses a saturated one anyway; a star you tap is always honoured, with a warning that suggests lowering the guide gain or exposure; and Use saturated stars drops the preference entirely. Saturation is only judged when the driver reports the significant bit depth, or when the frame really does contain the container’s maximum sample. If neither holds, the full scale is unknown and nothing is called saturated, because inferring it from the frame’s brightest pixel is circular and flags the brightest star in every frame, which is usually the one you were pointing at.
Live view, star profile, and graph
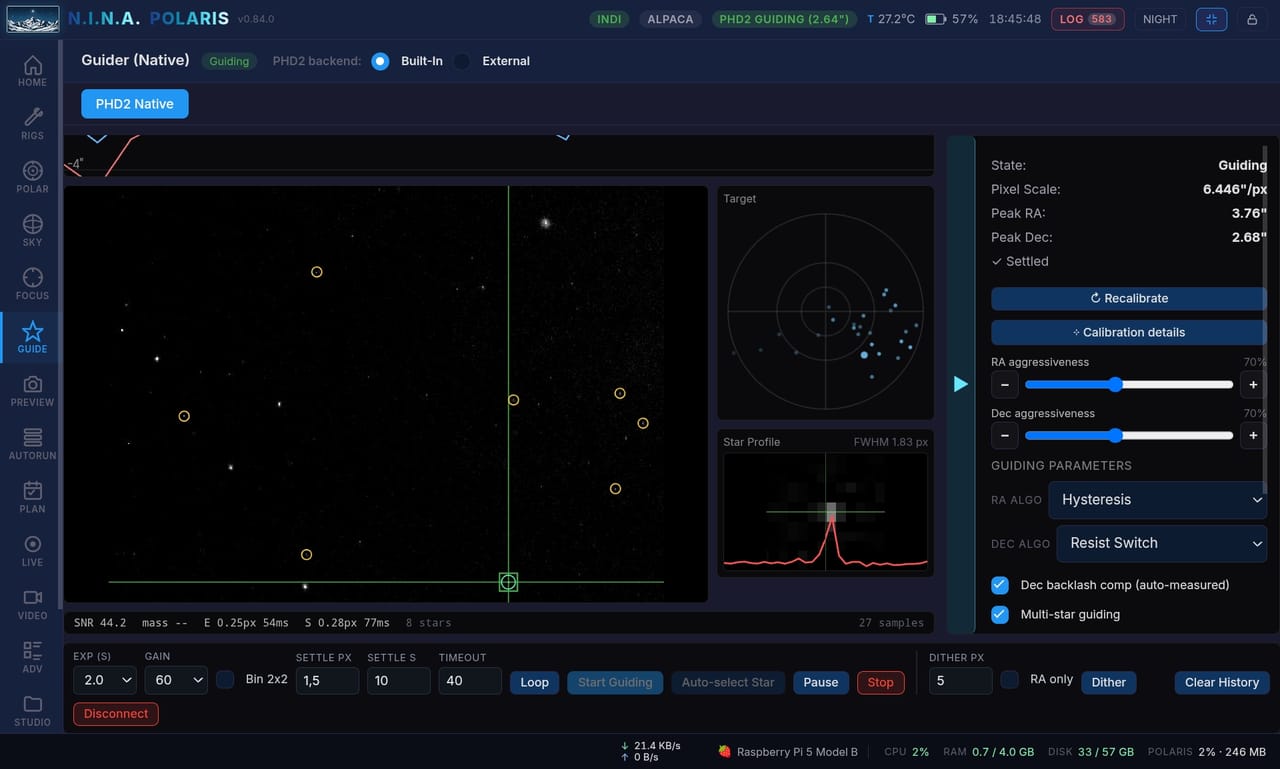
The guide frame shows the lock crosshair and star markers. Star Profile shows a zoomed image of the locked star plus its intensity cross-section and FWHM (full width at half maximum, a standard star-size measure), ASIAIR-style. The history graph plots the RA (red) and Dec (blue) error in arcseconds on a symmetric scale; the y ± buttons set the full scale, and the axis is labelled in arcseconds. The vertical impulse bars are the per-frame correction pulses, drawn opposite the error, that is, in the direction the mount is pushing the star back. A Target bullseye scatters the recent RA/Dec error.
Star lost
If the native guider loses its guide star it reports LostLock, the same state PHD2 uses, surfaced in the GUIDE panel and the status bar, and keeps the loop responsive while it tries to reacquire; it does not freeze the session. Note that a stuck INDI BLOB (the image-data packet an INDI camera driver sends) on some drivers can still require restarting the INDI driver; that is a driver-level wedge, not a Polaris reconnect.
When guiding gives up during a plan
Losing the star for a moment is routine. Losing it repeatedly, because cloud has come in or the mount is being pushed by wind, used to end the night: the guiding circuit breaker stopped the guider and the session with it, and whatever hours were left went unused.
Under a running PLAN (Chapter 16) the breaker now asks for a hold instead. Polaris stops the guider, turns tracking off so the mount is not chasing a target it cannot track, and parks the plan on that target. Then it tries again: after 3 minutes, then 5, then 10, then 15, each attempt being tracking on, a Slew & Center back onto the target, and a fresh start of guiding. A failed attempt parks it again and waits for the next slot.
The target is given up, and the plan moves on, when its window closes, when the next target’s window opens, or after four attempts for a windowless target that has a successor. A skipped target is marked as such and the plan continues, which is the point: a cloud bank over one target is not a reason to lose the ones behind it.
The PLAN run bar and the HOME dashboard show the hold while it lasts, with the reason, the attempt count and when the next retry is due.
Mount safety
If you press Start Guiding (or auto-guide from a restored calibration) without a connected, pulse-guide-capable mount, guiding aborts with a clear alert instead of “running” while every pulse is silently dropped. If the mount drops mid-session, you get a periodic “Mount not connected: guide pulses are being dropped” alert.
Testing without hardware
Select the Simulator guide camera and mount drivers in RIGS, with the guider driver set to native, to exercise the full calibrate, guide, and dither flow indoors. See Chapter 8.
12.2 Dithering
Automatic dithering, a small random nudge every N frames so the stacker rejects hot pixels and walking noise (the streaky trails fixed pixel defects would otherwise leave in the final stack), is driven from two places: the AUTORUN sequencer, which dithers every N frames between exposures (Chapter 14), and the LIVE tab’s live-stacking triggers (Chapter 17). Both route through whichever guider backend is active, so dithering works the same with the native guider and with external PHD2. The guider must be actively guiding, and the dithered frame waits for settle before the next exposure or integration.
While a dither settles, the native guider shows an ASIAIR-style settle readout, the live error against the settle tolerance plus a progress indicator, so you can watch it converge instead of guessing. The dither and settle state also surfaces in the guider badge of the top status bar.
12.3 The PHD2 integration
With the guider driver set to phd2, Polaris manages an external PHD2 process (Stark et al., n.d.) and controls it entirely over JSON-RPC. The GUIDE tab then has two sub-tabs. PHD2 GUI embeds PHD2’s native window in the browser (covered in the next section) and comes first in the tab order; Control is the JSON-RPC UI, with the profile switcher, exposure, Dec mode, equipment connect, guiding controls, RMS error chart (RMS, root mean square, is the standard measure of average guiding error), Smart Calibrate, and algorithm presets, and it works on every OS. The ordering matches the workflow: setup (Connect Equipment, Loop, Auto-Select Star, manual calibration) happens in the GUI, while Control is for monitoring and automation once PHD2 is configured.
Connection
If PHD2 is not installed, a download banner appears with a link to the official PHD2 page. Install it and restart the server, or set PHD2:ExecutablePath in appsettings.json if your binary lives in an unusual place. When the executable is auto-detected, click Launch PHD2: Polaris spawns PHD2 and waits for its event server on TCP port 4400 (loopback only, meaning it accepts connections only from the same machine, never from the network). An Auto-start on boot checkbox below persists in the profile, so every Polaris startup launches PHD2 about 2 s after server start, backed by PHD2AutoStartService.
Once PHD2 is up, the Connect button wires Polaris’s JSON-RPC client to it, and live status appears in the status-bar header (PHD2 ON or OFF).
Profile and equipment
The Profile dropdown lists PHD2’s profiles, read via get_profiles. Switching profiles auto-disconnects equipment, because PHD2 requires it. Connect equipment tells PHD2 to wire up the gear configured in the active profile, and a Current equipment display shows the guide camera, mount, aux mount, and AO (adaptive-optics unit, if any), so you know what PHD2 thinks it is using.
Only one program can have the guide camera open. While Polaris holds it through a vendor SDK or Alpaca, the INDI copy of that camera is disconnected as soon as anything connects it, and that includes PHD2 asking for it as an INDI camera. Either disconnect the guide camera in the GUIDE tab before handing it over, or set the rig’s guider to PHD2, in which case Polaris releases its own handle when PHD2 opens the camera. A camera that is only selected in the card, and not connected, is free: Polaris does not stand in the way of it.
Exposure, Dec mode, and guiding controls
The exposure dropdown is populated from PHD2’s get_exposure_durations, and Dec mode (Auto, North, South, Off) is passed to set_dec_guide_mode. The guiding controls map to the standard PHD2 commands: Guide starts guiding with the settle parameters; Loop cycles exposures without guiding, for finding a star or focusing; Pause and Resume keep the loop running but suspend pulse output; Stop stops everything; Dither manually triggers a dither; Auto-select star calls find_star; and Clear calibration and Clear history cover maintenance.
The live RA/Dec chart
A live plot (drawn with the Chart.js charting library) of the last 60 GuideSteps, sampled at 1 Hz (once per second), with an auto-scaling Y axis. RMS RA, RMS Dec, RMS total, peak RA, and peak Dec readouts update every second.
Settle parameters
- Settle pixels (default 1.5): guiding counts as settled when the peak error stays below this for the settle time.
- Settle time (default 10 s).
- Settle timeout (default 40 s): the give-up threshold.
These apply to all Guide and Dither commands.
Smart Calibrate
Smart Calibrate is the killer feature for cold-start calibration. Instead of opening PHD2’s Calibration Wizard, Polaris computes everything for you. Click Smart Calibrate and a modal opens with three options: Slew to equator (optional; Polaris commands the main mount to the local sidereal time at Dec 0 degrees, that is, to the point on the celestial equator currently crossing the meridian, before calibrating, since calibration accuracy is best near the celestial equator), a step size override (leave blank to auto-compute from pixel scale and guide rate), and a timeout (default 240 s).
Polaris then runs a nine-phase pipeline:
Preflight → PixelScale → ComputeStep → Slewing → ApplyStep
         → Calibrating → Validating → Ok/Fail
Live progress chips appear in the status bar and the result lands in a toast. On success, the calibration is verified for orthogonality (XAngle perpendicular to YAngle within 20 degrees) and a non-zero rate. Behind the scenes, the pixel scale comes from PHD2’s get_pixel_scale (with a fallback computed from the rig’s guider focal length), the guide rate is read from the mount (or defaults to 7.5 arcsec/s, which is 0.5 times sidereal, half the rate at which the sky itself drifts), and the step is computed as 25px × pxScale / guideRate × 1000 milliseconds, clamped to the range 250 to 3000.
Algorithm presets
Three curated bundles are applied via set_algo_param:
- Default: PHD2’s stock values. Balanced.
- Reactive: higher aggressiveness, lower hysteresis. Good for short focal lengths, good seeing (steady air), and fast mounts; the risk is overshoot.
- Smooth: gentler corrections, higher hysteresis and min-move. For long focal lengths or windy, poor-seeing nights.
- Custom: a sentinel, set automatically when you edit any knob in the Advanced disclosure. The override bag persists on the rig.
Click a preset pill to apply and persist it. The Advanced section below lets you tune individual knobs per axis (Hysteresis; Aggressiveness; MinMove, the smallest error worth correcting at all; and FastSwitch) and saves whatever you touch as the Custom preset.
Profile sync
A sync indicator at the top right of the tabstrip reflects the live status of PHD2ProfileSyncService: Profile synced when the rig name matches a PHD2 profile and it is the active one; Profile missing when no PHD2 profile carries this rig’s name (open the PHD2 GUI tab, create one via the Wizard, then click the retry button); Sync error when PHD2 returned an error during the switch; and Syncing while the profile flip and preset application are in flight. By default (PHD2AutoSyncOnRigSwitch = true), switching rigs in Polaris triggers an automatic PHD2 profile switch and preset application.
12.4 The embedded PHD2 GUI
Some of PHD2’s surface is GUI-only: the Profile Wizard, the Brain dialog, the Guiding Assistant, dark-library management, the equipment picker, and custom algorithm selection are not exposed over JSON-RPC. Polaris therefore embeds PHD2’s native GUI inside the PHD2 GUI sub-tab, using a backend that depends on the host OS:
| Polaris host | Backend | Setup |
|---|---|---|
| Linux | xpra (PHD2 in a dummy X display) | apt install xpra xserver-xorg-video-dummy |
| Windows | TightVNC + noVNC | see below |
| macOS | not supported | use PHD2’s native window directly |
Linux: xpra with an Xorg-dummy display
On Linux, Polaris runs PHD2 inside an xpra (The Xpra project contributors, n.d.) session (xpra is a tool that streams a Linux program’s window into a web page) with an Xorg-dummy virtual display (a fake monitor for PHD2 to draw on, since the imaging computer usually has no screen attached), then relays xpra’s HTML5 client through /phd2-gui/* as a reverse proxy: your browser talks only to Polaris, and Polaris passes the traffic along. This is 64-bit Linux only. On 32-bit ARM (a Raspberry Pi 2 or 3 with 32-bit Raspberry Pi OS), xpra installs from apt but its session start crashes: the dummy Xorg driver is unreliable on ARMv7 and several of the libraries xpra is built on (Python and GTK components) misbehave. Polaris detects this at startup and disables the panel with a clear message. On such hardware, upgrade to 64-bit Raspberry Pi OS on a Pi 4 or 5, run PHD2 on a separate machine on the LAN and point Polaris at it via the PHD2 host and port setting in the GUIDE tab, or reach PHD2’s window with a remote-desktop tool such as VNC, or with X11 forwarding (showing the window on another Linux machine’s screen). The full JSON-RPC Control surface still works on 32-bit ARM; only the embedded GUI window is unavailable.
The install procedure (Raspberry Pi, Debian, Ubuntu) is adapted from the PHD2 maintainer recommendation. First install xpra and the Xorg-dummy driver:
sudo apt update
sudo apt install \
    xpra \
    xserver-xorg-video-dummy \
    xserver-xorg-input-libinput \
    xserver-xorg-input-all \
    xserver-xorg-core
Polaris probes xpra --version on startup and lights up the panel automatically when xpra is detected.
Second, configure xpra to use Xorg-dummy rather than Xvfb (another virtual display, xpra’s default). PHD2 is built with the wxWidgets interface toolkit rather than GTK, and in practice it runs reliably under Xorg-dummy but glitches under Xvfb. Edit /etc/xpra/conf.d/55_server_x11.conf, comment out the existing xvfb = ... Xvfb stanza (the last lines of the file), and uncomment the Xorg-dummy stanza:
# xvfb = Xvfb -screen 0 8192x4096x24 +extension GLX \
#     +extension RANDR +extension RENDER +extension Composite \
#     -extension DOUBLE-BUFFER -nolisten tcp -noreset \
#     -auth $XAUTHORITY

xvfb = /usr/lib/xorg/Xorg -novtswitch \
    -logfile ${XPRA_SESSION_DIR}/Xorg.log \
    -configdir ${XPRA_SESSION_DIR}/xorg.conf.d/$PID \
    -config ${XORG_CONFIG_PREFIX}/etc/xpra/xorg.conf \
    +extension GLX +extension RANDR +extension RENDER \
    +extension Composite -extension DOUBLE-BUFFER \
    -nolisten tcp -noreset -auth $XAUTHORITY
Third, verify PHD2 is reachable:
which phd2     # should print /usr/bin/phd2 or similar
phd2 --version # should print 2.6.xx or newer
If PHD2 is not installed yet, sudo apt install phd2 or the PHD2 Linux build guide will get you there. Finally, restart the Polaris server, open GUIDE → PHD2 GUI, and click Start PHD2 GUI session. After about 5 to 10 seconds the PHD2 native UI renders inside the tab, and you can run the Profile Wizard, Brain dialog, and Guiding Assistant as if you were sitting at the Pi’s monitor.
The panel walks through four states: a platform-unsupported banner (non-Linux host, or 32-bit ARM); install instructions when xpra is missing; a Start PHD2 GUI session button when xpra is installed but no session runs (expect 5 to 10 s of spin-up); and, once running, the iframe at full available viewport height plus a toolbar. The toolbar shows a confirmation like xpra v6.x.x port 14600, a green PHD2 running or amber PHD2 not running inside session indicator (distinguishing two failure modes that previously looked identical), a Relaunch PHD2 button shown only when PHD2 is missing (it runs xpra control :100 start-child phd2 inside the live session, with no full xpra restart, useful when PHD2 crashed mid-session or never spawned), a Restart button for a full teardown and recreate of xpra and PHD2, and Stop, which kills the session.
By default the xpra session starts on demand, the first time you open the PHD2 GUI tab. To pre-start it at Polaris boot so the iframe loads instantly, set in appsettings.json:
{
  "Phd2Gui": {
    "AutoStart": true,
    "DisplayNumber": 100,
    "BindPort": 14600
  }
}
DisplayNumber is the X display number passed to xpra (default :100); BindPort is the TCP port xpra listens on, localhost only (default 14600). Polaris reverse-proxies /phd2-gui/* to this port; never expose it to the network directly. Auto-start costs about 150 MB of RAM constantly, which is why it is opt-in.
Under the hood, Polaris’s Phd2GuiSessionService spawns xpra start :100 --start=phd2 --html=on --bind-tcp=127.0.0.1:14600; the Polaris web server forwards /phd2-gui/* to ws://127.0.0.1:14600/* using YARP’s IHttpForwarder2; and the GUIDE tab embeds <iframe src="/phd2-gui/"> (an iframe is a page shown within a page). Because the embedded page lives under the Polaris web address, sessionStorage (the browser’s per-tab storage, which the xpra HTML5 client needs) works, and your Polaris authentication, relay tokens or LAN, covers PHD2 GUI access too. Every 15 seconds Polaris TCP-pings port 14600 and surfaces the session state via /ws/status under guider.guiSession.*.
Windows: TightVNC and noVNC
Windows has no xpra, so Polaris takes a different route: the TightVNC (GlavSoft LLC, n.d.) service (a free remote-desktop server for Windows) captures the Windows desktop on 127.0.0.1:5900, Polaris bridges that RFB stream (RFB is the picture protocol VNC remote-desktop tools speak) over a WebSocket, and the browser renders it with the noVNC (The noVNC authors, n.d.) client, a remote-desktop viewer that runs entirely inside a web page. PHD2 runs in its real Windows window; you maximize it once, and the embedded view shows everything you would see on the mini-PC’s monitor.
The one-time setup:
- Download the Windows installer from https://www.tightvnc.com/download.php (pick the 64-bit MSI for modern Windows) and run it. In the Service Configuration dialog, set a password for “Password for Remote Access” (you are prompted for it once per browser session; Polaris does not store it) and leave “Accept incoming connections” enabled. The installer registers a Windows service named
tvnserverthat starts automatically. - Optionally, but recommended: restrict TightVNC to loopback. By default it accepts connections on every interface, while Polaris only ever connects via
127.0.0.1:5900. Right-click the TightVNC tray icon, open Configuration, and on the Network tab set “IP access control” to allow127.0.0.1only, or check “Loopback connections only”. Polaris warns with a red status in the Settings card if it detects TightVNC listening on a public interface. - In Polaris, open GUIDE → PHD2 GUI and click Re-detect. The card should report “TightVNC vX.Y detected”, “Service: Running”, and the canvas becomes available.
To use it, click into the PHD2 GUI sub-tab; the noVNC client prompts for the password you set during install (once per browser session), and the Windows desktop appears inside the iframe. Maximize the PHD2 window so it fills the view, then use PHD2 normally: Profile Wizard, Brain, Guiding Assistant, dark library, all of it.
Architecturally:
Browser ──── HTTPS GET /phd2-vnc/ ────→  Polaris   (serves static noVNC HTML5)
        ──── WS    /phd2-vnc-ws  ────→  Polaris   (WS↔TCP bridge)
                                              ↓ raw TCP
                                         127.0.0.1:5900
                                              ↓
                                         TightVNC service
                                              ↓ captures
                                         Windows desktop
Services/Phd2VncSessionService.cs detects TightVNC through the registry and the service controller, probes the listening port, and exposes Start and Stop service buttons (admin rights required). Program.cs maps /phd2-vnc-ws to a WebSocket-to-TCP pump pair that streams 16 KB chunks in both directions, with linked cancellation so closing either end tears down both. wwwroot/phd2-vnc/index.html loads noVNC’s RFB class from the copy shipped inside Polaris (a vendored MPL 2.0 bundle) under wwwroot/js/lib/novnc/ and points it at the same-origin /phd2-vnc-ws URL. All three paths (the static files, the WebSocket, and the status REST endpoints) pass through AuthMiddleware, so only authenticated Polaris users can reach the bridge. On licensing: TightVNC is GPLv2, invoked as a separate Windows service via .NET’s built-in ServiceController class (the BCL) with no code mixing; noVNC is MPL 2.0, compatible with Polaris’s MPL 2.0.
When to use which view
The embedded GUI is meant for setup and tuning, not continuous monitoring during sequences. Use the Control tab, with its JSON-RPC statistics and guide-step chart, for live operations; its bandwidth is negligible. On a Raspberry Pi 4 with a heavily loaded session, you can also reduce the xpra frame rate by adding framerate=10 to /etc/xpra/conf.d/16_client.conf; the defaults handle PHD2 fine on a Pi 5.
12.5 Troubleshooting
Smart Calibrate fails with “PHD2 reports not calibrated after Guiding state, unexpected”. Usually a guide star could not be locked. Lengthen the find_star exposure or pick a denser field manually.
The profile switch hangs at “switching”. PHD2 is busy disconnecting equipment. Wait 30 s and it resolves; if stuck longer, click the refresh button in the Control tab’s connection panel.
The xpra iframe shows “session not running” right after Start. The first launch takes 5 to 10 s for Xorg-dummy to come up. Wait, then refresh. If it persists, re-check /etc/xpra/conf.d/55_server_x11.conf for the Xorg-dummy switchover.
“xpra start exited 1: cannot open display”. Xorg-dummy is not configured; revisit the 55_server_x11.conf edit above.
The PHD2 GUI iframe shows a bare blue desktop with no PHD2 window. xpra started but PHD2 itself crashed or never spawned; the toolbar shows PHD2 not running inside session in amber. Click Relaunch PHD2 to spawn a fresh PHD2 inside the existing session. If that fails repeatedly, the host is probably missing PHD2 entirely (sudo apt install phd2) or the binary is not on the PATH seen by the system service (systemd) that launched Polaris.
The iframe shows JSON like {"error":"xpra session not running. POST .../start to launch it."}. Exactly what it says: click Start PHD2 GUI session (or POST to /api/guider/gui-session/start). The error renders verbatim because the proxy correctly forwards Polaris’s pre-check response.
The xpra iframe loads but is blank, or shows xpra’s connect dialog. xpra’s HTML5 client expects no password by default. If you added one via xpra’s auth options, the iframe cannot supply it automatically. Either remove the password (Polaris’s outer authentication is sufficient, since the port is localhost-only) or open /phd2-gui/ in a new browser tab and type the password once; xpra stores it in sessionStorage from there.
PHD2 crashes inside the xpra session. The session stays alive even when PHD2 dies; nothing renders. Click Restart in the toolbar to relaunch PHD2.
Windows: Re-detect says “TightVNC not installed” right after installing it. Confirm tvnserver.exe exists in C:\Program Files\TightVNC\ (or Program Files (x86) for the 32-bit installer). Polaris reads the registry key HKLM\SOFTWARE\TightVNC\Server; if the install wrote a non-standard path, re-run the installer and pick the default location.
Windows: the card shows “TightVNC service is stopped” and the Start button fails. Polaris needs admin privileges to control Windows services. Either restart Polaris elevated (right-click, Run as administrator) or open services.msc, find tvnserver, and start it manually; Polaris picks up the state on the next 15-second health probe.
Windows: the canvas connects but the password is rejected. TightVNC has two passwords, “Password for Remote Access” (full control) and a view-only password; the noVNC prompt expects the full-control one. If you only set the view-only password, re-run the installer or set the main password from the tray Configuration dialog.
Windows: the canvas connects but shows a black screen. The Windows session is probably locked. Connect via RDP (Windows Remote Desktop), or unlock the desktop at the mini-PC’s keyboard; TightVNC mirrors the active session, and if no one is logged in there is nothing to mirror.
Windows: performance is sluggish on slow WiFi. Adjust the encoder in the tray Configuration under Server → Encoding: a lower compression level costs less CPU and more bandwidth, a higher one the reverse. The defaults are usually fine on a LAN.
Calibration, dithering, and guiding in general have glossary entries in Appendix B.
JSON-RPC is a simple text-based protocol that lets one program send commands to another over a network connection. PHD2 offers one, and Polaris uses it to drive PHD2 without you having to touch its window.↩︎
YARP is Microsoft’s reverse-proxy library for ASP.NET Core, the web framework Polaris is built on. It relays both ordinary web requests and WebSockets, the persistent two-way browser connections used for live streams.↩︎