17 Live Stacking and EAA
The LIVE tab integrates incoming frames in real time into a single growing image. It is the tool for Electronically Assisted Astronomy (EAA: observing live on a screen instead of through an eyepiece), comet hunting, or simply watching your deep-sky target build up while the sequence runs.
One distinction is worth fixing in your head before anything else: capture and stacking are separate things. The LIVE capture loop always runs on the host; the Pi or mini-PC keeps exposing even if your browser is backgrounded, sitting on another tab, or disconnects entirely, and you can run two Polaris tabs and switch freely between them. The Compute dropdown (Auto / Server / Client) only chooses where the per-frame stacking math runs, never who drives the camera. On underpowered hosts such as a Pi 2 or 3, flip it to Client so your browser takes over the stacking math, running it through WebAssembly (WASM for short, a browser technology that runs near-native-speed code and is available in every modern browser); the second half of this chapter covers that mode in detail.
17.1 How a frame becomes a stack
Polaris does not drive the capture from the LIVE tab; it subscribes to frames arriving from anywhere: the sequence engine, a PREVIEW snap, or the camera stream. While stacking is active, each incoming frame:
- has its stars detected,
- is aligned against the reference (the first frame’s star pattern) with an affine transform, a shift-rotate-scale mapping that lays one frame precisely over another,
- accumulates into a running-mean buffer (the stack itself: the average of every frame so far), and
- re-renders the stacked image to the canvas.
The frame count and reference star count update every second.
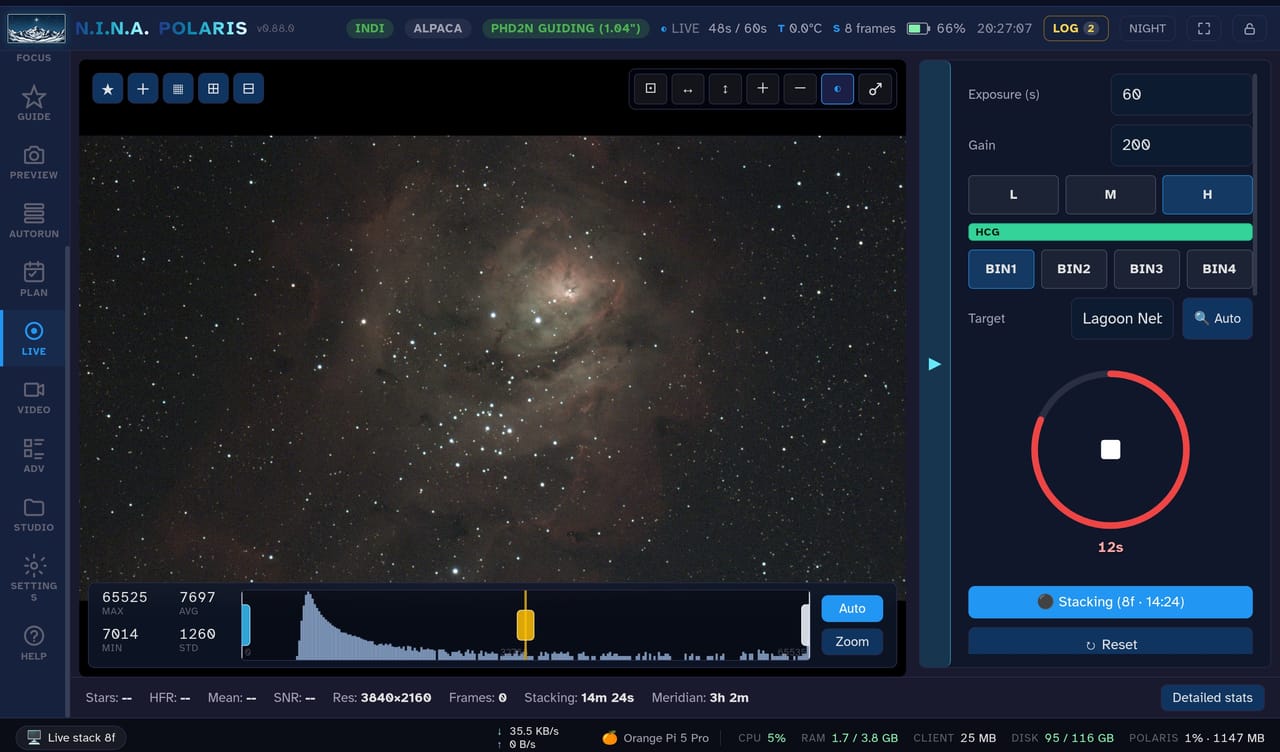
17.2 Controls
The right sidebar is split top to bottom: the capture inputs (Exp, Gain, Bin, Filter) at the top followed by Stacking resolution (see Section 17.3), the Polaris Shutter centered in the middle, and the session readout plus secondary buttons at the bottom. The shutter owns the whole live-stack lifecycle, ASIAIR-style - there is no separate Stack toggle. Tapping the shutter arms stacking and starts the LIVE loop: a fresh, empty stack starts silently, while a stopped stack that already has frames asks Continue (keep adding) or Restart (clear and begin fresh). Tapping again while running stops both the loop and stacking but keeps the accumulator, so the next tap offers Continue or Restart.
The session readout and buttons:
- Stacking readout is a compact pill next to the shutter showing the state (Stacking / Stopped), total integration time, frames stacked, and frames discarded by the kappa-sigma quality gate. The integration timer counts only while actively stacking - it freezes on stop and at the duration cap, and resumes on Continue.
- Reset discards the running stack and the reference; the next incoming frame becomes the new reference. This is the explicit “clear the accumulator” action.
- View opens a zoomable, pannable viewer (OpenSeadragon) on the current stack.
- Save writes the current stack on demand as a FITS file (FITS is the standard astronomy image format). User-requested saves land in a dedicated
stacked/subfolder, separate from the per-frame light captures, so the integrated result is easy to find. - Compute (Auto / Server / Client) is the per-rig override for where the stacking math runs; see the client-side compute section below.
For one-shot-colour (OSC) cameras, colour live stacking is automatic. There is no mono/colour toggle; the stacker debayers each frame (converts the sensor’s raw colour-filter mosaic into a full-colour image) and integrates in colour by default.
17.3 Stacking resolution and memory
Live stacking is the most memory-hungry thing Polaris does, because every per-pixel buffer of the session exists at once: the frame count, the R/G/B accumulators, the variance terms, and the scratch planes used for debayer and alignment. That comes to roughly 38 bytes per pixel in colour and 30 in mono. On a 26 MP sensor those 38 bytes per pixel are the difference between a session that runs all night and a host that gets killed at 3 a.m.
Stacking resolution (in the sidebar, just under the Bin buttons) decides how much the frame is reduced before it enters the stack:
- Auto picks the finest resolution that fits the host’s memory budget, per camera and per machine. This is the default and it is usually right.
- 1:1 Full, 1:2 Half, 1:4 Quarter override that choice. Your pick is remembered for that camera on that machine.
Each option shows its output dimensions and its estimated cost, and options that do not fit the budget are greyed out rather than offered and then taking the host down mid-session.
This setting reduces only the live view. Frames saved to disk are always written at full sensor resolution, so the subs you keep for later processing are never degraded by a choice made here.
What it actually saves
Measured on an OrangePi 5 Pro (4 GB) with an 11.7 MP OSC camera, total resident memory of the Polaris process during a live-stack session:
| Stacking resolution | Total RSS | Cost of the stack itself |
|---|---|---|
| 1:1 Full | 903 MB | ~530 MB |
| 1:2 Half | 450 MB | ~80 MB |
| 1:4 Quarter | 400 MB | ~30 MB |
The important number is the one that does not move: about 370 MB of that total is the host itself (the .NET runtime, the camera and mount drivers, catalog caches, preview buffers). No stacking resolution can reduce it. Only the second column responds to this setting.
Two things follow from that, and both are practical:
1:4 is rarely worth it. It saves about 50 MB over 1:2 while throwing away four times the resolution. Reach for it only when 1:2 genuinely does not fit, which is what Auto already decides for you. If you are choosing by hand, 1:2 is almost always the better trade.
Judge a board by the second column, not the first. A 4 GB board runs 11 MP at 1:1 with room to spare. A 1 GB board cannot, but it is not the stacking that fails first: the fixed floor already consumes a third of its RAM. On boards in the 1 to 2 GB range, let Auto choose, and expect it to land on 1:2.
These figures scale with pixel count, not with sensor size in millimetres. A 26 MP camera costs roughly 2.2 times the 11.7 MP numbers in the second column, which is why a big OSC can fail to fit 1:1 even on a board where a guide-class sensor fits trivially.
17.4 The stats bar
The stats bar tracks the health of the session: the star count in the latest frame, the median HFR of the latest frame (HFR, half-flux radius, measures star size; lower means sharper focus), the pixel statistics of the stack (mean, median, standard deviation, minimum, maximum), the SNR (signal-to-noise ratio, how strongly the target stands out above the background noise), and a history chart of HFR and star count over the last N frames.
17.5 SNR and the ETA to target
Polaris computes a background SNR on every frame and on the running-mean stack as it accumulates. In plain words: how far does the target’s signal rise above the background, measured in units of the background’s own noise? The exact recipe:
SNR = ( mean(signal) - mean(background) ) / σ(background)where σ(background) is the standard deviation (the statistical spread) of the background pixels. Pixels above median + 5·MAD count as “signal” (stars plus the extended target); pixels within median ± 1·MAD count as “background”, roughly the central 50% of the histogram, which is robust to outliers.1 Saturated pixels and zeros are excluded so hot pixels and resampled-frame borders do not bias the numerator. The same math runs whether the server is doing the stacking or the WASM client.
You can set a target SNR per rig in RIGS, under Manage rigs, or override it for the current session via the small input in the LIVE overlay’s “Stack quality” widget. When a target is set, the overlay shows three big numbers and an input:
- SNR, the cumulative stack’s SNR right now;
- Frames, how many frames have been integrated so far;
- ETA, the estimated time to reach the target SNR, for example “~12 min to SNR 50”;
- Target, an input to edit the target SNR live; the value saves itself a moment after you stop typing.2
The ETA rests on a simple growth law: the SNR of a clean stack grows as the square root of the frame count N. On a log-log plot (both axes on logarithmic scales), square-root growth appears as a straight line with slope 0.5, so Polaris fits a line through your recent samples and solves for the frame count that hits the target. When the fit is weak (an R², the 0-to-1 score of how well the line matches the data, below 0.6; fewer than 3 samples; a slope going the wrong way; or an extrapolation beyond the 1000-frame cap), the ETA shows a plain dash instead of inventing a number. Once you reach the target, a “done” check mark replaces the ETA.
Reading SNR over time
The chart under the overlay plots cumulative SNR on the left axis (in cyan) and HFR on the right (in amber). A healthy session shows SNR climbing along the square-root-of-N curve and HFR roughly flat. If HFR starts climbing without SNR keeping up, focus is drifting and you should refocus, or let auto re-focus do it. If SNR plateaus while HFR looks fine, clouds or sky glow rolled in.
Where the SNR comes from in each mode
In server (full) mode, the server computes the SNR on the stack buffer after each integration, and the UI updates via the 1 Hz (once-per-second) status payload. In client (WASM) mode, the browser’s stacker computes the SNR on its running mean and reports it back to the server over the WebSocket, the persistent connection Polaris uses to push live updates back and forth; the server feeds those numbers into the same ETA calculator and status payload, so the UI behaves identically in both modes.3
17.6 Sub-exposure advice
Next to the SNR and ETA, the quality box shows a Sub hint: the sub-exposure length that best suits the sky you are actually shooting under. It comes from the classic “swamp the read noise” rule (Robin Glover’s The Ideal Exposure): make each sub just long enough that the sky background’s own shot noise dominates the camera’s fixed read noise, after which longer subs stop improving the stacked result and only risk saturation and lost frames.
Polaris measures the sky for you: the background level of each frame (its median, above the camera’s offset) gives the sky rate in electrons per pixel per second, and the sensor’s read noise and gain (electrons per ADU) turn that into an optimal sub length. Those sensor constants are exact if you have run Sensor Analysis for the camera (the hint reads from Sensor Analysis); otherwise Polaris falls back to the manufacturer’s published gain curve for common cameras and marks the hint estimated. A ⚠ next to the number means the recommendation was pulled down by star saturation rather than by the read-noise criterion.
Treat it as a floor, not a target. A bright broadband sky might swamp the read noise in a second or two, while narrowband under a dark sky can justify minutes; imagers routinely expose narrowband longer than the minimum to lift faint signal and cut down the frame count. The hint tells you when you are wasting exposure fighting read noise, or clipping stars for nothing, not that you must shoot exactly that length.
17.7 Partial-stack checkpoints
The Checkpoints tab in the triggers panel auto-saves the running stack to disk as it grows: every N integrated frames, or every N minutes of integration, or both. Each checkpoint is a full stacked master FITS in a checkpoints/ folder beside the target’s subs, separate from the masters you save by hand. Keep last prunes to the most recent few so they do not pile up (0 keeps them all).
Two things this buys you. First, a safety net: if the session is interrupted, the last checkpoint holds the integration up to that point rather than losing the night. Second, a quality record: each checkpoint is logged with the frame count, elapsed time, SNR and HFR that produced it, and Export quality CSV writes the whole SNR/HFR-over-time timeline out for inspection later.
17.8 Auto-stop and quality alerts
Turn on Stop capture when Target SNR is reached (same tab) and Polaris ends the LIVE capture loop the moment the stack’s cumulative SNR crosses the Target SNR you set in the quality box, so an unattended session finishes on quality rather than running until dawn.
Polaris also watches the SNR and HFR trends and raises a toast when the curves show trouble: a per-frame SNR that falls away while HFR stays put means light is being lost (clouds or sky glow), and an HFR that climbs while the stack stops gaining SNR means the stars are bloating (focus drift). The alerts are throttled so a passing cloud does not spam you.
17.9 Auto re-focus and re-center
Long sessions degrade: focus drifts with temperature, and mount drift accumulates. Polaris fires auto-focus and re-center automatically on configurable triggers, without your intervention. Expand the Auto re-focus / re-center panel in the LIVE tab to configure it.
Auto re-focus
Enable it and pick any combination of triggers; the first one to cross its threshold fires:
- Every N integrated frames, a pure frame counter;
- Every N minutes, wall-clock elapsed time;
- ΔT ≥ X°C, sensor temperature drift since the last AF (auto-focus) run;
- HFR ≥ Y% above last, when the current HFR degrades by Y% compared to the HFR measured right after the last successful AF.
The AF sweep configuration (steps, step size, exposure) is reused from the FOCUS tab (Chapter 11). When a trigger fires:
- Captures pause naturally: the frame handler awaits the AF run, and whatever is pushing frames is awaiting that handler.
- The AF sweep runs and finds the best focuser position.
- The new HFR and temperature are baselined.
- Captures resume on their own.
A Now button bypasses the gates for a manual fire.
Auto re-center
Re-centering follows the same OR-combined pattern with three trigger types: every N frames, every N minutes, and drift ≥ X arcsec (arcseconds, each 1/3600 of a degree). The drift trigger runs a plate solve per frame (matching the stars in the frame against a catalog to compute exactly where the scope points, and from that the drift from the reference), which is expensive on a Raspberry Pi 4 (1-3 seconds per solve); its default of 0 means disabled. When a trigger fires, Polaris re-slews and plate-solves until the mount is centered to within the Tolerance arcsec setting, 30 arcseconds by default.
The reference RA/Dec is established by a one-shot plate solve on the first integrated frame of the session, a true astrometric (sky-measured) position rather than the mount’s potentially biased report. The status line shows the reference once it is solved, and a banner appears if the first-frame solve failed; in that case re-centering stays disabled until the next stack reset. The Now button only enables once the reference is solved.
One trigger at a time
Trigger handlers run sequentially inside the frame integration. Auto-focus and re-center cannot run concurrently; a guard simply skips trigger evaluation for frames arriving while a trigger is already executing, so the two can never overlap.
Per-rig persistence
The full trigger policy lives on EquipmentProfile.LiveStackTriggers. Switch rigs and the new rig’s policy loads automatically. Different setups, say a cold APO versus an SCT with an active dew heater, have different thermal characteristics, so a per-rig policy makes sense.
17.10 Auto dither
Polaris supports ASIAIR-style dithering during live stacking: a small random nudge of the mount every N integrated frames, so the target lands on slightly different pixels each time. This decorrelates hot pixels, walking noise (the streaky trails that slow drift drags fixed defects into), and other fixed-pattern artifacts from the sky, so they can be averaged down and, with outlier rejection enabled, removed outright. It also means the frames saved to disk are dithered, which benefits your final offline integration.
The panel lives under Auto re-focus / re-center / dither in the LIVE tab, as Auto dither:
- Every N frames, the dither cadence, counting integrated frames;
- Amount (px), the random offset in guide-camera pixels;
- RA only, restricting the nudge to RA for mounts with sloppy Dec backlash;
- Settle px / for (s) / timeout (s): after the dither, the frame waits for the star to settle back within tolerance before the next frame is integrated, exactly like the AUTORUN sequencer.
The guider must be actively guiding, whether it is Polaris’s built-in (native) one or the external PHD2 (the free autoguiding program most amateur astrophotographers use); the dither is routed through the active guider, so it works on both backends (Chapter 12). If the guider is not guiding, the dither is skipped, and the gate advances so it does not re-check on every frame. A dither fires instead of a re-center on the same frame, since a re-center would cancel the offset just applied. The settings live on EquipmentProfile.LiveStackTriggers, per rig, alongside the re-focus and re-center policy. The same dither-every-N-frames option also exists for the AUTORUN sequencer and likewise routes through whichever guider backend is active.
17.11 Rejecting outliers (kappa-sigma)
By default the live stack is a plain running mean: every frame’s pixels are averaged in, with no per-pixel outlier rejection. That is fast, but a cosmic ray, a satellite or plane trail, or a hot pixel is averaged in too, just at reduced amplitude.
The Reject outliers (kappa-sigma) checkbox in the LIVE tab, next to “Save each frame”, adds per-pixel rejection. For each pixel, Polaris tracks the running mean and spread of the frames seen so far, and a new sample more than k sigma away (more than k times the measured spread from the mean) is dropped instead of folded in. That is all “kappa-sigma” means: kappa (k) is the threshold multiplier and sigma is the measured spread. The threshold k (default 3, range 1.5 to 6) is editable inline; lower means more aggressive rejection.
A few things to know about it:
- It pays off most when combined with dithering. Dithering moves a defect to a different sky pixel each frame, so it becomes the outlier that rejection then removes cleanly. Without dithering, a fixed hot pixel can land on the same sky spot repeatedly and look like signal.
- The first few frames always seed the statistics; nothing is rejected until a spread estimate exists, so give it five or more frames.
- It runs on the CPU and allocates one extra full-frame buffer, so it costs a little more RAM and per-frame time than the plain mean. It is off by default and opted into per rig, and it takes effect on the next Reset, since the reference frame allocates the buffers.
- The setting lives on
EquipmentProfile.LiveStackSigmaRejectionandEquipmentProfile.LiveStackSigmaKappa, per rig. Colour stacks reject on luminance (the overall brightness, ignoring colour): a bright outlier drops the whole RGB triple so the colour balance is not skewed.
17.12 Removing hot pixels
The Remove hot pixels checkbox (🔥) in the LIVE tab is a second, complementary defence, and it is on by default. Where kappa-sigma rejection catches transient outliers (a cosmic ray, a satellite trail), this catches the fixed defects the sensor produces every frame: hot pixels that read far too bright and cold pixels that read far too dark.
Those fixed defects are exactly what per-pixel rejection struggles with. On a one-shot-colour sensor the frame is debayered and then warped into alignment, and both steps are interpolations: a single hot Bayer site is smeared into fractional contributions spread across several output pixels, and a slightly different set of pixels each frame once you dither. No single contribution is far enough from the mean to trip the threshold, but they sum into a faint wandering trail that is usually green (a Bayer cell has two green sites, and green carries most of the luminance). Per-pixel rejection cannot catch that; a cosmetic pass on the raw sub can.
It works by running a cosmetic pass on each sub before debayer and warp, in the sensor’s own orientation and at full resolution, so it operates on the raw defect while it is still a single pixel. On a colour sensor the pass is Bayer-aware, so it never treats a normal colour difference as a defect. A few things to know:
- It works from the very first frame, with or without dithering, and needs no master dark. If you already shoot calibrated with a good dark, the two simply agree.
- It complements rejection rather than replacing it: leave both on for the cleanest result, cosmetic for the fixed defects and kappa-sigma for the transients.
- Polaris reads the toggle live on every frame, so turning it on or off takes effect immediately, with no Reset.
- The setting lives on
EquipmentProfile.LiveStackCosmetic, per rig. If you ever see faint stars getting clipped, turn it off for that rig; on a well-behaved sensor there is no reason to.
17.13 The refocus suggestion
The auto re-focus path only fires when you have a motorized focuser and have turned on RefocusEnabled in the rig. Plenty of setups do not qualify: manual Crayford focusers, the cheap rack and pinion on a starter scope, or motorized rigs where you prefer to refocus by hand. Without either condition, Polaris would otherwise stay silent about degrading focus, and you would only notice after several blurry frames piled up in the stack.
Polaris fills that gap with a trend-based suggestion. It watches the same per-frame HFR and star-count stream the auto-fire path uses and raises an advisory chip plus a LIVE-tab callout when the numbers trend the wrong way. Nothing moves the focuser; you refocus manually, then click I refocused to acknowledge.
How the detection works
The detection is automatic, with no thresholds to tune:
- Warm-up: the service buffers the first 15 valid samples (HFR above 0, star count of at least 5) without raising anything.
- Baseline: once warmed up, the 5th-percentile HFR over the last 20 samples becomes the “best stable HFR” reference, together with the median star count.
- Trend test on every subsequent frame: a linear regression (a straight-line trend fit) of the last 10 HFR samples gives a slope, and the rolling mean of the last 5 HFR samples is compared to the baseline. The suggestion fires when the slope is positive, the mean exceeds the baseline by a factor of 1.15, and the 5-frame extrapolated change exceeds 30% of the baseline.
- Star-count secondary: a 30% drop in average star count versus the baseline median fires on its own. This covers the very-out-of-focus case where HFR looks deceptively stable because dim stars dropped out entirely and HFR is computed on a shrinking set of bright cores.
- Auto-dismiss once the rolling means recover to within 5% of the baseline for 3 consecutive frames.
These constants live in Services/RefocusSuggestionService.cs as private const fields, so a future tuning pass touches one file.
What you will see
A toast appears the first time the detector fires, and a chip such as “Refocus: HFR rising 18% over 10 frames” joins the activity bar at the bottom of every tab; clicking the chip jumps straight to FOCUS, Manual Assist. A yellow callout also appears in the LIVE tab above the auto-refocus panel, with three buttons: I refocused dismisses the suggestion and replaces the baseline with the post-refocus HFR (the new “good”), Open FOCUS jumps to FOCUS, Manual Assist without dismissing, and Dismiss clears the chip without resetting the baseline, useful when you trust the original baseline and just want to acknowledge.
The detector stays silent when auto-refocus is enabled in the rig (that path already covers you; toggle one or the other in the LIVE tab’s auto re-focus panel), during the first 15 frames of any session (the warm-up gate), on frames with an HFR of 0 or fewer than 5 stars (dropped as unreliable, so bad seeing, which is the astronomer’s word for unsteady, blurring air, or clouds cannot poison the detector), and when no live stacking is running, since the detector subscribes to frame-integrated events.
API
POST /api/livestack/refocus-suggestion/dismiss with body { "resetBaseline": true } (the default) replaces the baseline with the rolling mean; false clears the chip without changing the baseline. GET /api/livestack/refocus-suggestion/status polls the state directly, and the same payload rides inside liveStack.refocusSuggestion on the WebSocket tick.
17.14 Per-frame pre-processing
The “Per-frame pre-processing” panel, below the auto re-focus and re-center panel, applies calibration and/or background extraction to every frame before it is added to the stack. The result: the live stack comes out of the gate already free of hot pixels, vignetting, and sky-glow gradient, instead of waiting until you re-process the master in STUDIO (Chapter 20).
Calibration
Toggle Apply calibration to each frame before stacking and Polaris matches the active rig’s master dark, flat, and bias against the incoming frame’s gain, exposure, and filter. Darks are exposures taken with the cap on that capture the sensor’s own thermal noise, flats are evenly lit frames that map vignetting and dust, and a bias records the readout offset; a “master” is the averaged stack of each kind (Appendix B has the full story). The matched master file names appear in the status block so you can confirm the auto-match picked what you expected.
The match is by (gain, exposure) for the dark, (gain, filter) for the flat, and gain only for the bias, the same logic STUDIO’s Calibrate step uses. The masters need to exist in your FrameLibrary first; build them in STUDIO (Stack tab, Master Dark/Flat/Bias) before turning this on. If no master matches, the frame passes through raw and a “no match” counter ticks; the stack continues. If calibration fails, for example on a corrupt master or a dimension mismatch, the warning is logged, the frame goes in raw, and a “fallback” counter ticks. The stack never aborts.
Master frames are kept in memory (cached) for the session, roughly 150 MB at peak for one full set at 24 MP. The cache resets on a rig switch and on a live-stack reset, for example when you switch targets.
Background extraction
Toggle Apply GraXpert BGE to each frame before stacking to run the GraXpert background-extraction model (The GraXpert Team, n.d.) on every frame before it joins the stack, wherever the stack actually runs. GraXpert is a free tool astrophotographers use to remove sky-glow gradients; BGE is short for background extraction:
- In client-mode stacking (which the server calls MetricsOnly, because it then computes only per-frame statistics), the browser runs the BGE model via WebAssembly and WebGPU (a newer browser interface that lets a web page use your graphics card). The 208 MB model is downloaded lazily the first time BGE is enabled in a session, sparing bandwidth on rigs that never use it.
- In server-mode (Full) stacking, the host runs BGE through its GraXpert backend: the GraXpert CLI (its command-line program), or, where available, the fast path on the RK3588’s NPU (the AI accelerator built into that board’s chip). Per-frame BGE on a Pi 4 or 5 CPU is fast enough at a normal exposure cadence. If no server-side GraXpert backend is installed, a banner explains that BGE is unavailable and the frame is stacked without it.
Counters mirror the calibration ones (processed, fallback, last error). The browser posts them back to the server, so every other connected browser sees the same numbers.
Failure mode
Both calibration and BGE are fail-safe: if anything goes wrong on a frame, the original raw pixels are used instead and the session continues. There is no “abort on calibration error” mode; the live stack is designed to keep growing through hardware glitches, missing masters, and model load races. The error message lands in the LOG panel and in the “Last error” row of the relevant fieldset.
Two endpoints manage the settings: GET /api/livestack/preprocessing/settings returns the current per-rig settings, and PUT /api/livestack/preprocessing/settings updates them and resets the master cache so the next frame re-resolves with the new overrides or flags.
17.15 Client-side compute: the WASM offload
By default the Polaris server does all the heavy image math: the star detector, alignment, the accumulator (the buffer holding the running stack), the whole live-stack pipeline. That works fine on a Pi 4 or 5, but on a Pi 2 or 3 the server-side math saturates all four cores and leaves no headroom for capture, INDI (the open-source driver framework Polaris uses to talk to cameras and mounts), and disk writes.
Client-side compute flips that around: the math runs in your browser via a WebAssembly module (WebAssembly Community Group, n.d.), and the Pi just orchestrates the equipment and relays raw frames. Most modern laptops and desktops have roughly 10 to 50 times the CPU of a Pi sitting idle anyway.
When to use it
| Host hardware | Recommended mode |
|---|---|
| Raspberry Pi 2 / 3 | Client (essential; the Pi cannot keep up otherwise) |
| Raspberry Pi 4 | Auto (the Pi 4 handles either; client gives more headroom) |
| Raspberry Pi 5 | Auto (either is fine; auto picks client when the browser supports it) |
| Intel mini-PC | Auto |
| Client is a mobile phone | Server (phones do not have spare CPU either) |
How it works
┌──────────────────────────────────────────────┐
│  Pi (server)                                  │
│    [Camera] → capture                         │
│         → ImageWriter (FITS to disk)          │
│         → LiveStackingService (MetricsOnly)   │
│             ├─ runs StarDetector              │
│             │  (for trigger HFR + star count) │
│             └─ skips StarMatcher/Resampler/   │
│                accumulator                    │
│         → ImageRelayService                   │
│             → /ws/image-stream raw uint16     │
└──────────────────────────────────────────────┘
                   ↓ ↑
                WebSocket
                   ↓ ↑
┌──────────────────────────────────────────────┐
│  Browser (client)                             │
│    [WASM: NINA.Polaris.Wasm]                  │
│      Initialize → AddFrame(pixels) →          │
│        StarDetector + StarMatcher +           │
│        AffineTransform + ImageResampler +     │
│        running-mean accumulator               │
│      ↓                                        │
│    WebGL2 stretch + debayer → canvas          │
│                                               │
│    {type:'client-stack-progress'}             │
│      → server's trigger orchestrator          │
└──────────────────────────────────────────────┘
The server still runs the StarDetector in MetricsOnly mode, because the auto-AF and auto-recenter triggers described earlier need the HFR and star count to fire. Everything else, alignment, warping, accumulation, and the displayable preview, happens in your browser.
Choosing the mode
The Compute dropdown in the LIVE tab toolbar offers three modes:
- Auto (the default): the server flips to MetricsOnly when a browser with the WASM module connects, and back to Full when the last one disconnects. The right setting for most users.
- Server: force the server-side accumulator regardless of clients. Use it when multiple browsers should see the same canonical stack, or when the client is slow.
- Client (WASM): force MetricsOnly. The next browser that arrives stacks from frame 1 on its side. Useful for testing the WASM path, or to keep the Pi free even when no browser is open yet.
The choice is saved per rig, so a Pi 2 setup defaults to client once you change it there, while a Pi 5 or mini-PC setup can stay on auto.
The status chip
The live-stack chip in the activity bar shows the mode with an icon next to the frame count: a globe icon means the browser is doing the math, a monitor icon means the server is. If the icon flips mid-session, the handshake reacted to a browser opening or closing, or to a Compute setting change.
Saving a client-stacked result
When the browser owns the accumulator (the server in MetricsOnly), the stacked buffer never reaches the host disk through the regular capture path. Click Save current stack in the LIVE tab toolbar to upload the current accumulator; the server writes it as a FITS file into {rig}/integrated/{target}/{filter}/master_*.fits, and from there it shows up in STUDIO like any other master. Server-side stacking (Full mode) already saves automatically; the button only appears when MetricsOnly is active.
Bundle size and browser requirements
The WASM module is about 12 MB on disk, roughly 3-4 MB on the wire with gzip compression and about 2.5 MB with the newer Brotli compression. It is a one-time download per browser session and cached afterwards; the first load takes 2-3 seconds on a modern laptop and 6-10 seconds on a mid-range phone.
Three browser capabilities matter. Plain WASM has been supported in every browser since 2017. WASM SIMD4 needs Chromium 91+, Firefox 90+, or Safari 16.4+; without SIMD the math runs two to three times slower but still works. WebGL2 (the browser’s long-standing graphics-card interface), used to draw the image on screen, is independent of WASM and needed in both server and client modes; modern desktop browsers all support it, and some older mobile browsers fall back to JPEG rendering.
If the WASM module fails to load, because of a network glitch or a browser blocking it, Polaris silently falls back to server-side mode for that session: the chip shows the monitor icon instead of the globe and the server takes over.
When the math does not match
The client-side WASM and the server-side .NET (the runtime the Polaris server is written in) run the same binaries (NINA.Image.Portable is referenced by both projects), so the output is byte-identical on the same inputs. If you ever see diverging results between the modes:
- Compare frame-by-frame metrics in the browser’s developer console, opened with F12 (the
client-stack-progressmessages log the HFR and star count) against the server’s/ws/statusvaluesliveStack.lastFrameHfrandliveStack.lastFrameStarCount. - Confirm the WASM bundle version is in sync:
Interop.Ping()returns a version string that the page logs at boot. - A stale browser cache is the most common explanation; reload with Ctrl+F5.
17.16 The WebSocket payload
For automation and external dashboards, the live-stack state rides in the 1 Hz /ws/status stream:
{
  "liveStack": {
    "isRunning": true,
    "frameCount": 42,
    "width": 4144, "height": 2822,
    "referenceStarCount": 87,
    "lastFrameHfr": 1.94,
    "lastFrameStarCount": 92,
    "triggers": {
      "isExecuting": false, "executingKind": null,
      "lastRefocusAt": "2026-05-22T22:48:13Z", "lastRefocusFrame": 30,
      "lastRefocusHfr": 1.87, "lastRefocusTempC": -10.2,
      "lastRecenterAt": null, "lastRecenterFrame": 0,
      "lastRecenterDriftArcsec": 0,
      "referenceRaHours": 23.234, "referenceDecDeg": 12.583,
      "referenceSolved": true,
      "lastError": null
    },
    "refocusSuggestion": {
      "suggesting": true,
      "reason": "HFR rising 18% over 10 frames",
      "baselineHfr": 1.92, "currentHfr": 2.27,
      "slopePerFrame": 0.04,
      "framesSinceBaseline": 28, "sampleCount": 28,
      "baselineStarCount": 87,
      "suggestedAt": "2026-05-22T23:05:11Z"
    },
    "preProc": {
      "calibration": {
        "enabled": true,
        "masterDarkName": "master_dark_120s_g100_x20.fits",
        "masterFlatName": "master_flat_L_g100_x20.fits",
        "masterBiasName": null,
        "framesCalibrated": 42,
        "framesFallback": 0,
        "framesNoMatch": 0,
        "lastError": null
      },
      "bge": {
        "enabled": true,
        "supportedThisSession": true,
        "framesProcessed": 42,
        "framesFallback": 0,
        "lastError": null,
        "smoothing": 1.0,
        "correction": "Subtraction"
      }
    }
  }
}
17.17 Common pitfalls
Frames stop integrating mid-session. Alignment failed for a long stretch, typically clouds or dew on the corrector. Polaris keeps trying each frame; clear the dew and integration resumes automatically.
Auto-recenter never triggers. The reference solve failed on the first frame: no stars, a blurry frame, or a wrong plate-solver path. Reset the stack so the next first frame solves cleanly, and verify ASTAP (Kleijn, n.d.), the free plate-solving program Polaris relies on, is installed and reachable.
The HFR trigger fires spuriously after passing the meridian. The pier-side flip (the mount swinging the telescope to the other side of the pier as the target crosses the north-south line overhead) changes the frame orientation; star detection sees “new” stars and the median HFR jumps temporarily. Raise the HFR threshold or combine it with an “every N frames” trigger so the spurious fire is bounded.
The stack looks worse than individual frames. Alignment keeps failing silently and only the first frame is actually in the stack. Check the WebSocket payload: frameCount should match how many frames you have captured. A persistent reference star count of 0 means the first frame had no detectable stars; Reset and try again.
MAD is the median absolute deviation: take the image’s median, measure how far each pixel sits from it, and take the median of those distances. It plays the same role as the standard deviation but is not thrown off by a few extreme pixels.↩︎
Via a debounced
PUTto the settings API.↩︎Internally: the server’s
LiveStackingServicecomputes the SNR on the accumulator buffer; the client postsclient-stack-progressmessages, and the server’sInjectClientStackMetricsfeeds the same ETA calculator and WebSocket payload.↩︎SIMD (single instruction, multiple data) lets the processor apply the same operation to many pixels at once, a big speed-up for image math.↩︎