18 Planetary and Lucky Imaging
Deep-sky imaging fights noise with long exposures; planetary imaging fights the atmosphere with short ones. Lucky imaging (Law et al. 2006) records thousands of very short frames, keeps only those captured in the fleeting instants of steady seeing (seeing is the astronomer’s word for how much the atmosphere blurs and shimmers the view), and stacks the survivors into an image sharper than any single long exposure could be. The VIDEO tab implements this workflow in two panes: Capture records continuous high-frame-rate video to SER files (The SER Astronomical Video File Format, n.d.) (SER is a simple raw video format shared by planetary imaging tools), and Process runs them through the built-in lucky-imaging stack pipeline.
18.1 The Capture sub-tab
A live preview canvas fills the available area, and the controls alongside it configure the stream:
- Exposure (s), typically 5-50 ms for planetary work;
- Gain (the camera’s amplification setting), camera-dependent; planetary imaging favors high gain;
- Bin, usually 1x1, or 2x2 if you are undersampled. Binning merges adjacent pixels into one larger pixel; undersampled means each pixel covers more sky than the finest detail your telescope delivers;
- Target name, which becomes the folder name (Jupiter, Saturn, Moon, and so on);
- Max duration (s), an auto-stop after N seconds, where 0 means no cap;
- White balance R / B sliders, visible only for one-shot-colour (OSC) cameras whose INDI driver (INDI is the open-source framework Polaris uses to talk to equipment) exposes the
WB_RandWB_Bproperties (ZWO, QHY); mono cameras hide the row.
Two buttons drive the capture. Start Stream opens the camera stream, using the driver’s built-in video mode (CCD_VIDEO_STREAM) if the driver supports it; otherwise Polaris falls back to taking rapid single exposures in a loop on the server. The button label shows the live frame rate. Record is enabled only while streaming and begins writing every frame to a SER file at {ImageOutputDir}/{Rig}/planetary/{target}/{ISO-timestamp}.ser. A counter shows frames and bytes written, with a dropped-frame warning if the writer cannot keep up with the stream.
Most planetary cameras digitize at 10, 12, or 14 bits, below the SER container’s 16. When the frames come from a native-SDK camera at one of those depths, Polaris writes them left-aligned (shifted up so the most significant bit is at the top of the 16-bit word), which is what AutoStakkert!, ASIVideoStack, PIPP and the other stackers assume. Left as the raw right-aligned ADC values, those tools would read the video as far too dark and, on a colour sensor, with a wrong colour cast that persists even after you set the Bayer pattern by hand. With the alignment handled at record time, your .ser files open with correct brightness and colour in an external stacker straight away.
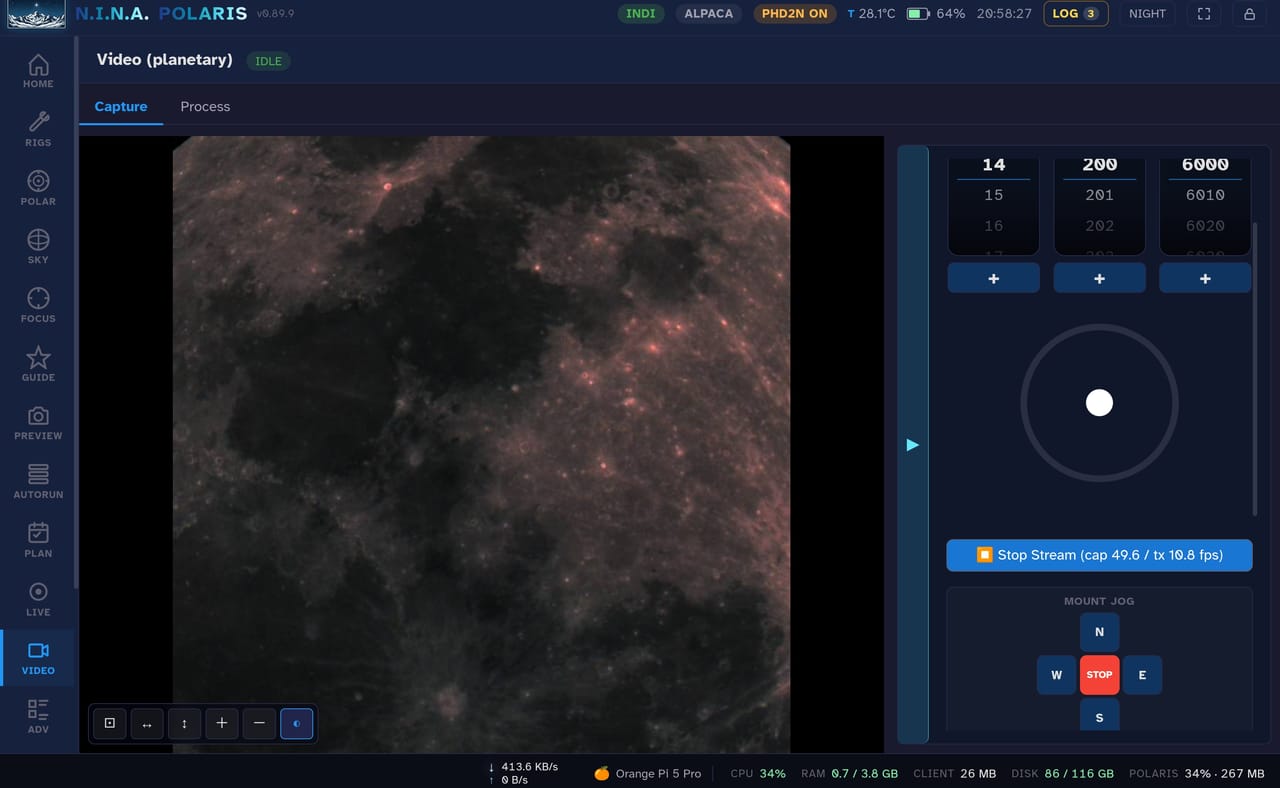
Suggested capture settings
Capture settings are saved per rig. As starting points, for Jupiter or Saturn on an 8-inch SCT (Schmidt-Cassegrain telescope): exposure 8-12 ms, gain around 350 (ZWO IMX462 or IMX664 sensors), and a max duration of 120 s in good seeing or 90 s to stay under the planet’s rotation cap (record longer and Jupiter’s fast spin starts to smear the detail). For the Moon at high magnification: exposure 1-2 ms, low gain (0-100), and 30-60 s per region, assembling a mosaic later.
18.2 The Process sub-tab
The Process sub-tab drives the built-in stacker (the PlanetaryStackerService):
- The SER file dropdown is populated recursively from
{ImageOutputDir}/planetary/, with a Refresh button to rescan. You can also point Scan at another folder, an NVMe drive full of last week’s clips, for instance, and stack from there. - Stack type is the one decision that changes how registration works, and it has exactly two answers, the same two ZWO’s ASIVideoStack offers:
- Planet for a bounded disc surrounded by sky: Jupiter, Saturn, Mars, Venus, a small Moon. Frames are registered on the disc’s centroid, which needs sky all the way around the target in every frame.
- Moon and Sun surface for a close-up that fills the frame, where there is no disc to find a centre for. Registration keys on a patch of the image you choose instead (below).
- Stack percent is the quality cutoff, default 50%. The stacker keeps the sharpest frames up to that fraction; a smaller number gives a sharper but noisier result.
- Output name sets the base filename for the stacked result.
- Stack kicks off the job, and Abort cancels it mid-run.
Picking a clip loads its first frame into a preview beside the form, full height on a wide screen. In Moon and Sun surface mode a draggable green box appears on that preview: it is the reference the whole clip is registered on, so drag it onto a feature with unambiguous detail, a crater rim or the terminator, rather than a flat mare. In Planet mode the box is hidden, because the centroid does that job.
Selecting a different clip clears the previous run’s progress, frame chart and result, so what you are looking at always belongs to the clip named above it.
Getting this wrong is the most common cause of a blurred stack. A full-frame lunar close-up read as a planet gives the centroid nothing bounded to lock onto, and it wanders with the seeing: the individual frames are sharp, the stack is smeared in one direction. If a stack comes out directionally soft, check this setting first.
The seven-phase pipeline
A status bar shows the phase live as the job progresses:
- Reading: opens the SER file and lists its frames.
- Analyzing: scores every frame’s sharpness. Colour clips are debayered first and scored on luminance, never on the raw mosaic, whose Bayer pattern is itself an edge signal and swamps the real detail. The score is the variance of a Laplacian over a lightly blurred copy of the frame, and each frame’s brightness is normalised before scoring so a passing cloud or a gain change cannot pass for sharpness.1 This phase parallelizes well; a typical Raspberry Pi 4 takes about 30 s for 1000 frames of 800x600 16-bit video.
- Ranking: sorts frames by quality, descending, and takes the top slice set by Stack percent.
- Aligning: lines the kept frames up, by the method Stack type chose, and then refines locally on a mesh of alignment points (Section 18.4).
- Stacking: a mean stack with a per-pixel count, producing uint16 output (16-bit unsigned integers, the same precision as the camera’s raw data).
- Writing: saves the result under
planetary/{target}/stacked/as a FITS file (FITS is the standard astronomy image format). - Ok / Fail: the terminal state.
18.3 The quality metric
Frame quality is the variance of a Laplacian filter over a blurred copy of each frame’s luminance, a standard sharpness metric (Pertuz et al. 2013) with the noise-suppression refinement PlanetarySystemStacker uses. Higher variance means a sharper frame. Stack percent lets you discard atmospheric-blur frames: pick an aggressive cut (20%) for the best detail, or a lenient one (80%) for lower noise at the cost of a slightly softer result.
Two details matter more than they sound. The metric runs on the debayered luminance, so a colour camera is scored on real structure rather than on its own Bayer grid; and every frame is normalised for brightness first, so the ranking answers “which frames are sharpest”, not “which frames are brightest”.
18.4 Alignment
Registration happens in two stages: one global shift per frame, then a local correction on a mesh of points.
The global shift is what Stack type selects.
- Planet finds the disc’s centroid, the brightness-weighted centre of the target against the sky, refined to sub-pixel accuracy. Cheap and robust, as long as the disc is surrounded by sky in every frame.
- Moon and Sun surface uses phase correlation (Kuglin and Hines 1975) on the patch inside the green reference box: the two frames are compared in the frequency domain and the shift that best lines them up falls out of the peak of the correlation. It needs no isolated object at all, which is exactly the case a centroid cannot handle, and it is why a frame-filling lunar clip has to be told it is a surface.
When a clip is left on the automatic setting, Polaris decides from the sharpest frame: a frame whose bright pixels fill most of the area, or that carries signal right out to the border, is treated as a surface. That guess is only a fallback. The reason the choice is a control in the first place is that no measurement of one frame is as reliable as you knowing what you pointed at.
The local correction then splits the frame into a mesh of alignment points over the regions that carry structure, in the manner of PlanetarySystemStacker, and searches a small shift for each point independently. Seeing does not blur a wide field uniformly: one crater can be crisp while another, half a frame away, is smeared, and a single global shift cannot fix both. Each point also selects its own best frames, so the sharpest moments for each part of the image are the ones that get stacked there. The mesh is built and tuned automatically; there is nothing to configure, and Polaris falls back to the single global shift when the target is too small for a useful mesh.
18.5 Output
The stacked result lands at {ImageOutputDir}/{Rig}/planetary/{target}/stacked/{outputName}_{ts}.fits as a 16-bit FITS: three channels for a colour camera, one for a mono one. Colour clips are debayered per frame before stacking, so the file comes out as real RGB rather than as a mosaic somebody downstream has to interpret. Open it in PixInsight, the free Siril (The Siril Team, n.d.), or Photoshop and apply wavelet sharpening (the multi-scale sharpening technique planetary imagers favor) and saturation in your favorite tool; the Polaris EDITOR (Chapter 25) targets deep-sky post-processing, so planetary finishing is best done externally.
18.6 The stream owns the camera
While video is streaming, nothing else can expose: autofocus, a snapshot, LIVE, a sequence. Polaris now says so instead of letting the attempt fail in silence, and it will not start the stream on top of a capture that is already running either.
The reason is worth knowing. In native mode the camera’s SDK pushes frames on its own, outside the path everything else uses to take an exposure, so a frame requested elsewhere landed on a camera that was already busy. On ZWO cameras that ends with a camera that stops responding until you unplug its power.
Whenever the stream is running, a STREAM chip appears in the top status bar in every tab. Clicking it takes you to VIDEO, where you can stop it.
18.7 Common pitfalls
The frame rate caps at about 5 fps even though the camera supports a native stream. Check that CCD_VIDEO_STREAM is actually exposed by your driver. Some INDI drivers default it to off, and it needs to be enabled in the indiserver parameters.
Dropped-frames warning. The writer cannot keep up with the stream cadence. Reduce the ROI, the region of interest, by capturing a smaller sub-frame (smaller frames write faster), lower the binning, or lower the target frame rate via the driver’s STREAMING_DELAY property.
The stacked output is dark. The frames were mostly cropped to a small bright region. Try a wider ROI, or increase the keep percentage to include more frames.
Storage explodes. Sixty seconds at 30 fps of 800x600 uint16 video is roughly 1.7 GB. Watch your disk; planetary captures fill SD cards fast. Chapter 19 covers where captures live and how to move them off the host.
A Laplacian filter responds strongly to fine edges; the variance of its output is high for crisp frames and low for blurry ones. Blurring first, and sampling on a stride, is the approach PlanetarySystemStacker takes, and it makes the metric far less sensitive to noise.↩︎