28 Administration and Diagnostics
A Polaris host is usually headless: no monitor, no keyboard, often no easy physical access at all once the rig is assembled. This chapter collects the tools that keep such a box healthy from the browser alone: a full command-line terminal embedded in the interface, one-click software updates (and rollbacks) on single-board installs, a debug log panel that gathers everything a bug report needs, a benchmark for comparing host hardware, and a sensor-analysis tool that measures what your camera actually does at each gain setting.
28.1 The remote terminal
Sometimes nothing beats a shell: restarting a service, tailing a log, editing a file. Polaris embeds a terminal in SETTINGS, Remote terminal, so you can do all of that from the same browser tab that runs your imaging session. It connects over SSH (Secure Shell, the standard encrypted remote-login protocol of Linux and, increasingly, Windows), either to the Polaris host itself or to any other machine on your network. The canonical moment: you are in the field, the Pi is two metres away in the dark, and you just need to run sudo systemctl restart indiserver.
Enabling it
The terminal is off by default; its endpoint refuses connections until you opt in. Edit appsettings.json next to the Polaris binary (on a Pi installed from the .deb: /opt/nina-polaris/appsettings.json) and add:
{
  "Terminal": { "Enabled": true }
}
Restart Polaris, and the Connect button in the card comes to life.
What the target machine needs
The terminal is an SSH client; the machine you connect to must run an SSH server on TCP port 22. On Raspberry Pi OS the server ships preinstalled; if it is disabled, enable it once with sudo systemctl enable --now ssh. On a Windows host the server is not installed by default; in an administrator PowerShell:
Add-WindowsCapability -Online -Name OpenSSH.Server~~~~0.0.1.0
Start-Service sshd
Set-Service -Name sshd -StartupType Automatic

# Allow inbound TCP 22 if the install didn't add the firewall rule
New-NetFirewallRule -DisplayName "OpenSSH Server" `
    -Direction Inbound -Protocol TCP -LocalPort 22 `
    -Action Allow -Profile Private,Domain
To reach a different machine on the LAN, just point the Host field at its address; .local names work if mDNS is up (Chapter 27).
Using it
In the Remote terminal card, fill in Host (localhost for the Polaris host itself, or an IP or .local name for another machine), Port (22 unless your SSH server listens elsewhere), User, and Password, then click Connect. The password is wiped from the form the moment it is sent. An 80 by 24 terminal opens with a live interactive session; full-screen programs such as vim, htop, and tmux work, as do colours and scrollback. Click Disconnect when done, or simply close the tab; an idle session is closed from the server side after 10 minutes. The display is rendered by xterm.js, a terminal emulator that runs inside the browser (The xterm.js contributors, n.d.).
One-click board tuning
When Polaris runs on a Raspberry Pi or an Armbian-based board, the card also shows an Optimize this SBC launcher with a button for whichever configuration tool the board ships: raspi-config on Raspberry Pi OS or armbian-config on Armbian. Clicking it enables the terminal if needed (with a one-time confirmation), pre-fills localhost, and queues sudo raspi-config or sudo armbian-config; you enter your own login and password, and the familiar text-menu tool starts, ready for overclocking, GPU memory split, enabling I2C or serial, filesystem expansion, timezone, and the rest. The elevation is your own sudo inside your own SSH session: Polaris never gains passwordless root and adds no privileged rules for this feature.
Security model
- Polaris never stores SSH credentials. They live in memory for exactly the lifetime of the connection and vanish when it closes; there is no auto-reconnect, and each session asks again.
- The SSH credentials are the only gate between the browser and a shell, so leave
Terminal:Enabledoff on hosts whose network you do not trust. On the LAN the connection rides the HTTPS transport described in Chapter 27; for access from outside, go through the relay, never a directly exposed port. - If your SSH server is configured for key-only authentication, a password typed here fails exactly as it would in any terminal; the server’s policy is honoured.
- The terminal is a shell channel only: it does not transfer files, forward graphical applications, or tunnel arbitrary traffic, and it cannot bypass SSH. If you are locked out of SSH, you are locked out of this too.
Troubleshooting
| Symptom | Cause | Fix |
|---|---|---|
| “WebSocket error. Is Terminal:Enabled=true on the server?” | The default Terminal:Enabled = false is still in place |
Edit appsettings.json, restart Polaris |
| “SSH connect failed: Unable to connect…” | No SSH server on the target, or wrong port | See the prerequisites above |
| “SSH connect failed: Permission denied” | Wrong password, or the server allows keys only | Fix the password, or set PasswordAuthentication yes in /etc/ssh/sshd_config and restart it |
| Terminal opens but nothing echoes back | The interactive session did not start on the target | Rare on standard distributions; report the host details |
| Garbled borders in text-menu programs | Terminal type mismatch on a stripped-down distribution | Set TERM=xterm-256color in the SSH user’s .bashrc |
28.2 Self-update
On a Linux host installed from the .deb package (Chapter 2), Polaris updates itself from the project’s GitHub releases with one click: no SSH, no apt command, no password. The feature exists only on .deb installs (the /opt/polaris layout managed by systemd, the Linux service manager); a Windows host or a development run shows no update badge.
Polaris checks GitHub for a newer release at startup and once an hour. When one exists for your host’s processor architecture (arm64, armhf, amd64), a green Update badge with the new version number appears in the top status bar. Clicking it opens a modal with the release details: version, publish date, the matched .deb file and its size, the full release notes, and a link to the release page.
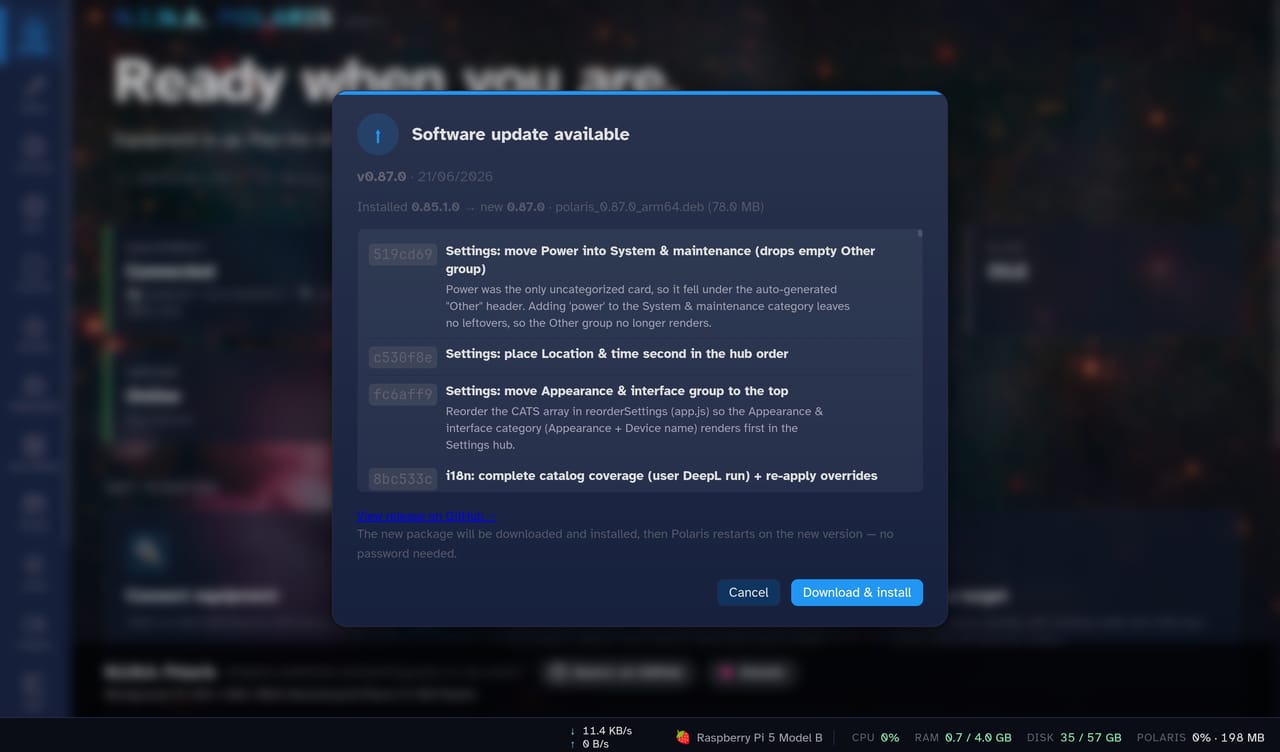
arm64 package, with Download & install one click away.
Click Download & install and Polaris downloads the architecture-matched polaris_<version>_<arch>.deb (the download address is resolved on the host from GitHub, never supplied by the browser), stages it, and hands it to a short-lived helper service that installs it with root rights. The service restarts on the new version, and the browser polls until the host reports it, then reloads itself. Leave the page open; the whole cycle takes from a few seconds to a couple of minutes on a Pi.
There is no password prompt because the .deb installs a tightly-scoped PolicyKit rule1 that authorizes only the update service. Your Polaris sign-in is the authorization.
Updating when the host is offline
In the field the host often has no internet while the phone in your hand does. Polaris can update through that connection instead. When you ask it to check for updates (SETTINGS, Power) and the host cannot reach GitHub, the modal switches to Update through this device:
- Your browser reads the latest release information from GitHub directly, over your phone’s own connection, and identifies the right
.debfor the host’s architecture. - Tap Download; the package saves to your device’s Downloads.
- Tap pick the file and choose it; the browser uploads it to the host over the local network.
- The host verifies the upload’s SHA-256 checksum (a cryptographic digest that changes if even one byte differs) against the value your browser read from GitHub, confirms it is really the Polaris package at a newer version, and installs it exactly as the online path does.
Because the integrity check is anchored to the checksum GitHub published, a corrupted download or a wrong file is rejected before anything installs, even though the host never talked to GitHub itself. The manual download-and-pick step exists only because GitHub’s file host does not allow browsers on other sites to fetch the package bytes automatically; the version lookup and the checksum are automatic.
Rolling back
If an update regresses something mid-trip, go back without SSH: SETTINGS, Power, Roll back version. Unlike the badge, this button is always present on a .deb install. The modal lists recent releases with your architecture’s package resolved: the running version is badged current, older ones offer Roll back, newer ones Switch, and releases with no package for your architecture appear disabled. Pick one and confirm; the install reuses the same staging, helper service, and restart machinery, and downgrades are permitted because the helper installs with apt-get install --allow-downgrades.
One warning the modal also shows: settings or the database written by a newer version may not load cleanly on an older one. Export your profile first if unsure. Offline rollback works exactly like the offline update, with the same checksum verification plus an explicit allow-downgrade flag on the upload.
Requirements and troubleshooting
Self-update works from any version that already ships the updater; the very first such release must be installed by hand with sudo apt install ./polaris_<arch>.deb, after which updates are one click. If the modal reports “Not authorized to install the update”, the PolicyKit rule is missing; reinstalling the .deb restores it. If an update seems stuck, give it up to three minutes and then refresh manually; the install log is at /tmp/polaris-update.log. No badge at all means you are not on a .deb install, already current, or offline; the release check is cached for 30 minutes.
28.3 The debug log panel
When something misbehaves at 2 a.m., the fastest route to a diagnosis is a complete record of what the server and your browser were both doing. Polaris keeps one, continuously, and exports it in one click.
Everything relevant to the current session lands in a single in-memory buffer on the host, capped at the most recent 5,000 entries: every HTTP call (method, path, status, duration), every server log message from every internal service, every API call the browser makes, every toast (the small green, amber, or red notification bubbles), and every browser-side error. Each connected browser sees the same log, live, over the status stream.
The LOG button sits in the top-right corner of the screen, next to NIGHT. It is grey when nothing notable has happened since you last looked, amber with a count when there are unseen warnings, and red with a count for unseen errors. Click it and the panel opens full screen with three filters: a minimum level (info, warnings, errors only), a source (server, HTTP, client, toast, API, exception), and free-text search over messages, categories, and paths. Entries are colour-coded by severity, and when an error carries a stack trace (the list of program locations that led to the failure), the panel shows it as a collapsed block, truncated to 20 lines.
Exporting for a bug report
Click Export JSONL and the browser downloads polaris-log-YYYYMMDD-HHMMSS.jsonl in JSON Lines format, a plain text file with one structured JSON record per line (Ward, n.d.). Attach that file to a bug report and the exact sequence of events can be reconstructed: the camera dropped at 22:14, the server retried at 22:14:05, the next capture timed out at 22:14:30. Export TXT produces the same content in a form easier to skim in an ordinary text editor.
You can attach an export without worrying about secrets: before any entry reaches the log, passwords, tokens, authorization headers, and the session cookie are redacted to ***, and sign-in-related paths are stripped of their query strings.
Clear wipes the server-side buffer, useful for starting a clean capture to isolate one event; it asks for confirmation because every connected client loses the history too.
Keeping logs across restarts
By default the log lives only in memory and disappears when Polaris restarts. If you are chasing an intermittent overnight bug, or want to know what happened before an unexpected reboot, enable Persist debug log to disk in SETTINGS, Debug logging. The host then writes daily JSONL files:
- Linux:
~/.local/share/NINA.Polaris/logs/polaris-YYYY-MM-DD.jsonl - Windows:
%LOCALAPPDATA%\NINA.Polaris\logs\polaris-YYYY-MM-DD.jsonl
Files older than 7 days are removed automatically so a Pi’s SD card never fills up. For normal operation leave it off: the in-memory buffer covers the current session, and skipping the writes spares the SD card.2
28.4 The hardware benchmark
Polaris runs on hardware ranging from a Raspberry Pi 4 to a desktop workstation, and the boards differ enormously in how fast they stack frames and encode the live video stream. The benchmark in SETTINGS, Hardware benchmark measures your machine with the real Polaris image-processing code running over a fixed, computer-generated star field, so every machine executes the identical workload and the scores compare directly.
Three groups of numbers come out:
- Stacking pipeline: star detection, frame alignment, resampling, accumulation, and signal-to-noise statistics; the per-frame cost of live stacking (Chapter 17).
- Capture and video encode: debayering (turning the sensor’s raw colour mosaic into a full-colour image), auto-stretch, JPEG downscaling, and compression; the per-frame cost of the live preview stream.
- CPU and memory: raw single-thread and multi-thread floating-point speed plus memory bandwidth, independent of the astronomy code; the multi-thread figure shows how much the extra cores actually help.
Each section reports throughput in frames per second and megapixels per second, and a single headline Polaris score (higher is better; a Raspberry Pi 5 lands around 200, a Pi 4 around 100). Click Run benchmark; it takes roughly 15 to 30 seconds and saves the run to the device’s history. Live stacking or a video stream must be stopped first so they do not skew the numbers.
The test is synthetic on purpose. Real capture speed is mostly decided by the camera and its USB link, not the computer, so benchmarking with a camera attached would make a fast board look slow behind a slow camera. If you do want real capture timing, tick Also measure the connected camera before running: Polaris then times a few real exposures (mean capture time, achievable frame rate) and runs the live video stream for a few seconds, reporting the captured and transmitted frame rates and the on-wire data rate. Those camera numbers are shown separately and only compare across computers if you move the same camera between them.
Each device keeps its recent runs in a History list; Export JSON downloads them for side-by-side comparison and Clear history resets the device.
Reference scores
Scores measured on real hardware with release builds (a debug build of the server scores roughly half, so never compare one against these):
| Machine | Polaris score |
|---|---|
| Orange Pi Zero 3 (4 cores, Allwinner H618) | 45 |
| Raspberry Pi 4 Model B (4 cores) | 110 |
| Orange Pi 4 Pro (8 cores, Allwinner A733) | 180 |
| Raspberry Pi 5 Model B (4 cores) | 245 (211 on an earlier build, 172 when thermally throttled) |
| Orange Pi 5 Pro (8 cores, RK3588S) | 274 with GPU offload, 227 CPU only |
| Radxa Dragon Q6A (8 cores, Qualcomm QCS6490) | 317 (296 before a better power supply and a fan) |
| Desktop Core i9-13900KF (32 threads) | 936 |
The recommended board is the Orange Pi 4 Pro with 4 GB: at roughly 50 to 70 US dollars it is the best balance of cost and capability in that table, scoring well above a Raspberry Pi 4 that costs about the same. Take the Radxa Dragon Q6A if you want the highest score whatever it costs, or the Orange Pi 5 Pro if you lean on the AI tools, since that is the board with the proven GPU and NPU acceleration path.
Two practical lessons from those runs. Cooling matters: the Pi 5 loses nearly 20 percent when passively cooled and thermally limited, the Orange Pi 4 Pro gains about 6 percent with a fan, and the Radxa Dragon Q6A gained about 7 percent once it had a better power supply and a fan, so keep small boards actively cooled and properly fed for sustained live-stacking loads. And the optional GPU offload (via OpenCL, a standard for running computation on graphics chips) helps only where the board’s memory design makes it cheap: it lifts the Orange Pi 5 Pro from 227 to 274, while on the Radxa and on desktops with discrete graphics cards Polaris automatically measures each operation once and offloads only the ones that actually win, so leaving the toggle on never makes things slower.
Reading the numbers when choosing a board: stacking megapixels per second decides whether live stacking keeps up with short sub-exposures and large sensors; encode throughput decides how smooth the live video stream feels; a multi-thread scaling factor close to the core count means the board uses its cores well; and memory bandwidth matters most for large sensors, where moving pixels dominates. The full per-board breakdowns (per-stage millisecond timings, floating-point and bandwidth figures) live in docs/user-guide/benchmark.md alongside new boards as they are measured; Appendix A has the hardware-sizing summary.
28.5 Sensor analysis
The Sensor analysis tool (RIGS tab, your camera’s card, Sensor analysis) characterizes a camera the way SharpCap’s Sensor Analysis does (Glover, n.d.) (SharpCap is a popular Windows capture program whose sensor-measurement workflow many imagers know). For each gain setting3 it measures:
- Conversion gain (e/ADU): how many electrons of captured signal correspond to one step of the camera’s digital output (ADU, analog-to-digital unit, the raw pixel value in the file).
- Read noise (e): the electronics’ own noise floor, in electrons, added to every frame regardless of exposure; lower is better.
- Full well (e): how many electrons a pixel can hold before it saturates and clips to white.
- Dynamic range (stops): full well divided by read noise, expressed in powers of two; the span between the faintest and brightest things one frame can record.
With these curves you can pick the gain that suits your imaging, for example the point where read noise drops sharply (many CMOS cameras have a high-conversion-gain “sweet spot” at low-to-mid gain) or the unity gain where one electron equals one ADU, a common deep-sky starting point.
How it measures
The tool uses the photon transfer (mean-variance) method, the standard laboratory technique for characterizing sensors (Janesick 2007). A pair of bias frames (exposures at the minimum time, recording only the electronics) yields the read noise: subtracting one from the other cancels the sensor’s fixed pattern, and the scatter of the difference, divided by the square root of two, is the read noise. Then a sweep of exposures against a uniform light source builds a series of flat levels; for light-dominated frames the frame-to-frame variance rises linearly with signal, and the slope of that line gives the conversion gain. Full well and dynamic range follow arithmetically, and the whole procedure repeats across the gain range to draw the curves. The analysis also detects cameras that deliver, say, 12-bit data packed into 16-bit files (which makes values step by 16) and divides the step out.
Running it
- Point the camera at a uniform, constant light source: a flat panel, an evenly lit wall, or twilight sky. Avoid stars or any structure.
- Open the RIGS tab, your camera’s card, Sensor analysis.
- Adjust the sweep if needed (minimum and maximum gain, gain steps, maximum exposure, exposure steps); the defaults are fine for a first run.
- Click Run. Many frames are captured per gain setting, so expect a few minutes; a progress bar tracks it and Cancel works at any time.
The result is a green gain curve and a red read-noise curve against gain, a per-gain table, and a summary line with the measured bit depth, the quantization step, how far the sensor stayed linear, and the unity gain. The tool runs against the camera simulator too (Chapter 8), so you can rehearse the workflow without hardware; the numbers then describe the simulator, not a real sensor.
Practical tips: keep the light constant for the whole run, since a drifting source breaks the mean-variance relationship and marks rows invalid. If many rows come back invalid, the light was too dim (the variance never rose) or too bright (frames saturated before the sweep finished); adjust the brightness or the maximum exposure and re-run. Live stacking and the video stream must be stopped first; the tool refuses to run while they are active.
PolicyKit is the Linux mechanism that lets an unprivileged program perform specific privileged actions. The rule at
/etc/polkit-1/rules.d/50-polaris-update.rulesallows thepolarissystem user to start exactly one thing: thepolaris-self-update.serviceunit. The same pattern authorizes the power, clock, and WiFi actions. The install runs in its own systemd unit so it survives the restart of the main Polaris service that the package itself triggers.↩︎For integrators, the same data is available over the API:
GET /api/logswith server-side filters,GET /api/logs/export?format=jsonl|txtfor a streaming download,POST /api/logs/clientfor client-submitted entries, andDELETE /api/logsto clear. The once-per-second status feed carries new entries to each connected panel. See Chapter 31.↩︎Gain is the camera’s amplification setting, similar to ISO on a DSLR. Raising it makes each captured electron count for more in the digital output, at the cost of a shallower full well.↩︎