5 Rigs and Device Drivers
Everything Polaris knows about your hardware lives in a rig: a named profile that bundles a telescope, a camera, a mount, a focuser, a filter wheel, the guide setup, an optional second camera, and a set of accessories, together with every per-setup default that goes with them. You can keep several rigs side by side, a permanent observatory setup and a grab-and-go refractor, and switch between them in one click. The RIGS tab is the cockpit for all of it: it holds the driver-host connection, one card per equipment role, and the multi-rig switcher.
This chapter covers the rig model and the four “driver doors” through which Polaris reaches hardware: INDI (the open-source driver system astronomy gear speaks on Linux) (Downey, n.d.) with its embedded driver manager, ASCOM Alpaca (the network flavour of ASCOM, the long-standing Windows standard for astronomy drivers) (The ASCOM Initiative, n.d.), direct ASCOM on Windows, and the camera makers’ own driver libraries (their SDKs, software development kits). DSLR and mirrorless bodies have their own vendor-specific paths, covered in Chapter 6; direct WiFi mount drivers are covered in Chapter 7; and the built-in simulator that stands in for all of this hardware is covered in Chapter 8.
5.1 The four driver doors
Polaris does not care which protocol your equipment speaks, but you do, because the setup work differs:
- INDI is the Linux-native door.
indiserver, the small background program that hosts INDI drivers, runs on the host and loads one driver per device; Polaris connects to it as a client, by default onlocalhost:7624(port 7624 on the same machine). This is the broadest door, covering hundreds of devices, and the default choice on a Raspberry Pi. - ASCOM Alpaca is ASCOM carried over ordinary web traffic (HTTP) and works on any OS. Polaris discovers Alpaca servers on the network, or you enter a host and port manually. On Windows, classic ASCOM drivers reach Alpaca through a bridge such as ASCOM Remote (a free helper app that publishes classic ASCOM drivers over the network) or the Omni Simulator (the ASCOM project’s fake-hardware test server).
- ASCOM (COM, direct) talks to classic ASCOM Platform drivers through COM1, Windows only, with no bridge process and no HTTP hop.
- Native camera SDKs bypass driver servers entirely for SVBony, ZWO ASI, PlayerOne, ToupTek, and Altair cameras, streaming straight off USB. This is the fast path for high-frame-rate planetary video (Chapter 18).
Each is described in detail later in this chapter, after the tour of the RIGS tab itself.
5.2 The connection panel
The driver-host connection lives in a framed panel above the Equipment / INDI Drivers / INDI Control Panel sub-tabstrip, so it stays visible on every sub-tab; all three need a live connection.
When no driver host is connected, the panel offers two tabs:
- INDI: host and port inputs plus a Connect button. The default is
localhost:7624. - ASCOM/Alpaca: a Discover button, manual host/port entry for servers hidden behind a router (NAT) that the broadcast discovery cannot see, and a per-server device list.
Once connected, the panel collapses to a compact green bar reading INDI · localhost:7624 · N devices with a check mark, plus Refresh and Disconnect buttons.
5.3 Role cards
Below the connection panel, one card per equipment role fills the Equipment sub-tab. Every card shares the same skeleton: a header with an icon, the role label, and a status dot (gray means no device selected, amber means selected but not connected, green means connected), and a body with a device dropdown, Connect and Disconnect buttons, and role-specific controls.
Main telescope
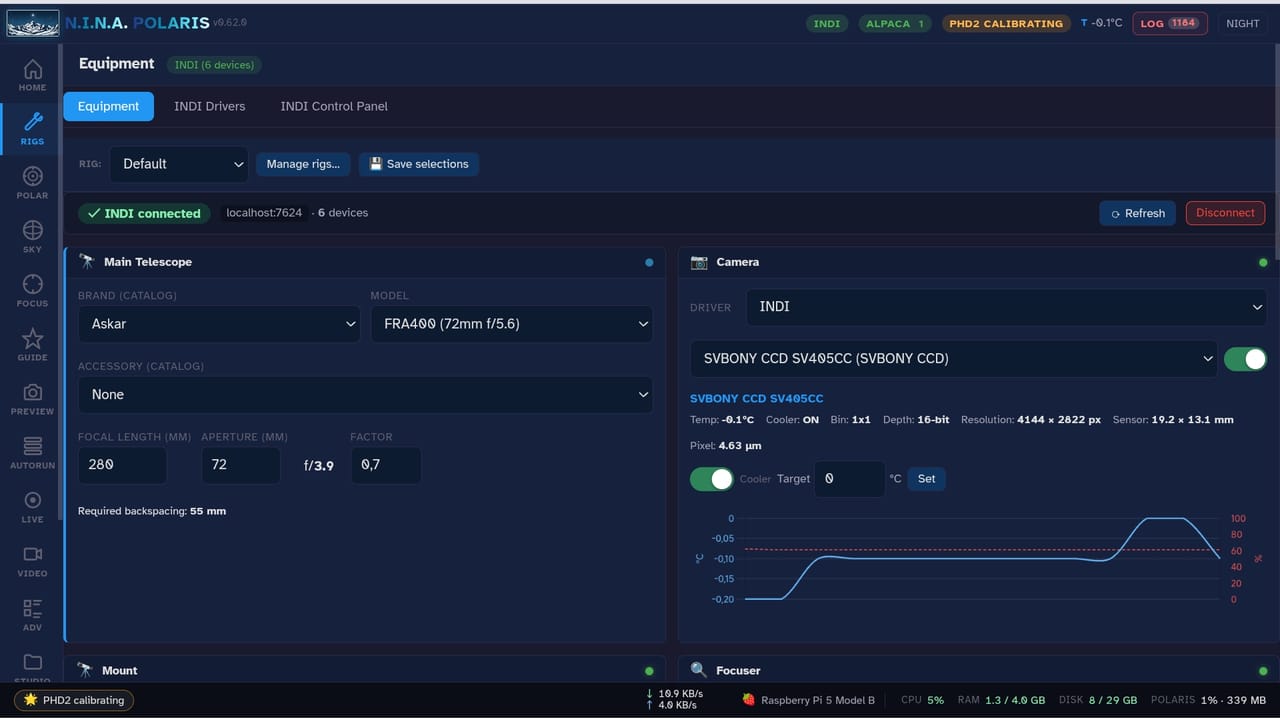
The Main Telescope card involves no hardware connection at all; it is purely optical metadata. The focal length and aperture you enter here drive the field-of-view calculation, the FOCALLEN header written into each FITS file (FITS is astronomy’s standard image format), and the hints handed to plate solving (matching the stars in a photo against a catalog to work out exactly where the telescope is pointing; see Appendix B). There are two ways to populate it:
The preferred way is the catalog pickers: a Brand dropdown of curated OTAs (Askar, Celestron, Sky-Watcher, GSO, Meade, SVBony, Explore Scientific, Astro-Physics, and more), a Model dropdown filtered by brand that shows aperture and f-ratio, and an Accessory dropdown of reducers, flatteners, Barlows, and extenders compatible with the picked OTA, which applies the focal-length multiplier automatically.
Alternatively, leave Brand set to “Manual entry” and fill the numeric Focal length, Aperture, and Factor inputs by hand. Both paths populate the same persisted fields on the active rig.
Camera
The driver dropdown lists INDI and Alpaca devices, plus, on Windows, the Canon EDSDK, Nikon, and Sony SDK entries when those SDKs are installed (Chapter 6). Connecting brings up a temperature chart, a cooler target input, and quick gain and binning controls (binning merges adjacent pixels into one, trading resolution for a brighter, faster readout); a cooler-power chart appears at the bottom left when a cooled sensor is active. Sensor dimensions are auto-detected from the driver, so there is no manual entry (this used to be a Settings field and has been removed).
Dedicated astronomy cameras expose an analogue gain number; the field carries a (?) helper that explains gain in ISO terms (higher gain means a brighter image and lower read noise, but less dynamic range). DSLR and mirrorless bodies report ISO instead: when the driver publishes a CCD_ISO list, Polaris shows an ISO dropdown in the capture controls in place of the numeric gain box (see Chapter 6).
Mount
The driver dropdown offers INDI Telescope, Alpaca Telescope, or one of the direct-WiFi drivers Polaris ships (SynScan WiFi, NexStar WiFi, LX200 TCP; see Chapter 7 for which of these are implemented today). Connecting brings up a tracking toggle, park and unpark buttons, an RA/Dec readout, and an NSEW directional pad.
Main scope focus motor and filter wheel
Both are standard select-and-connect cards. The focuser card is named after the optical train it drives, the Main Scope Focus Motor. The Filter Wheel card exposes filter swap controls; the filter labels come from the rig’s FilterOffsets table, edited in the Manage rigs modal.
The wheel comes back on the filter it was last set to. INDI drivers keep FILTER_SLOT in their own config file, and Polaris loads that config when a device connects, so the slot has to be saved for the choice to survive: every filter change writes it a few seconds later. The first connect after an update still honours whatever was in the file, so if the wheel lands on the wrong filter once, set the one you want and it sticks from then on.
Guiding system
One card covers the whole guide setup, split into three labelled groups.
Scope is metadata-only, like the Main Telescope card but for the guide optics. The guide focal length and aperture drive pixel-scale sanity checks in PHD2 (the free autoguiding program most amateur astrophotographers use) and the guiding resolution readout. The catalog pickers here are driven by wwwroot/data/guidescopes.json, a curated list of common guide scopes (SVBony, ZWO, William Optics, Askar, Sky-Watcher, Orion, QHY, and others); picking a model auto-fills focal length and aperture. For off-catalog scopes, leave Brand at “Manual entry” and type the numbers. Guide scopes take no reducer, so there is no accessory picker.
Camera behaves according to the rig’s Guider driver setting on this card, native or phd2:
- With the native guider (the default), Polaris manages the guide camera directly: a driver and device picker (INDI, Alpaca, vendor SDK, or Simulator) and a connect toggle, just like the imaging camera. The built-in native autoguider (Chapter 12) auto-connects and uses it for pulse guiding (steering the mount with short timed correction pulses). The guide camera must differ from the imaging camera while that is connected.
- With PHD2 (Stark et al., n.d.), a separately running PHD2 owns the camera, and the card mirrors, read-only, what PHD2 reports through its
get_current_equipmentstatus query, so you can see at a glance which guide camera PHD2 is using.
Focus Motor is an optional motor on the guide scope, for setups that motorise it: a driver and device picker plus a connect toggle. Once connected it can be jogged from the FOCUS tab via the Focuser: Guide source switch, and auto-focused with the Auto V-curve Optical train: Guide option, which uses the guide camera (Chapter 11).
Auxiliary camera system
The aux system is a second imaging camera riding the same mount through a different lens or telescope, capturing in parallel to make use of the same tracked night. The card is split into Camera + Lens/Scope and Focus Motor groups and carries:
- a driver and device picker (INDI, vendor SDK, or Alpaca, like the main camera), connect and disconnect, and live status;
- focal length, aperture, brand, and model for the aux optical train, its own values, used for the
FOCALLENheader of aux frames; - exposure, gain, and binning; the aux loop runs on its own cadence, independent of the main camera;
- an Enable aux capture toggle: when on, the aux loop captures and saves frames automatically whenever a main session (LIVE or AUTORUN) is running, pausing while the mount is busy with a dither (a tiny deliberate nudge of the framing between frames), a settle, a meridian flip (the mount swinging the telescope to the pier’s other side as the target crosses the meridian), or a slew, so trailed frames are not saved (Appendix B defines these in full);
- an Aux Focuser picker, an optional focuser for the aux train, for manual focusing and Auto V-curve via Optical train: Auxiliary.
Aux frames are written to a separate aux/ subtree, {rig}/aux/{target}/{filter}/{session}/, so they never mix with the main camera’s lights/ (Chapter 19). The aux camera is also viewable in the FOCUS tab via the Camera: Auxiliary source switch. Capture and save is the aux camera’s whole job; there is no guiding, live stacking, or sequencing through it. The SKY map does draw its real field of view, though: when connected it shows a pink aux FOV rectangle, and a SKY plate solve fires a parallel aux solve so the rectangle reflects the true rotation and scale the aux frame will come out with (Chapter 10).
Accessories
A collapsible block below the main grid that auto-expands when at least one accessory has a saved selection. It holds five cards:
- Rotator: angle readout, slew, and sync;
- Flat Panel: light toggle and brightness slider where supported;
- Dome: azimuth, shutter, park, and a slave-to-scope toggle;
- Weather: a read-only sensor display (cloud, humidity, dewpoint, wind, sky temperature, and MPSAS, a sky-brightness measure in magnitudes per square arcsecond, higher meaning darker);
- Power Box: a switch / power-distribution hub such as a Pegasus Astro Ultimate Powerbox. Like the filter wheel it is multi-driver: pick INDI, ASCOM (COM), or Alpaca, then the device, and Connect. Polaris treats it generically as an ASCOM ISwitchV2 device, so there is no per-brand curation - the card simply lists every channel the driver exposes: on/off buttons for the 12V outlets, a value box plus Set for dew-heater / PWM channels, and read-only voltage / current / temperature sensors. The Refresh button re-reads the channel values (useful for the Alpaca and ASCOM paths, which cache between writes). Outlets and dew levels are also drivable unattended from the sequencer - see the Power Box instruction group in Chapter 15.
An INDI power driver (for example indi_pegasus_upb) exposes its outlets as switch vectors and its dew rails as number vectors; Polaris flattens both into the generic channel list, so the same card and the same sequencer instructions work whether the box is reached over INDI, ASCOM COM, or Alpaca. The ASCOM COM path is Windows-only; INDI and Alpaca cover the Linux SBCs.
5.4 Managing rigs
The rig dropdown at the top of the tab switches the active rig in one click; all device selections and per-rig defaults reload automatically. The Save selections button persists the current dropdown picks, the cooler target, and the focuser step into the active rig.
Manage rigs… opens a modal with the rig lifecycle controls: inline rename per rig, a per-rig devices summary (camera, mount, focuser, filter wheel), a per-rig optics summary (focal length, f-ratio, accessory), a collapsible per-rig filter offsets table ({Filter → ΔSteps}, used by the MoveToFilterOffsetInstruction in sequences, Chapter 15), Activate and Delete buttons per rig, and New empty rig and Duplicate active at the footer. The modal is intentionally slim: device pickers and optics live on the RIGS-tab cards, so the modal is for rig lifecycle and filter offsets only.
Beyond the obvious device names, each rig persists:
- cooler target temperature (°C);
- default gain, offset, and binning;
- focuser step size and backlash;
- main scope focal length, aperture, brand, model, accessory, factor, and required back-focus;
- guide scope focal length, aperture, brand, and model;
- guide focuser device and driver;
- aux camera device and driver, aux optics (focal length, aperture, brand, model), aux exposure, gain, and binning, the enable flag, and the aux focuser device and driver;
- the PHD2 endpoint (host and port), profile id cache, algorithm preset, calibration step override, and custom algorithm parameters;
- the filter offsets table;
- live-stack triggers (the refocus and recenter policy, see Chapter 17).
Who owns gain and offset
Worth spelling out, because it surprises people arriving from a driver-centric workflow: Polaris owns gain and offset, the way N.I.N.A. and ASIAIR do. They are sent to the camera before every capture, and whatever the driver’s own control panel (INDI, ASCOM) was set to is overwritten each time an exposure starts.
That push exists for a reason: a freshly created INDI driver configuration sits at offset 1, which clips the shadow end of an IMX571 sensor’s histogram to black, and the field reports it produced were of lights that looked like darks.
Offset is per panel. LIVE, PREVIEW, AUTORUN and ADV each have their own Offset field, and a capture obeys the field of the panel it came from: a framing snap and a live stack are different jobs and do not have to agree about the pedestal. All four save to the active rig, so they survive a reload and follow the rig rather than the browser. In ADV an exposure instruction may pin its own offset, which outranks the panel’s field; captures with no panel of their own, the plate solve, autofocus, polar alignment and the video stream, use the LIVE value.
An offset of 0 means “read the driver”. That panel’s captures send nothing, the camera keeps whatever you set in its own control panel, and the frame’s FITS OFFSET card records what the driver reports it is running at. The card always describes the capture that took the frame: the value that capture applied, or the driver’s value when it applied none. A camera whose driver advertises no offset control at all gets no OFFSET card, because there would be nothing true to write in it.
So there are two coherent ways to work, and the rig’s field picks between them per panel: type the pedestal you want into the panel and let Polaris own it, or set that panel to 0 and manage the offset in the driver.
5.5 The telescope and accessory catalogs
The catalog dropdowns are driven by three JSON files (plain text files holding structured data, editable in any text editor) checked into the repository: wwwroot/data/telescopes.json and wwwroot/data/optical-accessories.json for the Main Telescope card, and wwwroot/data/guidescopes.json for the guide scope. To add a new OTA, reducer, or guide scope, edit the JSON, restart the server, and refresh the browser. Pull requests (changes proposed through GitHub) with additions for popular new hardware are welcome (Chapter 32).
5.6 INDI drivers manager (embedded indi-web)
Polaris’s normal INDI client connects to a running indiserver on port 7624 and lists whatever drivers that server has already loaded. It cannot, by itself, add or remove drivers; that requires either restarting indiserver with new arguments or talking to its FIFO (a command pipe: a special file indiserver watches for instructions). Without help, every “I plugged in a new accessory and need its driver loaded” trip means logging into the host over SSH (a remote command-line session), pkill indiserver, and relaunching with the new driver on the command line.
The embedded indi-web panel removes that trip. indi-web (Mutlaq, n.d.) is the small web page that starts and stops INDI drivers; Polaris embeds it inside the RIGS tab, so you can start, stop, and configure INDI drivers from the browser. Unlike the embedded PHD2 window, which needs xpra (a tool that streams a desktop program’s window into the browser) to appear, indi-web is already a browser app: Polaris simply passes its traffic through its own web address (a reverse proxy) at /indi-web/ and shows it in an iframe (a window-in-a-page that displays one web page inside another). No extra display server, no extra streaming bandwidth. The panel gives you:
- a checklist of every INDI driver installed on the host;
- profiles, groups of drivers you turn on together, for example “Mono SHO rig”, “OSC travel rig”, “Sim only” (OSC is a one-shot colour camera; SHO is the narrowband filter trio);
- start, stop, and restart of
indiserverfrom the browser; - the telescope simulator and utility drivers without command-line wizardry.
Requirements and install
indi-web needs Linux or macOS (Windows is unsupported, since indiserver itself does not ship for Windows), Python 3.x with pip (Python’s package installer) available on the PATH (the list of folders the system searches for commands), and the INDI core installed via apt install indi-bin on Debian, Ubuntu, or Raspberry Pi OS (or your distribution’s equivalent); indi-web runs the indiserver already on your system, it does not bundle its own. It listens on port 8624, indi-web’s default, bound to 127.0.0.1 only (the loopback address, reachable only from the host itself); Polaris proxies access through itself.
Install is one line on the Polaris host:
pip install indiwebYou do not need to start indi-web yourself. Polaris’s IndiWebManagerService detects the binary, manages the process, and surfaces it in the RIGS tab.
If pip install lands in a virtual environment2, point Polaris at the absolute path of the indi-web binary in appsettings.json. For a plain venv:
{
  "IndiWeb": {
    "ExecutablePath": "/home/polaris/.venv/polaris/bin/indi-web",
    "AutoStart": true,
    "Port": 8624,
    "BindAddress": "127.0.0.1"
  }
}
For an install managed with pipenv (a tool that creates and tracks such virtual environments for you), following the upstream README’s recommended path:
sudo apt install pipenv
cd ~ && mkdir indiweb && cd indiweb
pipenv --python=$(which python3)
pipenv install indiweb
# discover the venv path pipenv chose:
pipenv --venv
pipenv --venv prints something like /home/polaris/.local/share/virtualenvs/indiweb-AbCd1234; the binary is at {that path}/bin/indi-web. Plug it into IndiWeb:ExecutablePath the same way. The hash suffix changes only if the Pipfile changes (rare), so set it once and forget it unless you pipenv update to a new release.
BindAddress should stay on loopback unless you really know what you are doing: indi-web has no authentication, so binding it to 0.0.0.0 (which accepts connections from any machine) re-exposes driver control to anyone on the LAN.
Workflow
Open the RIGS tab and scroll to the INDI Drivers section near the bottom of the page, below Accessories. A status pill shows the current state: Running (green, indi-web is up and the iframe is loaded), Stopped (installed but not running; click Start), Not installed (a pip install hint is shown inline), or OS not supported (a Windows banner with the reason).
Click Start; the iframe appears after a quick network check (a TCP probe) confirms indi-web is listening, typically one to three seconds. In the embedded UI, pick or create a profile, tick the drivers you want, and click Server, then Start. indi-web now owns the indiserver process, and Polaris’s normal equipment cards see the loaded drivers in their device dropdowns. When you are done, click Stop in the Polaris control row; Polaris kills the child process tree cleanly.
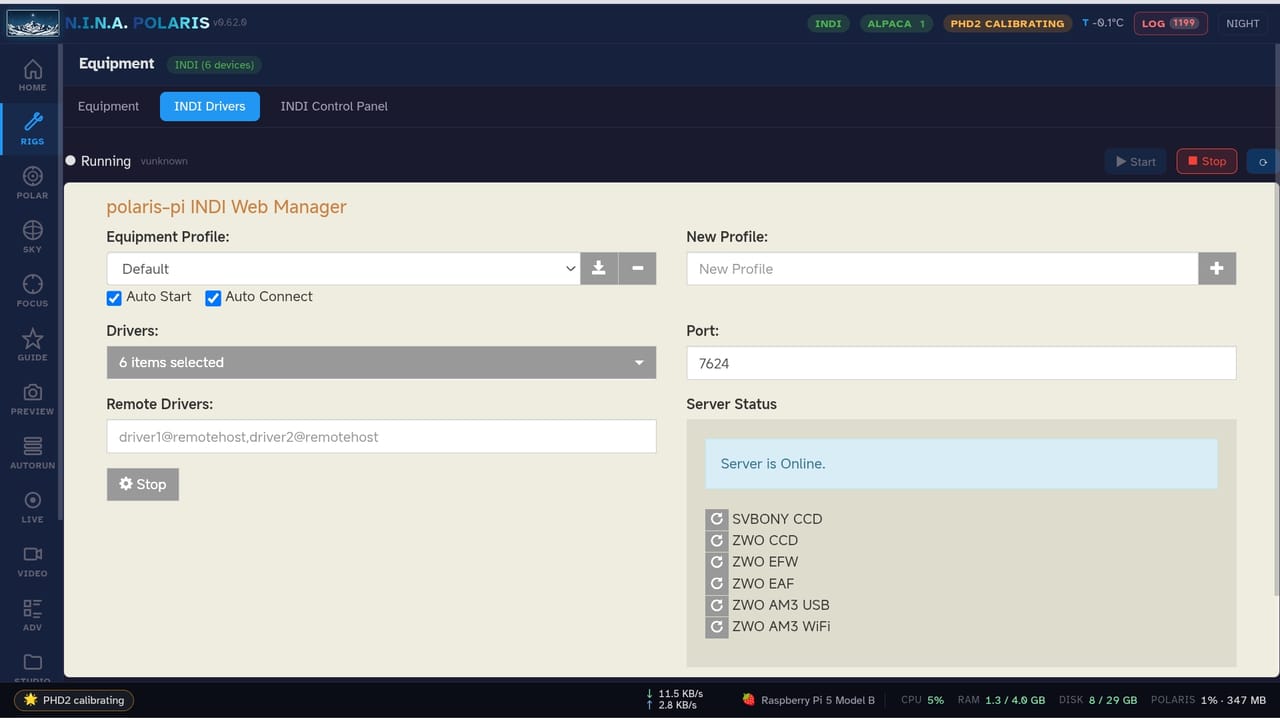
To have indi-web come up with Polaris itself, set IndiWeb:AutoStart = true in appsettings.json. With auto-start on, the service launches indi-web about three seconds after Polaris boots, and the INDI Drivers section shows the running iframe immediately on first open. Without it (the default), indi-web only runs when you click Start.
Installing a driver package
The driver you need is not always installed. A new camera, a focuser from a different maker, a GPS dongle: each lives in its own Debian package, and until that package is on the host, indi-web has nothing to offer in its driver list.
Open Install drivers, the collapsible block just under the indi-web control row. It lists the driver packages Polaris can install on this host, each with a short note on what it covers, whether it is already installed and at which version, and an Install button when it is available and missing. Clicking it downloads and installs the package, then restarts indi-web so the new drivers appear in the embedded UI. Nothing else is touched, and no device moves.
Two rules shape what the list contains, and both exist because of the same trap. INDI on Debian and Ubuntu comes from one of two places: the astronomy PPA, which ships the whole third-party driver set as a single indi-3rdparty-drivers package, or the distribution archive, which ships one package per family (indi-asi, indi-toupbase, indi-svbony and so on). The two builds cannot be installed side by side. Ask apt for a driver from the wrong one and it happily makes room by removing the INDI you are actually using, and PHD2 along with it, in the middle of a session.
So Polaris first works out which of the two builds is installed, and offers only packages built against it. Then, before installing anything, it asks apt what it would do and reads the answer. If the plan removes so much as one package, the install is refused and the card tells you exactly what would have gone. An install from here can add software; it can never take any away.
If the list is empty, or the driver you want is missing from it, the package is not in the repositories this host has configured. That is the case to solve at the terminal, with apt and the PPA instructions on the INDI site, rather than from this card.
Restarting a wedged driver
Sometimes a single INDI driver stops responding mid-session, most often a camera driver that stops delivering frames (a “dropped BLOB”): the exposure fires but the image never arrives and the capture eventually times out. Reconnecting the device does not fix this, because the stuck part is the driver process itself, not the Polaris-to-device link. The cure is to restart that one driver.
When indi-web is running, the Driver watchdog panel at the top of the INDI Drivers sub-tab gives you two ways to do it:
- Per-driver restart. Every running driver is listed with a
↻ Restartbutton that bounces just that driver on theindiserver, through indi-web’s REST API, leaving the other drivers untouched. This is far less disruptive than restarting the whole indi-web or the server. - Auto-restart (on by default). After repeated capture timeouts for the same camera, Polaris resolves that camera’s driver and restarts it automatically, then tells you what it did. It is rate-limited, with a minimum gap between restarts and a cap per half hour; once the cap is hit it backs off and asks you to intervene (check cabling, power, and USB), so a genuinely broken driver is not bounced forever. It only ever restarts a driver, and never moves hardware.
Auto-restart only works while indi-web owns the server. If Polaris is pointed at an external indiserver you started yourself, the watchdog cannot restart the driver; it just surfaces the problem so you can restart the driver on your INDI host. The behaviour is tunable under the IndiWatchdog keys in appsettings.json (enable flag, timeout threshold and window, and the restart rate-limit and cap).
Coexistence with the built-in simulator
Both IndiWebManagerService and the built-in simulator service (Chapter 8) want to control indiserver. They get along, but you have to pick one owner per session. If you are using indi-web for everything, real hardware or simulators, leave the simulator service disabled and use indi-web’s profile dropdown to load the simulator drivers (indi_simulator_ccd, indi_simulator_telescope, and so on) when you want a dry run. If you are using the simulator service for dry runs, leave indi-web stopped; the simulator service spawns its own indiserver via FIFO. If both run at once they race on the same FIFO and one of them loses commands.
Troubleshooting indi-web
The banner says “indi-web not detected” but you installed it. Polaris looks at the PATH of the user running Polaris. If you installed with pip install --user and Polaris runs under a different user (for example when systemd, the Linux service manager, runs it as the polaris user), ~/.local/bin may not be in that user’s PATH. Either install system-wide with sudo pip install indiweb, or set IndiWeb:ExecutablePath to the absolute path in appsettings.json.
The banner shows the binary path but the status is “Not installed”. Detection runs but comes back empty because the user running Polaris cannot read or execute the path. With systemd that user is whoever the unit’s User= directive names (often polaris or root), not your interactive login. Verify by impersonating the Polaris user:
sudo -u polaris /home/polaris/.local/share/virtualenvs/indiweb-XXXXXXXX/bin/indi-web --versionIf that errors with “Permission denied” or “No such file or directory”, either make the venv readable by the Polaris user (chmod -R o+rx on the venv tree if it is currently 700, or chown -R polaris:polaris if it should belong to that user), or edit User= in /etc/systemd/system/polaris.service so Polaris runs as the user who owns the venv.
Start failed with ModuleNotFoundError: No module named 'cgi'. Python 3.13 removed the cgi module from the standard library, but the copy of bottle.py that ships inside indi-web still imports it. Install the drop-in replacement from PyPI (Python’s package archive) into the same venv:
sudo /opt/polaris-indiweb-venv/bin/pip install legacy-cgi
sudo systemctl restart polaris.service
The path is /opt/polaris-indiweb-venv/ when installed via the Polaris .deb, or ~/.local/share/virtualenvs/indiweb-XXXX/ for a pipenv install. This bites every install on Raspberry Pi OS images shipped after late 2025, which moved to Python 3.13 as the default; the .deb postinst installs legacy-cgi automatically, so it only affects users who set up indi-web manually.
The status flips to “Stopped” right after you click Start. The child process spawned but died before the TCP probe could catch it. Check journalctl -u polaris -f (or wherever your log lands); Polaris logs Spawning indi-web: {path} {args} followed by either the listener-up message or an indi-web exited prematurely (code N) line. Common causes: HOME not set in the systemd unit (Bottle, the small web framework inside indi-web, reads configuration from $HOME on startup and indi-web exits immediately when it is empty; add Environment=HOME=/home/polaris to the [Service] block and systemctl daemon-reload); port 8624 already in use by an old indi-web or a container (lsof -i:8624 to find it, kill it, restart Polaris); or libindi missing (apt list --installed | grep indi-bin, and if empty, sudo apt install indi-bin).
The iframe shows “Bad Gateway” (502). The reverse proxy got an error talking to 127.0.0.1:8624, usually because indi-web died between the status probe and the iframe fetch. Check the Polaris log for the inner error and click the refresh control in the Polaris control row to re-probe.
The iframe shows the indi-web UI but the driver list is empty. That is an indi-web to indiserver problem, not a Polaris problem. indi-web finds drivers by scanning XML files under /usr/share/indi/; if indi-bin is not installed the directory is empty and there is nothing to list.
Polaris’s equipment cards do not see drivers started via indi-web. Polaris’s INDI client connects via TCP to indiserver on the configured host and port. Check that they match what indi-web’s “Server” page reports.
You want to manage indi-web with your own systemd unit instead. On a host installed from the .deb there already is one, and Polaris uses it: polaris-indiweb.service. Polaris starts, stops and restarts that unit instead of forking indi-web itself, which is what keeps indiserver and every driver under it alive when polaris.service restarts. An update, a crash or a sudo systemctl restart polaris leaves the mount tracking and the camera on its setpoint; only the web UI blinks. The INDI card’s status row names the owner, systemd or child-process, so you can tell which mode a host is in.
Do not add a second unit of your own beside it. Both would try to bind 8624 and one loses with an EADDRINUSE (“address already in use”) error. To point the packaged unit at an indi-web you installed yourself, create /etc/default/polaris-indiweb:
INDIWEB_BIN=/usr/local/bin/indi-web
INDIWEB_PORT=8624
INDIWEB_HOST=127.0.0.1
Keep the port and host equal to IndiWeb:Port and IndiWeb:BindAddress in appsettings.json, or Polaris probes a port nobody is listening on and reports indi-web as down.
Running Polaris from a source checkout, or on macOS, there is no such unit and Polaris falls back to spawning indi-web as a child process. That is fine when nothing is going to restart a unit underneath it.
5.7 When a device vanishes: Reset USB
A camera that stops appearing, a focuser whose serial port is suddenly gone, a driver answering every command with an input/output error: on a small board this happens, and the usual cure is a walk to the telescope to unplug and replug a cable.
Reset USB, in the INDI card, does that walk for you. It asks the kernel to enumerate the bus again, which recovers a device it had lost track of and a serial adapter that renumbered, and then restarts the INDI drivers so none of them is left holding a port that no longer exists. The chain carrying the root filesystem is deliberately left alone, so a board booting from a USB SSD cannot re-enumerate its own disk out from under itself.
Read what it reports. If a device appears that was not there before, the reset recovered it. If nothing changes, the device is not electrically present, and no amount of re-enumeration will change that: a USB-C cable with no data pairs, for instance, comes back as a USB Billboard Device every single time. That is the moment to go and check the cable, the connector and the power, instead of restarting software.
Every device disconnects and comes back when you press it, so do not press it in the middle of a capture.
5.8 The INDI control panel
The INDI Control Panel sub-tab is a built-in replacement for indi_control_panel, the old standalone desktop program, which recent Raspberry Pi OS and libindi 2.x (the INDI core library) releases no longer ship. It shows every property each connected device exposes, grouped per device, and lets you read and edit them right in the browser. Properties are grouped (Main, Options, Site, and so on) and searchable; number, switch, text, and light types each get the right editor, and read-only properties show greyed out. Edits are sent through the same path the rest of the app uses and then auto-saved to the driver’s ~/.indi/*_config.xml, so they come back on the next connect. Refresh / Resync at the top re-reads the property list; use Resync after loading or unloading a driver in the INDI drivers manager.
The INDI protocol carries only a short label per property, no description. To make the cryptic names friendlier, every property has a small (?) icon next to its name. Hover it to read a plain-language English explanation as a tooltip; around 80 common INDI standard properties (camera, mount, focuser, filter wheel, dome, rotator, weather, plus the general ones) ship with a built-in description. Click it to open a small editor that shows the built-in text and gives you a box to write your own note, which is saved and shown instead from then on. Notes are saved per property name, not per device, so a note you write on CCD_TEMPERATURE shows up for every camera and survives reconnects; Clear note returns to the built-in description. The built-in descriptions live in wwwroot/data/indi-property-help.json; your own notes live in the profile, so a factory reset clears them along with the rest of your settings (Chapter 28).
5.9 Property control panels
Where the INDI Control Panel shows you everything a driver exposes, property control panels let you build your own small dashboards of just the handful of readings and controls you actually watch on a given night, in a SCADA-style floating card you can put anywhere on screen.
You build them in the Control Panels sub-tab of the RIGS tabstrip. Create a panel, give it a title, then add widgets. Each widget binds to one of four sources:
- a power-box switch channel (on/off or a value);
- a native camera control (gain, offset, cooler target, and so on);
- any INDI property element, chosen by device and property;
- a typed equipment field or action (cooler on/target, tracking, park and unpark, focuser position, filter, rotator angle, flat panel, dome shutter).
Polaris suggests the right widget kind from the target’s metadata: a read-only value becomes a readout, a boolean a toggle, a ranged number a slider or number box, an action a button. Live values update on their own, once a second for equipment and switch readings and on a short poll for camera and INDI values, and only while a panel that needs them is visible.
The panels float over every tab, not just RIGS, so you can leave a cooler-and-focus panel open while you work in PREVIEW or LIVE. Drag the header to move a panel, drag its corner to resize it (the same handles as the guiding overlay, Chapter 12), and click one to bring it to the front. Drag a panel near a screen edge to dock it: docked panels stack in a rail down that side, several sharing the edge with no wasted height, and you reorder them with the ↑/↓ buttons or pop one back out with undock.
Everything about a panel, its widgets, size, position, and dock, is saved per rig, so your panels follow the active rig and come back after a reconnect or a browser refresh. Save a rig as a new one and the layout comes with it.
5.10 ASCOM (COM, direct) on Windows
On Windows, Polaris can talk to your ASCOM Platform drivers directly through COM interop, without going through ASCOM Remote Server or the Alpaca Omni Simulator. The hop you would otherwise pay (HTTP to localhost, then COM) goes away, and you do not have to keep a separate bridge process running.
| ASCOM (COM, direct) | Alpaca (HTTP) | |
|---|---|---|
| OS | Windows only | Any |
| Setup | Just install the ASCOM Platform | Install Platform + ASCOM Remote / Omni Sim |
| Latency | ~0 ms | ~1-3 ms localhost |
| Driver compatibility | Every ASCOM driver ever shipped | Only those exposed through the bridge |
| Service mode | Not when Polaris runs as SYSTEM | Works |
The short version: on Windows, prefer ASCOM (COM, direct) unless you specifically need Polaris to run as a Windows service.
You need three things: Windows (the COM path is Windows-only; Linux and macOS keep using INDI or Alpaca), ASCOM Platform 6.5 or 7.x from https://ascom-standards.org/ (a free download), and at least one registered ASCOM driver; most cameras, mounts, focusers, and filter wheels installed via their vendor installers land there automatically. Polaris ships no ASCOM bits itself: if the Platform is not installed, the “ASCOM (COM, direct)” entry in the RIGS dropdowns shows up greyed out with a hint to install it.
Connecting a device:
- In the RIGS tab, pick the device card (Camera or Mount).
- In the Driver dropdown, choose “ASCOM (COM, direct)”.
- Click Detect. The dropdown fills with every ASCOM driver of that device type registered on the machine, labelled with the description the driver author wrote into the registry (“ZWO ASI Camera”, “iOptron CEM70”, “Pegasus FocusCube3”).
- Pick the driver.
- Optionally click Setup to open the driver’s modal setup dialog: COM port pickers, mount-model pickers, filter naming, whatever the vendor exposed. Polaris waits for you to dismiss the form before continuing.
- Toggle the connect switch on. Polaris instantiates the driver, sets
Connected = true, reads the metadata, and you are live.
Under the hood, each connected ASCOM device gets its own dedicated worker thread running in STA mode3, and all property reads, writes, and method calls against that driver go through that thread, one at a time. This keeps a slow operation on one device, say a 60-second telescope slew, from blocking another device on a different thread, such as an autofocus loop on the focuser. The cost is about 1 MB of stack memory plus one operating-system thread per connected device; a typical four-device rig uses four extra threads, which is negligible.
Troubleshooting ASCOM COM
“ASCOM (COM, direct)” is missing or greyed out. On Linux or macOS this is expected; use INDI or Alpaca. On Windows it means the ASCOM Platform is not installed, or your user lacks read access to the HKLM\SOFTWARE\ASCOM branch of the Windows registry (the system-wide settings database). Install or reinstall the Platform and reopen RIGS.
Detect finds nothing. The driver vendor’s installer did not register the COM class for your user. Re-run the installer (most need admin rights), or check HKLM\SOFTWARE\ASCOM\<Type> Drivers\ for the expected ProgID (the name under which the driver registered itself).
The Setup dialog fails with a “no interactive desktop” error. Polaris is running as a Windows service or under SYSTEM, and the setup dialog needs an interactive desktop session to render. Either start Polaris from your normal logged-in user account, or configure the driver once from another interactive app (the ASCOM Platform’s Chooser, or the vendor’s standalone tool) and come back to Polaris.
Connect succeeds but the driver behaves oddly. ASCOM drivers vary in quality; some advertise capabilities they do not support, or throw PropertyNotImplementedException on properties they are meant to implement. Polaris swallows the common failures and substitutes neutral defaults (NaN for temperature, false for cooler-on, and so on), but if a critical method fails, the pop-up toast shows the driver’s numeric Windows error code (the HRESULT) verbatim so you can report it to the driver vendor.
A 32-bit driver on 64-bit Polaris. Most modern ASCOM drivers are 64-bit and load directly into Polaris. A handful of legacy drivers are 32-bit only and require ASCOM’s COM surrogate (a helper process Windows uses to run a 32-bit driver on behalf of a 64-bit program). Polaris detects these and lists them in the dropdown, but you will need to either use ASCOM Remote or Alpaca instead (which works around the bitness gap) or ask the vendor for a 64-bit build.
For development without hardware, the Equipment Simulator panel in SETTINGS can spawn the ASCOM Omni Simulator, which exposes every device type through Alpaca with no driver registration involved; see Chapter 8.
5.11 Native camera SDKs
Polaris can talk to SVBony, ZWO ASI, PlayerOne, ToupTek, and Altair cameras through their native USB SDKs, bypassing the INDI server entirely. This is the fast path for high-frame-rate planetary video: the INDI route does a full per-exposure round trip per frame, often around 1 fps for a non-streaming driver, whereas the native SDK streams continuously straight off USB.
Use it for planetary and lunar video, where you want the highest sustainable frame rate at a small ROI (region of interest, a crop of the sensor); pick a small subframe such as 640×480 for the highest fps. For deep-sky imaging the INDI driver is fine; the SDK backend is an alternative you select per rig, not a replacement. Frame rate is ultimately sensor-bound: a cooled deep-sky OSC camera like the SVBony SV405CC (Sony IMX294) tops out at tens of fps even over the native SDK, and true 100 fps needs a small, fast planetary sensor such as the ZWO ASI462 or ASI678.
The camera driver picker in RIGS lists “SVBony (SDK, native)”, “ZWO ASI (SDK, native)”, “PlayerOne (SDK, native)”, “ToupTek (SDK, native)”, and “Altair (SDK, native)” whenever the matching native library loads on the host. Choose one, Discover, and connect like any other camera; all camera operations (capture, gain, cooler, ROI, and live video) go through the SDK while it is the active driver.
Platforms and packaging
On Windows the native vendor libraries (.dll files) ship inside the package, copied next to the executable with no separate download. On Linux the .so libraries are not in the base package: they are large and most users need only one vendor, so they are installed on demand from SETTINGS, Software Updates, under Native camera SDKs. The Install native camera SDKs button downloads the pack for your architecture (arm64 or x64) and unpacks it into the profile data directory, where the per-vendor resolvers pick it up. Until the pack is installed the “(SDK, native)” driver options do not appear in the RIGS picker and the INDI driver remains available; after installing, replug the camera once and the native entries show up. On Linux, the .deb installs udev rules4 (/lib/udev/rules.d/99-polaris-{svbony,asi,playerone,touptek,altair}.rules) so the polaris service user can open the camera without root, and raises usbfs_memory_mb (the kernel’s buffer for USB transfers) for high-fps USB3 streaming. The package’s post-install script reloads udev automatically; replug the camera once after install. If the native library is missing for your platform or architecture, the driver simply does not appear in the picker, and the INDI driver remains available.
To quantify the gain, run the Hardware Benchmark video probe (SETTINGS, Hardware Benchmark, “measure the connected camera”; set a small Video ROI and tick Measure recording) before and after switching from INDI to the SDK backend, and compare capture fps, transmit fps, record fps, and dropped frames.
Maturity
| Backend | Native libs available5 | Validated on hardware |
|---|---|---|
| SVBony | Linux arm64/x64, Windows x64 | SV405CC (Pi 5, USB3) |
| ZWO ASI | Linux arm64/x64, Windows x64 | not yet |
| PlayerOne | Linux arm64/arm32/x64/x86, Windows x64 | not yet |
| ToupTek | Linux arm64/x64, Windows x64 | not yet |
| Altair | Linux arm64 (glibc)/x64, Windows x64 | not yet |
The ZWO, PlayerOne, ToupTek, and Altair backends are written to the vendor SDKs and compile and pass managed smoke tests, but have not been exercised on real cameras yet. Treat the first connect, capture, and stream as a shakedown, and if you hit a bug, capture the Polaris log (journalctl -u polaris.service -f on the Pi) around the failure and file it. The known fragile spots, documented so whoever debugs the first session knows where to start:
- ToupTek raw format and bit depth. The backend forces raw Bayer output (the sensor’s undeveloped colour-mosaic data,
OPTION_RAW=1) at maximum bit depth (OPTION_BITDEPTH=1) and reads the actual depth and Bayer pattern back fromget_RawFormaton connect. Some models only deliver 8-bit, ignore the bit-depth option, or report a different FourCC (a four-character code naming the pixel format); if the image looks mono, half-height, or has wrong colors, verify this first (log the FourCC and bit depth from connect). - ToupTek live ROI.
put_Roiis applied without stopping pull mode (the delivery mode where Polaris asks the SDK for each frame) and the frame buffer re-sizes fromget_Sizeper frame; on sensors that will not change ROI live, this may need a stop and restart of pull mode aroundApplyRoi. - ToupTek OEM rebadges. Omegon, RisingCam, and similar brands are ToupTek-based and enumerate under the same SDK, but only genuine ToupTek units are expected to work as-is; OEM product IDs may need adding to the udev rule.
- Altair. Altair Astro cameras have their own vendor SDK drop (
camera_sdk/Altair,libaltaircam) and a dedicated “Altair (SDK, native)” picker entry, separate from ToupTek. It is the same ToupTek-derived API surface (Altair is a ToupTek OEM), so the same ROI, raw-format, and pull-mode notes apply. Vendor udev IDs are04b4,0547, and16d0. - PlayerOne config-value union. A developer-level detail: the SDK hands settings back in
POAConfigValue, a C union (one memory slot that can hold along, adouble, or aPOABool), which Polaris reads through an explicit-layout struct overlappingintanddoubleat offset 0. If gain, exposure, or temperature come back nonsensical, this translation is the prime suspect. - ROI alignment (all SDK backends). Sub-frame width and height are snapped to the vendor’s required multiples (ZWO width % 8 and height % 2; PlayerOne width % 4 and height % 2; ToupTek even). A camera that rejects a subframe or returns a shifted image usually means the alignment or offset math needs tightening for that sensor.
- USB udev IDs (Linux). The PlayerOne vendor id
a0a0is confirmed from the SDK header; ToupTek uses04b4and0547. A camera that connects as root but not as thepolarisservice user means its vendor or product id is not covered by/lib/udev/rules.d/99-polaris-{playerone,touptek}.rules; add it and reload udev.
The ToupTek backend uses the vendor’s official cross-platform C# binding, the glue code that lets Polaris call the vendor library (camera_sdk/ToupTek/dotnet/toupcam.cs), in callback (pull) mode. The vendor SDK binaries under camera_sdk/ are redistributed under their respective vendor licenses; see that folder’s vendor readme files.
5.12 Common pitfalls
Cards show empty dropdowns even after INDI connects. INDI has not finished listing its devices yet. Click Refresh in the connection strip, or wait one or two seconds.
The camera connects but sensor dimensions are 0×0. The driver does not populate CCD_INFO until the first exposure. Take a 0.1 s snap from the PREVIEW tab (Chapter 13) and the dimensions populate.
Switching rigs does not disconnect the old devices. This is by design. Disconnect manually before swapping setups; otherwise INDI ends up with multiple devices “connected” to the same hardware.
COM (Component Object Model) is the Windows plumbing that lets one program call directly into another; “COM interop” is the .NET mechanism Polaris uses to make those calls.↩︎
A virtual environment (venv) is a private folder holding a Python program and its dependencies, kept separate from the Python that ships with the OS. Raspberry Pi OS Bookworm and later block system-wide
pip installto protect the OS’s own packages (a Python policy known as PEP 668), so installing into a venv is the recommended route there.↩︎STA (single-threaded apartment) is a Windows rule saying a driver must always be called from the same one thread. Polaris gives each device its own thread and funnels every call through it in order, which is exactly the treatment ASCOM drivers expect.↩︎
udev is the part of Linux that reacts when hardware is plugged in; a udev rule is a small text file telling it who may use a device.↩︎
Windows bundled; Linux via the on-demand pack above.↩︎