24 Star Removal and Image Blend
Stars and nebulae want different processing. The nebula needs an aggressive stretch to pull faint wisps out of the background; give the stars the same stretch and they bloat into white blobs. The classic answer is to split the image in two, a starless image and a stars-only image, process each on its own terms, and put them back together. In PixInsight this is the StarNet-plus- ImageBlend routine; Polaris does the whole loop in the browser, in two pieces:
- Remove stars: a star-removal neural network runs as an ONNX model in your browser (the same engine, cache, and licence prompt as the GraXpert operations in Chapter 23), writing
_starlessand_starssibling files next to the source. - Image Blend: recombines two images with an independent stretch per layer, a blend mode, and an opacity slider.
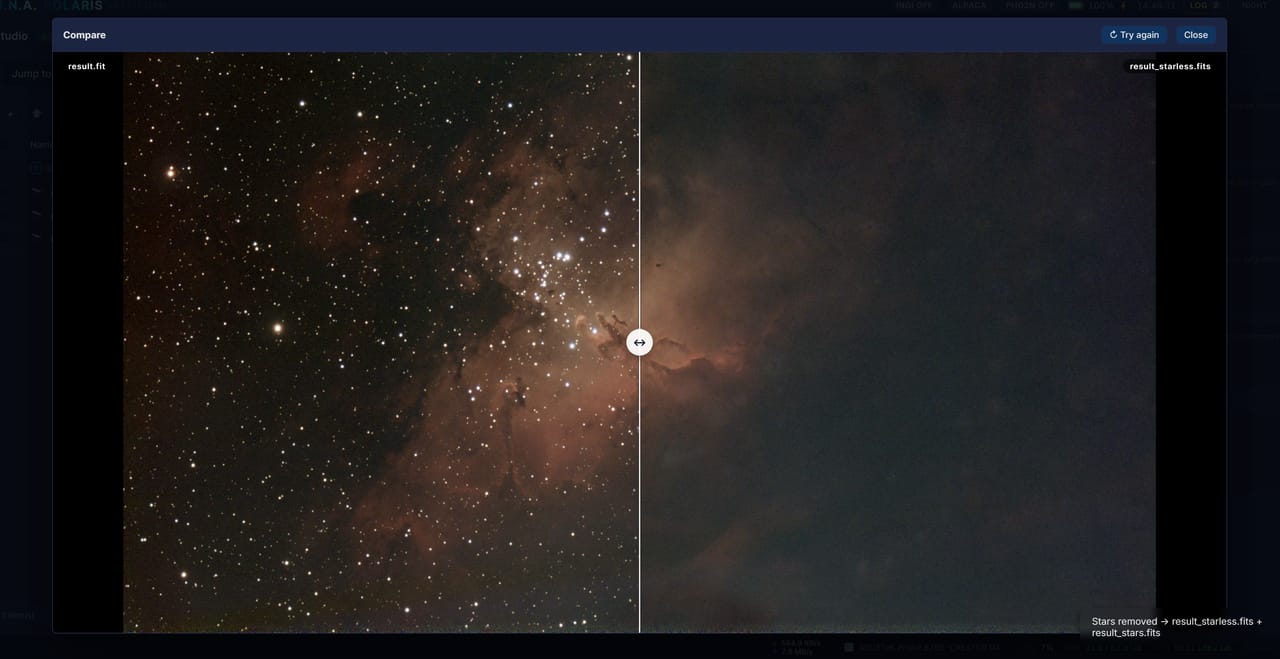
result.fit left of the draggable divider, result_starless.fits right, with the status line confirming both siblings were written.
24.1 Choosing a model
Polaris supports several star-removal models; when more than one is installed, the Remove stars dialog shows a Model dropdown:
- nox (StarNet-like, about 54 million parameters1) is MIT-licensed, code and trained weights alike, and is the recommended default (Harvey 2023). It has a native colour model (one inference per tile) plus a grayscale model, and delivers StarNet-grade quality under a permissive licence.
- starrem2k13 (a pix2pix-style U-Net, two well-known neural network designs for image-to-image work, about 31 million parameters) is also MIT-licensed and processes 512-pixel tiles one colour channel at a time (Patel, n.d.).2
- StarNet++ (v1) offers high-quality removal, but its trained weights are CC BY-NC-SA (non-commercial), so it is opt-in and you install it yourself (Misiura, n.d.).
Each model comes in two precisions, following the GraXpert convention from Chapter 23: version 1.0.0 is the original full-precision FP32 model (about 218 MB for nox or StarNet, 125 MB for starrem2k13), best quality and an optional download for desktops; 1.0.0-fp16 is the half-precision variant (about 109 and 62 MB respectively), the default that runs on every platform. Half the weights fit single-board computers, phones, and tablets, and because the inputs and outputs stay full-precision the accuracy is essentially unchanged. The FP16 variants are what ship bundled in the OS images, and the pipeline auto-selects the -fp16 sibling whenever it is installed.3
24.2 Installing a model
The easiest path is the built-in model catalog described in Chapter 23: Settings → AI inference (ONNX) → Download models → Refresh catalog, then Download next to the model you want. It lands in the host’s models directory and the registry rescans automatically.
Converting a model yourself needs a build machine (the converters use Docker, a tool that runs software in ready-made isolated packages, so no fussy Python environment is required):
nox: download
generator_color.h5andgenerator_gray.h5from the nox releases page, then runpowershell -ExecutionPolicy Bypass -File scripts\convert-nox-onnx.ps1 ` -WeightsDir C:\path\to\nox\v1.0which writes
model.onnxintonox-color-ai-models/1.0.0/andnox-gray-ai-models/1.0.0/.starrem2k13: download the trained TensorFlow checkpoint from the project’s GitHub releases, then run
scripts\convert-starrem2k13-onnx.ps1 -WeightsDir <path>; the output lands inwwwroot/graxpert/models/starrem2k13-ai-models/1.0.0/.StarNet++: not bundled (the weights are about 207 MB and non-commercial). Get the StarNet v1 TensorFlow weights and the
DanWBR/starnetcheckout, then runscripts\convert-starnet-onnx.ps1 -Docker, which dropsmodel.onnxintowwwroot/graxpert/models/starnet-ai-models/1.0.0/.
After converting, restart Polaris or POST /api/onnx/rescan; the Remove stars button appears in the FILES toolbar once a star-removal family shows up in the model manifest. Each converter has a companion document under scripts/ with details and no-Docker alternatives.
24.3 Removing the stars
- Open FILES (Chapter 19) and select exactly one image, a stretched or linear master (linear meaning straight off the stack, not yet brightened) in FITS or XISF format, the standard astronomy format and PixInsight’s native one respectively.
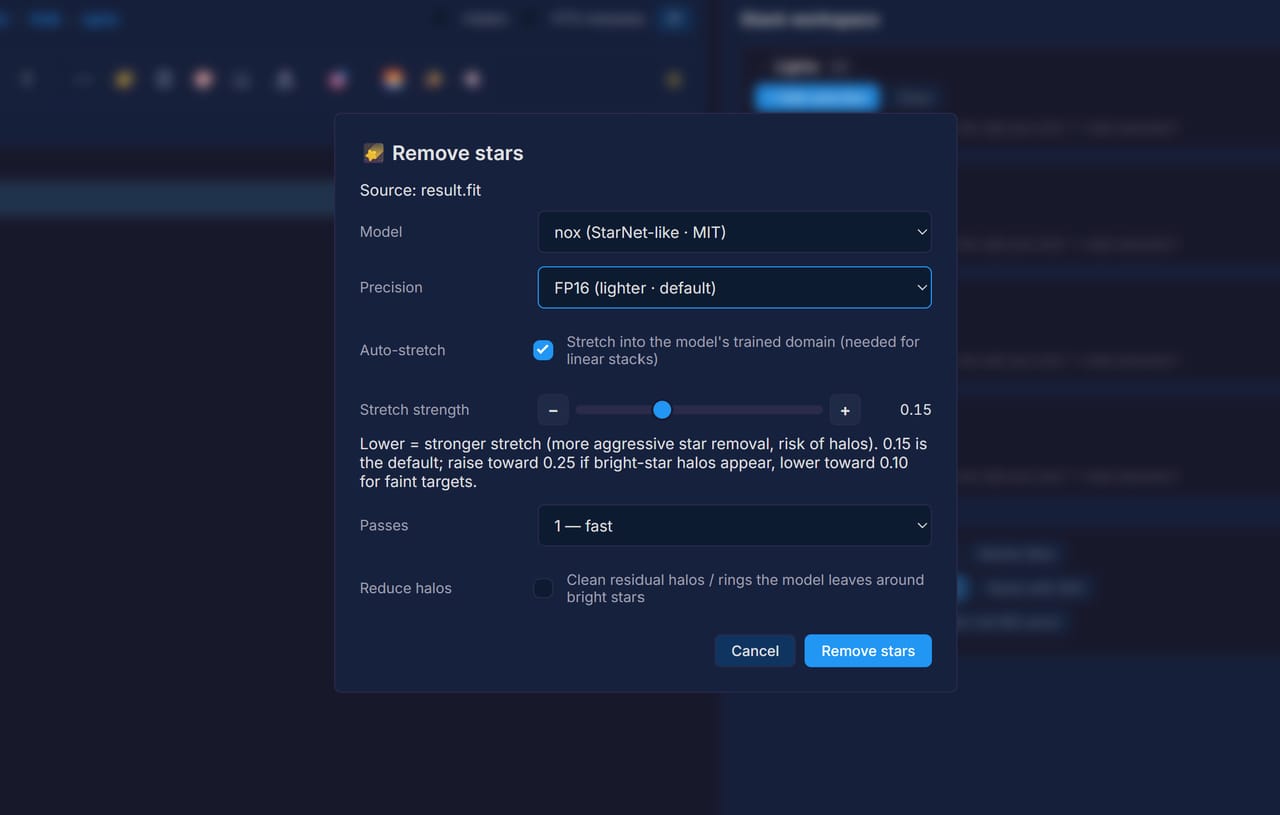
- Click Remove stars and tune the dialog:
- Model: shown only when more than one model is installed.
- Precision: FP16 (lighter, the default) or FP32.
- Auto-stretch and Stretch strength: stretches linear data into the brightness range the model was trained on; leave it on for linear stacks. Lower strength means a stronger stretch (more aggressive removal, more halo risk); 0.15 is the default, raise toward 0.25 if bright-star halos appear, lower toward 0.10 for faint targets.
- Passes: a second pass re-runs the starless result through the network to clean bright-star halos, at about twice the cost.
- Reduce halos with its Halo strength control: a post-process that removes the residual halos and dark rings the network leaves around bright stars (next section).
- A progress overlay tracks the tiled inference (the image is processed as a grid of 256-pixel squares). On a WebGPU-capable browser this takes seconds; on the plain CPU fallback it can take up to a minute for a large master.
- Two siblings are written next to the source,
{name}_starless.fitsand{name}_stars.fits, and the before/after comparator opens with the original on the left and the starless result on the right (drag the divider to compare).
The stars-only image is derived automatically as clamp(original - starless, 0), that is, whatever the network removed and nothing else, so no separate star-mask step is needed and a Screen recombination can reconstruct the original exactly.
Both colour and mono images work: RGB goes through the network with all three channels together, while mono data is fed to all three input channels and averaged back. To run the inference on the graphics card, tick Use GPU in the AI settings and access Polaris over https (or localhost); Chrome blocks WebGPU on plain-HTTP network addresses. HTTPS setup is covered in Chapter 27.
24.4 Halo reduction
StarNet-family networks remove the star core but tend to leave a soft, wide halo, and sometimes a dark ring, around the brightest stars in the starless image. The optional Reduce halos step cleans these up after the network runs, entirely in the browser:
- It builds a star mask from the removed light (
original - starless) and widens it to cover the halo radius around each star. - Inside that mask it replaces the starless pixels with a smooth background estimate, the average of the surrounding pixels that lie outside the star regions, so the halo or ring is filled with plausible sky.
- The mask edge is feathered so there is no visible seam.
Halo strength raises the coverage radius and the fill window: higher removes larger halos but can soften faint nebulosity that sits directly under a bright star. For a target that is mostly nebula with few bright stars, use a lower strength or turn the step off; for star-dense fields with obvious halos, raise it. The cleanup runs on a downscaled copy (halos are large, smooth features, so no detail is lost), which keeps it fast and memory-safe even on large masters and small boards, and the removed halo light is folded back into the _stars layer so the recombination still adds up to the original.
24.5 Recombining with Image Blend
Image Blend puts the two halves back together: two same-size images, an independent non-linear stretch on each, a blend mode, and an opacity slider, with a live preview throughout. It mirrors PixInsight’s ImageBlend script, and although it exists for the starless workflow it works for any two matching images, for example screening a hydrogen-alpha layer (the deep red emission of hydrogen nebulae) onto a colour-camera RGB image.
It opens two ways:
- From star removal: after Remove stars finishes, the modal opens automatically with the starless image as the base and the stars as the blend.
- Manually: in FILES, select exactly two files, the base first and the blend second, then click Image Blend.
The server loads both images into a short-lived session (evicted after 30 minutes idle) and renders a downscaled JPEG preview as you drag the sliders.
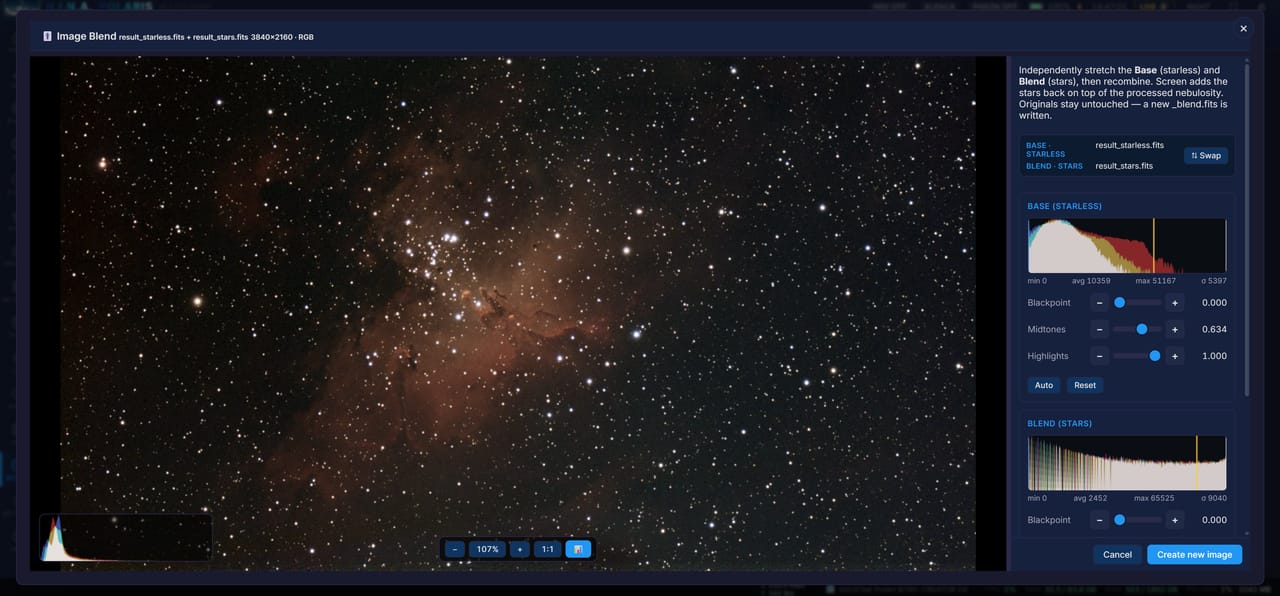
result_starless.fits with result_stars.fits: each layer gets its own histogram and blackpoint, midtones, and highlights sliders, with Swap, Auto, and Reset controls and Create new image to render the result.
Each of the two panels, Base and Blend, carries:
- Blackpoint / Midtones / Highlights: a midtones transfer function stretch4, identical to the EDITOR’s manual stretch. Lower the midtones to lift faint signal; raise the blackpoint to clip the background.
- Auto: a sensible non-linear starting point; the base gets a stronger shadow lift than the stars layer.
- Reset: back to linear (0 / 0.5 / 1).
And two global controls:
- Mode:
Screen(the default, computed per pixel as1 - (1 - a) * (1 - b)),Add, orLighten(the per-pixel maximum). Screen is the right choice for adding stars back: it brightens without clipping the nebula. - Opacity: mixes the blended result against the base,
base * (1 - op) + blended * op. Lower it to make the stars subtler.
In practice the stars layer wants a gentler midtone lift than the starless layer; that difference is the whole point of the split.
Create new image renders the recombination at full resolution in floating point (rounded to 16-bit only when written) and saves a _blend.fits sibling that carries the base image’s metadata and sky coordinates5 plus the blend parameters as FITS keywords. The FILES list refreshes onto the result.
Two constraints to know: both images must have the same width, height, and channel count (the loader rejects mismatches; RGB is processed one colour plane at a time), and the preview uses a fast 8-bit path while the final render uses the full-precision stretch, so the written file is cleaner than the preview suggests.
24.6 Licensing
The three models carry different terms, and Polaris ships the notice beside each installed model as {family}-ai-models/1.0.0/LICENSE.txt:
- nox: MIT, code and trained weights, copyright 2023 Christopher Harvey (Harvey 2023); the architecture derives from StarNet ideas by Nikita Misiura, used under MIT.
- starrem2k13: MIT, code and trained weights, copyright code2k13 (Ashish Patel) (Patel, n.d.). MIT permits commercial and non-commercial use with attribution.
- StarNet++: the code is MIT, but the pre-trained weights (and the converted ONNX model, which embeds them) are CC BY-NC-SA 4.0, copyright Nikita Misiura (Misiura, n.d.): non-commercial use only, with attribution.
A parameter is one learned number inside a neural network; the count is a rough measure of the model’s size and capacity.↩︎
Polaris uses the model from the project’s pinned commit
0398ce05, not the repository main branch’s tiny U2NETP, which removes stars poorly.↩︎To regenerate FP16 from a converted FP32 model:
scripts/quantize_onnx_models.py --fp16 --only <family>, which writes a{version}-fp16sibling; add--replaceto overwrite in place.↩︎The midtones transfer function (MTF) is the standard three-handle stretch of astro processing: the blackpoint clips the background, the midtones handle lifts or darkens everything in between, and the highlights handle sets the top end.↩︎
The WCS, world coordinate system, headers: the FITS keywords that record which patch of sky the pixels cover.↩︎