16 The Multi-Target Night Planner
The PLAN tab, in the sidebar right after AUTORUN, is Polaris’s whole-night planner, in the style of ZWO’s ASIAIR (a popular all-in-one imaging controller). Where AUTORUN runs one shooting schedule against whatever the scope is currently pointed at (Chapter 14), PLAN lets you queue several targets in advance, each with its own frame list, and runs them in order. Between targets it slews and plate-solve-centers automatically: it takes a short exposure, matches the stars against a catalog to see exactly where the scope points, and nudges until the target is centered. Along the way it can handle guiding (a second camera watching a star so tracking errors are corrected continuously), cooling, auto-focus, and the meridian flip (the pier-side swap German equatorial mounts need when a target crosses the north-south line overhead). When the night is done, it runs your end-of-session actions.
Under the hood a plan “compiles” to an Advanced Sequencer document and runs on the same engine as the ADV tab (Chapter 15), so only one of the two can run at a time. PLAN refuses to start while a sequence is already running, and vice versa, with a clear message in both directions.
16.1 The plan library
Plans live in a global library in your user profile, not inside a rig, so a saved plan is runnable with any active rig. A picker row at the top lets you choose a saved plan or use New, Duplicate, and Delete. Export and Import share a plan as a JSON file (a plain-text data file) so you can load it back on another host.
16.2 Plan settings
Open the plan-settings sheet with the hexagon button to configure the whole night:
| Setting | What it does |
|---|---|
| Start | Begin now or at a clock time; the runner waits, then starts. |
| End | Stop when all frames are done, at astronomical dawn (when the sun climbs to 18° below the horizon and the sky first begins to brighten), or at a set time. |
| Auto guiding | Start the active guider (Polaris’s built-in one, or PHD2, the free autoguiding program most amateur astrophotographers use) before the first target and stop it at the end. |
| Auto cooling | Cool the camera to a target temperature at the start and warm it at the end. |
| Auto meridian flip | Flip across the meridian automatically, pausing and resuming the active guider around the flip. |
| Auto-focus | Run auto-focus at the start and/or per target. |
Meridian flip tuning
When auto meridian flip is on, the PLAN panel exposes the flip parameters directly, so there is no need to visit the AUTORUN or ADV trigger configuration:
- Minutes after meridian: how long past the meridian to wait before flipping.
- Recenter after flip: plate-solve-center on the target again after the flip so framing is preserved.
- Auto-focus after flip: run an auto-focus once the flip completes.
The flip pauses and resumes whichever guider backend is active, native or PHD2, not just PHD2 (Chapter 12). View plan shows where the flips will fall before you commit to an order (see Section 16.5).
16.3 Targets
Each plan holds an ordered list of targets, and for every target you can:
- Enable or disable it without removing it from the plan.
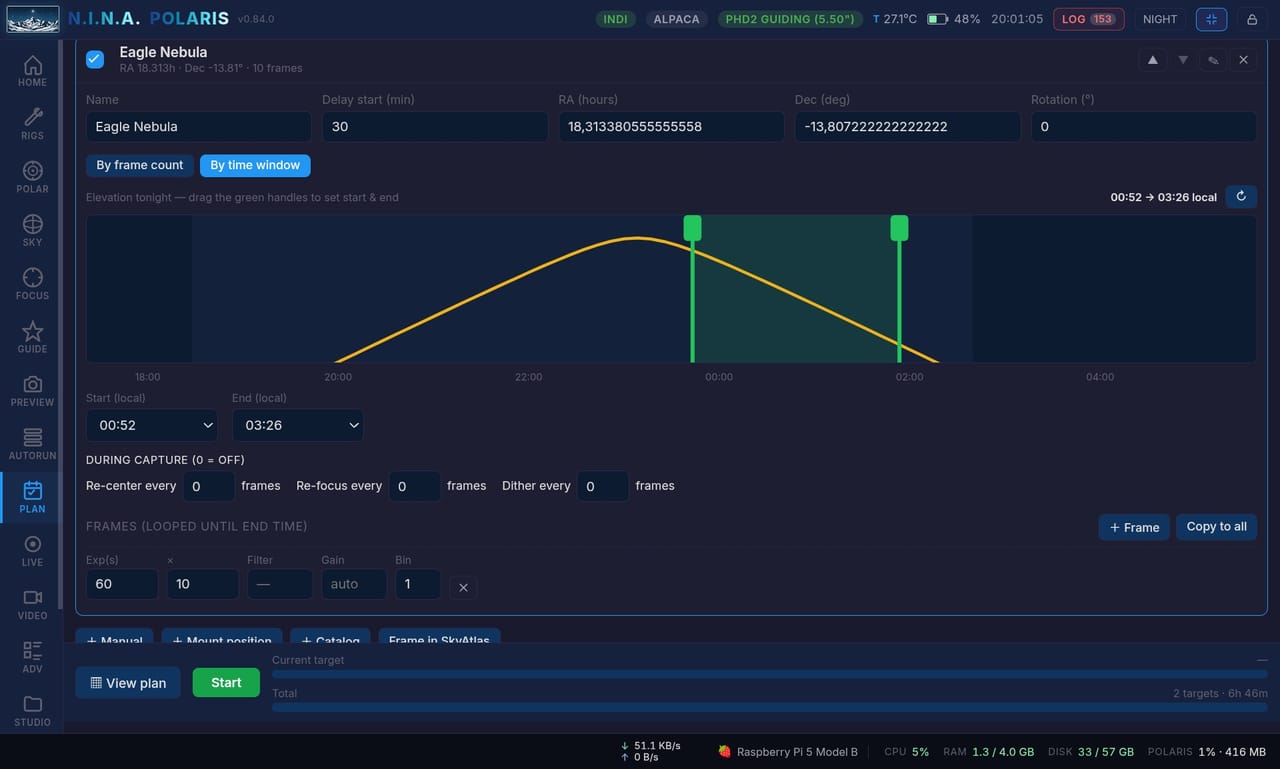
- Set its Name, RA/DEC (right ascension and declination, the sky’s equivalent of longitude and latitude), rotation, and a delay start (min) that holds the target until it clears an obstruction.
- Edit its per-target frame list: exposure and count per filter, gain, and binning (combining adjacent pixels into one larger, more sensitive pixel), edited like the AUTORUN frame rows. A “copy frames to all targets” action saves repetitive setup.
- Set per-target re-center, re-focus, and dither every N frames to keep framing, focus, and dithering maintained within a long target run. A dither nudges the mount slightly between frames so hot pixels and other fixed-pattern noise land on different sky pixels each time.
- Reorder or delete it within the list.
Adding a target
There are four ways to add a target:
- Catalog search: find a DSO (deep-sky object: a galaxy, nebula, or star cluster) by name or catalog designation from the bundled database.
- Manual RA/DEC: type coordinates directly.
- Use current mount position: capture wherever the scope points right now.
- Frame in the Sky map: switch to the SKY tab (Chapter 10), frame the target with the FOV (field of view) overlay and rotation, then Add to plan captures the center RA/DEC and the rotation.
16.4 End-of-session actions
When the plan finishes, or reaches its end condition, Polaris can warm the camera and turn the cooler off, park or home the mount, send the focuser to zero, and shut down the host. The shutdown action is gated behind an explicit confirmation, because the device powers off completely and must be turned back on physically.
16.5 Running a plan
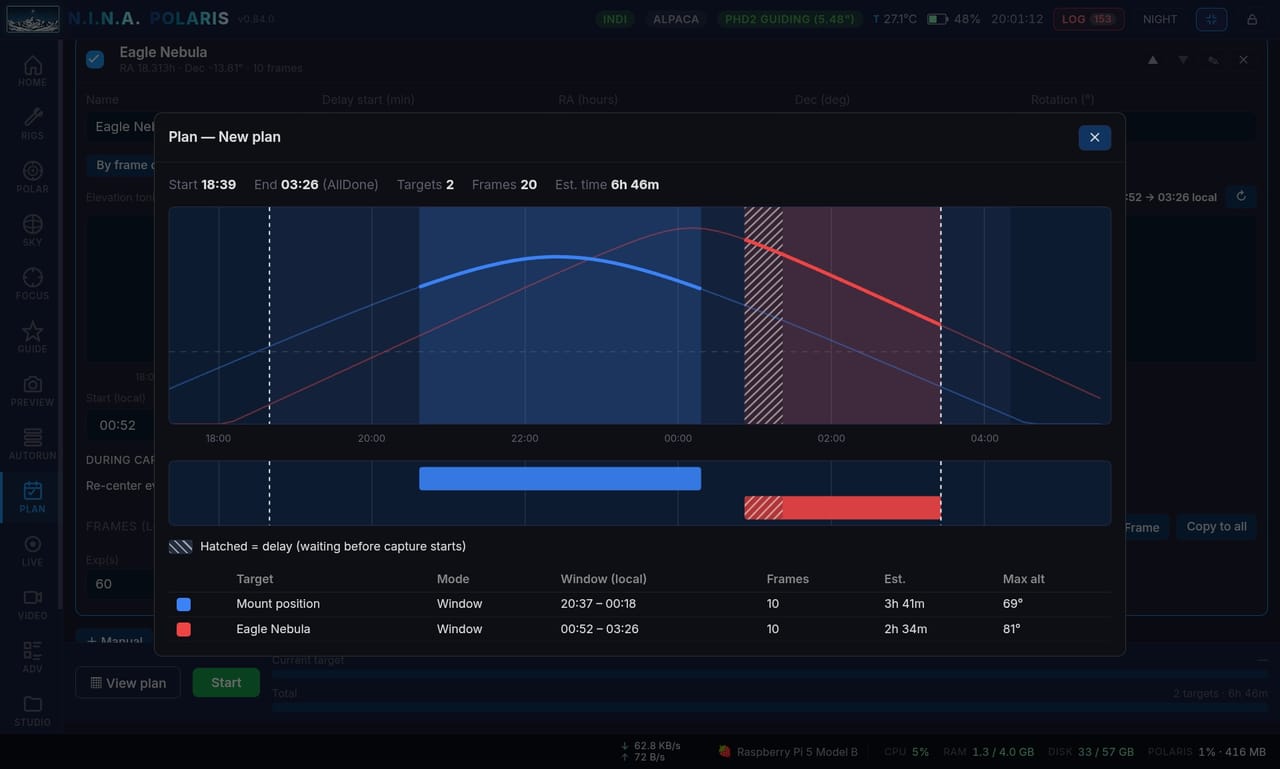
Before you start, View plan draws a whole-night timeline graph with elevation curves per target and per-target delays marked, so you can sanity-check the order. It also marks, in amber, every meridian crossing that falls inside a target’s window: on the elevation chart, on the Gantt row, in a legend listing each target’s flip times, and in a Flip column in the summary table. The times come from the sidereal clock at your longitude, so they are the real crossings for your site rather than a rule of thumb.
Seeing them laid out is what tells you whether the night’s order is sensible: a target that flips eleven minutes after it starts is a different proposition from one that flips at the end, and moving it later may be free. If auto meridian flip is off, the view says so with a warning, because those markers are then a list of the moments somebody has to be awake for. The Polaris Shutter provides Start and Stop in the run bar, pinned to the bottom of the panel, alongside current-target and total progress bars and the target’s elevation during capture. The plan status (waiting for start, running, and the current target) is mirrored on the HOME dashboard and in the top status bar, so you can watch the night from any tab.
16.6 Notes and current limits
PLAN and ADV share one engine; starting one blocks the other, with a clear message. Targets are single-frame in this version: mosaic targets and rotator-driven auto-rotation are planned for a later pass, so today the Rotation field is record-keeping unless you add a rotator move to the flow yourself.