20 STUDIO: Calibration and Stacking
STUDIO is Polaris’s post-processing hub, the place where a folder of raw frames becomes a clean, integrated master image without leaving the browser. Its Stack workspace handles the batch work: building master calibration frames, calibrating lights, aligning and stacking, converting color-camera data to color (debayering), and combining channels; the toolbox and Auto Workflow add gradient removal, noise reduction, sharpening, and repeatable pipelines. For most images this replaces a separate desktop workflow in PixInsight (Pleiades Astrophoto, n.d.) (a commercial astro-processing suite) or Siril (The Siril Team, n.d.) (its popular free counterpart); for the cases where you do want Siril’s own preprocessing, STUDIO can hand the frames to it directly, covered at the end of this chapter.
This chapter covers the batch side. The file browser that shares the tab is described in Chapter 19, channel combination in detail in Chapter 21, color calibration in Chapter 22, the AI cleanup tools in Chapter 23, and the single-frame Edit workspace in Chapter 25.
20.1 The frame library
STUDIO’s view of your data is backed by the frame library: an index of every FITS and XISF file under the Studio root ({ImageOutputDir}, Chapter 19), kept in a SQLite database (Hipp et al., n.d.) (a small database engine that stores everything in one file). The library records each frame’s type, filter, target, and exposure from its FITS header, so you can filter the view by:
- Type: Light, Dark, Bias, Flat, or Master
- Filter: R, G, B, L, Ha, OIII, and so on
- Target
- Date range
A grid view shows thumbnails (256 pixels, cached under {AppData}/Polaris/studio/thumbs/ on the host), and clicking a frame opens the single-frame viewer described next. The Rescan button picks up new files added by the sequence engine or copied in through the file browser.
20.2 Sessions: the night log
The frame library knows more about each file than a folder listing can show, and the Sessions sub-tab turns that into the observing log most people otherwise keep by hand, or never keep at all.
Frames are grouped by local night, so everything from one session lands together no matter which side of midnight it was taken. Open a night and you get what was actually shot: per-target and per-filter frame counts and integration time, the camera, telescope and focal length, and the ranges the night moved through, sensor temperature, focus position and temperature, ambient temperature and humidity, guide RMS and peak, pier side, sky brightness. The equipment fields come from the FITS headers Polaris writes, which is why they are trustworthy: they describe the frames, not your memory of them.
Each night also matches the calibration it would need: darks by camera, gain, offset, binning, exposure and temperature; bias the same way; flats by filter, taking the nearest night. So the log answers “can I calibrate this?” as well as “what did I get?”. Master frames are excluded from the counts, since they are products rather than captures.
What the headers cannot record, you add: a short notes form per night takes seeing, transparency and free text, stored on the host with the profile. Copy as Markdown puts the whole night on the clipboard for a forum post or an observing journal.
If the list looks thin on an older install, the index predates some of these fields; rescan rebuilds it from the files on disk.
20.3 The single-frame viewer
The viewer opens on any frame with deep zoom and pan (OpenSeadragon (OpenSeadragon contributors, n.d.)) and a set of side panels:
- Stretch sliders: black point, mid-tone, and white point. A stretch is the non-linear brightening that makes a linear astro image visible on screen; the sliders re-render live.
- Auto Stretch: defaults computed with the midtones transfer function (MTF), the standard auto-stretch formula used across astro software.
- Histogram: a 256-bin overlay of the pixel distribution.
- Stats: mean, median, MAD1, standard deviation, star count, and HFR (half-flux radius, a per-star size measure; smaller is sharper).
- Star annotations: a toggle that circles the detected stars.
- Export: JPG, PNG, or 16-bit TIFF, landing in
{ImageOutputDir}/{Rig}/processed/{Target}/.
20.4 The Stack workspace and its slots
The right-hand Stack workspace is organized around four slot cards: Lights, Darks, Flats, and Biases. Each card shows a count and the filenames already added, with an “x” next to each entry to remove it and a Clear button to empty the slot. Filling a slot is a browser gesture:
- Navigate the file browser to a folder of lights.
- Multi-select the frames you want (Ctrl-click, Shift-click).
- Click + Add to Lights on the Lights slot card.
- The selected paths are added (duplicates are dropped) and the browser selection clears.
- Repeat for darks, flats, and biases from their folders.
Slots survive a page refresh and even a server restart,2 so a stacking session can span evenings. Clear all slots resets everything when you start a new project.
The Stack pipeline operates on file paths, not on frame-library entries: files do not need to be indexed before you can stack them. Pick them in the browser and the actions just work.
Below the slots, the action buttons each consume specific slots:
| Button | Consumes | What it does |
|---|---|---|
| Master Dark | Darks | Sigma-clipped mean of the darks, one master per (exposure, gain) group |
| Master Flat | Flats | Sigma-clipped mean of the flats, one master per (filter, gain) group |
| Master Bias | Biases | Sigma-clipped mean of the biases, one master per gain group |
| Calibrate | Lights plus the nearest masters | Subtracts the dark, divides by the flat, optionally subtracts the bias |
| Integrate | Lights (typically calibrated) | Aligns and stacks |
| Combine | Lights grouped by filter | RGB or LRGB channel combination (Chapter 21) |
| Color Calibrate | First light in the slot | Background neutralization and beyond (Chapter 22) |
| Siril | Lights plus optional darks and flats | Delegates the whole job to a Siril script, if installed |
Every action runs as a background job on the host. Progress appears below the toolbar (“Master in progress… 3/10 darks processed”), and completion raises a toast with the output path; click it to jump to the file in the browser.
20.5 Building master frames
A master is the average of many calibration frames of one kind: many darks become one master dark with far less random noise, and likewise for flats and biases (Appendix B). Select the frames (or fill the slot) and run the master action. Polaris auto-detects the frame type from the FITS IMAGETYP header, and offers three integration methods:
- Median: robust against outliers, slightly noisier.
- Mean: lowest noise, but a single cosmic-ray hit survives.
- Sigma-clipped mean (the default): computes the mean after discarding pixels more than 3 sigma from it (more than three times the measured spread), over 2 iterations. The practical best of both.
A progress bar ticks per frame. Output lands at calibration/masters/master_{type}_{key}.fits, where the key encodes the group (exposure and gain for darks, filter and gain for flats, gain for biases), with NSUBS (frame count) and INTMETH (method) recorded in the FITS header. The master is indexed in the frame library automatically, which is what makes the auto-matching below possible.
20.6 Calibrating lights
Calibration removes the sensor’s signature from each light frame: the dark current, the vignetting and dust shadows mapped by the flat, and the readout offset recorded by the bias. Select the lights (or fill the Lights slot) and press Calibrate. Polaris picks the matching master dark, master flat, and master bias by exposure, gain, and filter; the auto-match can be overridden with per-master dropdowns, and you can also force specific masters by adding them to the master slots. The per-pixel arithmetic is:
(light - dark - bias) / (flat - flatDark) * mean(flat - flatDark)where flatDark is a dark matched to the flat’s exposure. The division flattens vignetting; the final multiplication restores the original brightness scale. Output goes to calibrated/{Target}/{Filter}/cal_{originalName}.fits, and the frames appear in the library with a “calibrated” badge.
20.7 Integration
Integration (stacking) aligns the calibrated lights and combines them into one deep master. Select them and press Integrate:
- Alignment: the star detector and star matcher (the same engine live stacking uses, Chapter 17) compute a per-frame affine transform (a shift-rotate-scale mapping) relative to a reference frame, chosen as the frame with the best HFR.
- Integration method: Average, Median, Sigma-clipped average, or Winsorized (instead of discarding outlier pixels, they are clamped to the threshold, which preserves a little more signal).
- Normalization: None, Scale to mean, or Multiplicative; normalization rescales each frame so sky-brightness differences between frames do not skew the combination.
- Outlier rejection: cosmetic correction (removal of isolated hot and cold pixels) plus sigma rejection of per-pixel outliers, which is what removes satellite trails and cosmic rays.
- Weighting: optionally weight each frame by its HFR, so sharper frames count for more.
Output: integrated/{Target}/{Filter}/master_{Target}_{Filter}_{N}x{Exp}s.fits, with NCOMBINE, EXPTOTAL, INTMETH, and REJECT headers recording the recipe.
Drizzle
After you pick the integration method, Integrate asks for a drizzle scale and shows a recommendation computed from your data. Drizzle is the variable-pixel linear reconstruction technique of Fruchter and Hook (Fruchter and Hook 2002): each input pixel is forward-projected as a shrunken “drop” onto a finer output grid, and with sub-pixel dithered subs (frames deliberately offset by fractions of a pixel between exposures, Chapter 14) it recovers resolution lost to undersampling, the situation where your pixels are too large for the detail the optics deliver.
- 1x: native size, the standard resample-and-combine with sigma-clip rejection. Right for well-sampled or over-sampled data.
- 2x / 3x: drizzle onto a grid two or three times finer.
The recommendation samples a few frames’ star FWHM in pixels (FWHM, full width at half maximum, is another star-size measure): under about 2 px the data is undersampled and 2x is suggested, with a note if you have few subs; at about 2.6 px and above it is well sampled and 1x is suggested, since drizzling well-sampled data just amplifies noise and enlarges the file. The algorithm is the same one Siril and PixInsight implement; those tools differ only in their default scale (Siril defaults to 1x, PixInsight to 2x), and here you choose with the recommendation in front of you.
Three practical constraints:
- Drizzle needs dithered subs; sub-pixel diversity is the whole point. An un-dithered set at 2x or 3x leaves coverage holes and grid patterns. The output header records
DRZEMPTY, the percent of output pixels no drop reached, as a coverage sanity check. - Drizzle keeps its accumulation buffer in RAM: a 2x integration has about 4 times the output pixels, 3x about 9 times. A pre-flight RAM guard refuses up front if it will not fit; on a small single-board computer prefer 1x or 2x.
- Drizzle mode combines as a weighted mean with no per-pixel sigma rejection, so for strong cosmic-ray or satellite-trail rejection use 1x.
Drizzled output is named master_light_..._drz{N}x_... with DRIZZLE, DRZSCALE, DRZFRAC, and DRZEMPTY headers.
20.8 Debayer and gradient removal
One-shot-color cameras record a mosaic of single-color pixels behind a Bayer filter pattern; debayering reconstructs the full-color image from it. With a frame open in the viewer, the Debayer button is enabled whenever a Bayer pattern is detected in the header, and either splits the frame into R, G, and B planes or returns a single RGB output. White balance uses Gray World (an automatic method that assumes the scene averages to neutral) by default, or your own per-channel multipliers.
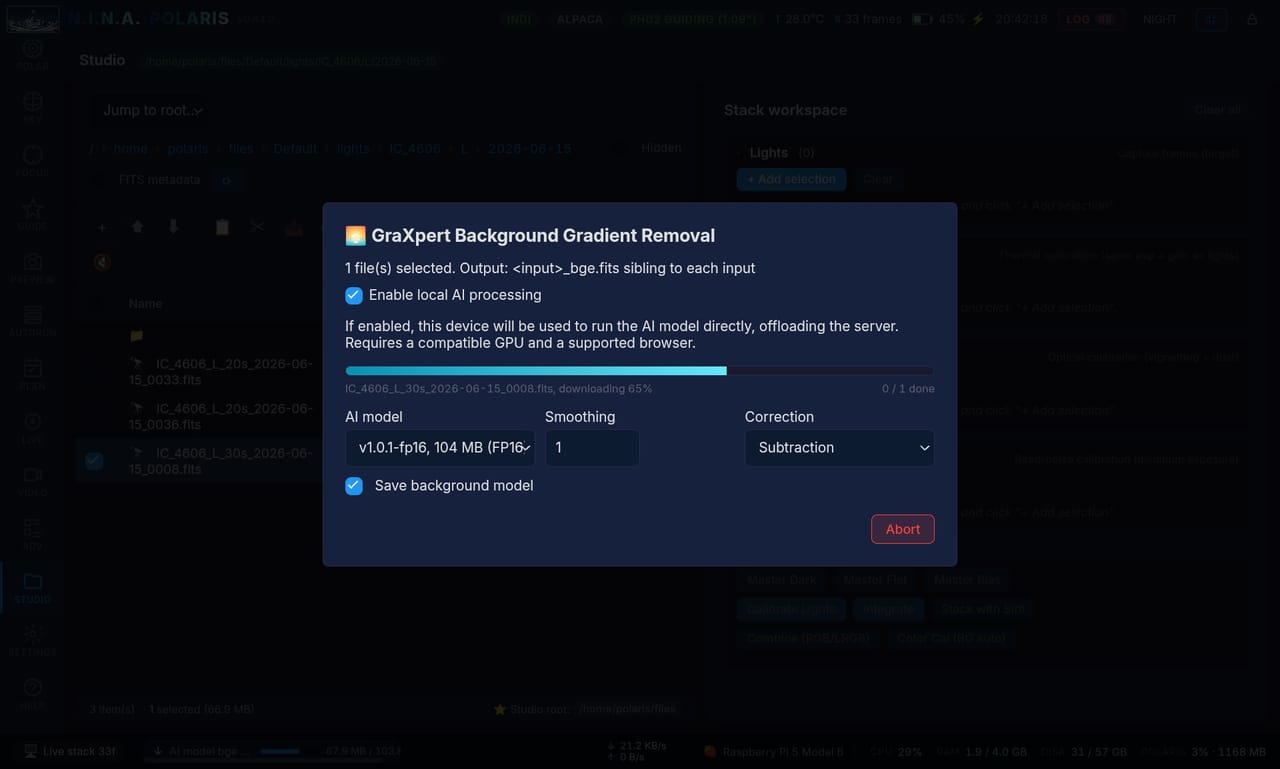
Remove gradient invokes GraXpert (The GraXpert Team, n.d.) (a free AI tool for removing sky-glow gradients), when installed, for background extraction; the output is a sibling file ending in _bge.fits. The full AI pipeline, including the in-browser version shown in Figure 20.1, is covered in Chapter 23.
20.9 Removing dust motes
A dust mote is the soft, roughly circular shadow a speck of dust on the sensor, filter, or camera window casts on the sky: a faint dark disc that no amount of stretching removes. The proper cure is flat frames (Chapter 14), which your processing divides the lights by to even out both vignetting and mote shadows. GraXpert’s background extraction, above, flattens the broad sky glow but leaves dust motes alone, because a mote is a small local feature, not a smooth gradient. When you have no flats for a night, the Dust motes button on the file toolbar removes them by estimating that missing flat from the sky around each mote.
The trick is that a mote does not add darkness, it multiplies: the dust lets only a fraction of the light through, so the fix is to divide it back out rather than paint over the hole. The tool builds a local “synthetic flat” (a correction map standing in for a real flat frame): it finds each mote automatically, measures the sky level in a ring just outside it, and scales the mote back up to match, fading the correction smoothly to nothing at the edge so no ring is left behind. A star that happens to sit on a mote is lifted back to its true brightness, not erased, because the frame is divided, not inpainted.
To use it, select one FITS in the file browser and click Dust motes. A live preview shows the corrected frame with every detected mote circled in blue and a running count (“2 motes found”). Four sliders tune the result:
- Sensitivity: how deep a shadow has to be to count as a mote. Raise it to catch fainter motes; lower it if it starts circling patches of sky that are not motes.
- Min size and Feather: the smallest mote radius kept, and how softly the correction fades at its edge, both as a percent of the frame’s long side.
- Strength: how much of the correction to apply, from 0 to 200 percent. 100 percent aims to match the surrounding sky exactly; go higher for a mote that is still visibly dark, or lower to ease off an over-correction.
Press and hold Hold: original to flip back to the untouched frame at the same stretch, so the change is judged against what you started with. Apply writes a sibling file ending in _dustfix.fits, with the original headers preserved and the settings recorded in DUST* keywords, and opens the before/after comparator.
Two honest limits. Like the rest of STUDIO, the tool works on a 16-bit copy, and it matches the corrected sky to its surroundings, which is right for a pleasing final image but not for photometry (measuring a star’s brightness precisely), where real flats remain the only correct answer. And because motes are found by a brightness threshold, glance at the circles and nudge Sensitivity until only genuine motes are marked before you Apply.
The same correction is also a step in Auto Workflow (below), so once a sensitivity that suits your optics is dialed in, a whole night’s worth of frames can have their motes removed in a batch.
20.10 Color and channels
Two Stack actions get their own chapters and are only summarized here:
- Combine merges per-filter mono masters into RGB or LRGB composites, applies narrowband palettes such as SHO and HOO, can subtract continuum, and evaluates free-form PixelMath expressions. See Chapter 21.
- Color Calibrate and SPCC neutralize the background and fit per-channel gains, up to full photometric calibration against a star catalog. See Chapter 22.
20.11 The post-processing toolbox
Within the viewer, a small pipeline of optional steps can be stacked and reordered by drag and drop:
- Noise reduction: Gaussian blur with a configurable radius.
- Sharpening: unsharp mask (sharpening by subtracting a blurred copy), with amount and radius.
- Saturation: a color-intensity boost applied in HSV space (the hue-saturation-value representation of color).
Apply re-renders the preview; Save processed exports the result. For anything beyond these basics, use Auto Workflow below or the EDITOR (Chapter 25).
20.12 Auto Workflow
The third STUDIO sub-tab is Auto Workflow: a saveable, linear post-processing pipeline applied to a source image and re-runnable as a batch over many files. You build it like the Advanced Sequencer (Chapter 15): pick steps from the palette on the left, they append to the sequence in the middle, and selecting a step edits its parameters on the right. Each step’s output feeds the next, a per-step preview shows the intermediate result, and intermediates are deleted by default (toggle keep intermediates to keep them).
To get started fast:
- A built-in Standard workflow is seeded on first run: auto-crop, background extraction, deconvolution, denoise, auto-stretch, the Lightroom-style light, color, and detail adjustments, and JPG export at quality 90. Load it from the Load list and tweak; delete it and it stays deleted.
- Three combine presets are also seeded: Mono LRGB, Mono SHO, and OSC dual-band SHO. Each opens with a combine source-stage (below) followed by the same color post pipeline.
- The Recommended preset button builds a safe default: auto-crop, background extraction, denoise, detail, auto-stretch, contrast, saturation, export.
- Auto all enables the “auto” option on every step that has one.
The combine source-stage
At the top of the builder, the Combine source dropdown lets a workflow produce its own source image by composing several per-filter masters instead of taking a file from the Sources list:
- Mono LRGB: assign R, G, B, and L masters; composed via Lab luminance (Chapter 21 explains the method).
- Mono SHO: assign Ha, OIII, and SII masters; composed as the SHO palette.
- OSC dual-band SHO: assign two debayered RGB masters shot through dual-band filters (Ha+OIII and SII+OIII). Ha and SII are extracted from the red channel, OIII from green plus blue (both masters’ OIII are averaged for signal-to-noise), the two are star-registered, and the result is packed as SHO.
Assign each role with Set, which uses the FITS currently selected in the file browser. While a combine mode is active the plain Sources list is hidden: the composed image becomes the single source the pipeline runs on. The combine runs once at the start, not per file, reusing the same cross-channel star registration as the manual Combine tool. The combine choice and role map are saved inside the workflow, so a saved LRGB or SHO workflow reloads ready to go, with the roles cleared for you to reassign.
The step palette
Classical tools (server-side, FITS in, FITS out):
- Auto Crop: detects the largest fully-covered inner rectangle and removes the black, ragged registration borders stacking leaves behind. No region to draw.
- Crop: manual rectangular crop, in fractions of the frame.
- SCNR: removes the residual green cast common in combined images (average-neutral or maximum-neutral, with masked variants). Ported from Siril (The Siril Team, n.d.).
- Stretch (GHS / asinh): the Generalized Hyperbolic and arc-sinh non-linear stretches; “auto” picks the amount from the image median. Ported from Siril.
- Cosmetic (hot/cold pixels): sigma-based removal of hot and cold pixels, with a CFA option for undebayered color data. Ported from Siril.
- Star Reduction: shrinks and dims stars using a detected-star mask and grayscale erosion (a morphological shrinking operation), with core protection.
- Wavelet Sharpen: a multiscale detail boost using the à-trous wavelet decomposition (Starck et al. 2007) (which separates the image into detail layers by scale), with optional denoise, applied on luminance so color is preserved.
- Multiscale HDR (recover cores): compresses the large-scale luminance so blown-out galaxy, nebula, and star cores come down toward the background while fine detail is kept.
- CLAHE (local contrast): contrast-limited adaptive histogram equalization (Zuiderveld 1994), a local-contrast booster. Best placed after the stretch.
- Highlight Recovery: soft-knee compression of blown highlights above a knee point.
- Dust Mote Removal: divides out dust-mote shadows with a local synthetic flat estimated from the surrounding sky, the same tool described in Section 20.9, here as a batchable step.
AI tools (run in the browser, and need the models installed; Chapter 23): Background Extraction, Denoise, Detail/Sharpen, Halo Removal, Upscale, and Star Removal (Chapter 24).
Deconvolution and stars: Richardson-Lucy deconvolution (Richardson 1972; Lucy 1974) (an iterative method that reverses a known blur), and Blend Stars Back, which needs a prior Star Removal step.
Editor adjustments: every Lightroom-style slider (exposure, contrast, black and white points, temperature, tint, vibrance, saturation, texture, clarity, dehaze, noise reduction, sharpen, vignette) is available as a step; all enabled adjustments are collected into one editor pass at the final Export bitmap step (PNG, JPG, or TIF).
Save, load, and batch
Name and Save the workflow, add multiple source files from the file-browser selection with + Add selected, and Run to apply the same pipeline to every source. From the EDITOR you can also press → Workflow to turn your current slider settings into a new workflow to name, save, and batch-apply (Chapter 25).
A licensing note: the classical filters (SCNR, GHS and asinh stretches, cosmetic correction, star reduction) and the multiscale and tonal operations (wavelets, HDR, CLAHE, highlight recovery) are re-implemented from scratch from published algorithms and the Siril sources’ documented behavior; no third-party code is bundled. The wavelet and narrowband tools take their inspiration from Seti Astro Suite Pro (Marek, n.d.).
20.13 Stacking with Siril
Siril (The Siril Team, n.d.) is a free, dedicated astronomical stacking and processing program, and Polaris treats it as its preferred external preprocessing engine. When it is installed on the host, STUDIO shows a Stack with Siril button that runs a Siril script (a .ssf file, Siril’s scripted recipe format) against the frames you selected, entirely on the host.
Installing Siril on the host
On Linux, use the distribution package:
# Debian / Ubuntu
sudo apt install siril

# Fedora / RHEL
sudo dnf install siril

# Arch
sudo pacman -S siril
If the distribution package is too old, install the Flatpak from Flathub instead; Polaris uses command-line features added in Siril 1.0. On Windows, download the installer from https://siril.org/download/; the standard install drops siril-cli.exe at C:\Program Files\Siril\bin\siril-cli.exe, which Polaris auto-detects. On macOS:
brew install --cask sirilor drag the .dmg into /Applications; Polaris finds the command-line binary inside the .app bundle automatically.
Verifying detection
- Open Settings → External tools.
- The Siril row should show Detected with the version and binary path.
- If it shows Not detected, click Re-detect. If that still fails, paste the absolute path to
siril-cli(.exeon Windows) into the Path override field; the override always wins over auto-detection.
Detection runs at startup, so a freshly installed Siril may need a Polaris restart or a Re-detect click.
Scripts
Polaris ships nine curated .ssf scripts covering the common preprocessing matrix:
| Camera | Calibration | Script |
|---|---|---|
| OSC (one-shot color / DSLR) | bias + dark + flat | OSC_Preprocessing.ssf |
| OSC | bias + flat (no darks) | OSC_Preprocessing_WithoutDark.ssf |
| OSC | bias + dark (no flats) | OSC_Preprocessing_WithoutFlat.ssf |
| OSC | lights only | OSC_Preprocessing_WithoutDBF.ssf |
| Mono | bias + dark + flat | Mono_Preprocessing.ssf |
| Mono | bias + flat (no darks) | Mono_Preprocessing_WithoutDark.ssf |
| Mono | bias + dark (no flats) | Mono_Preprocessing_WithoutFlat.ssf |
| Mono | lights only | Mono_Preprocessing_WithoutDBF.ssf |
| OSC dual-narrowband | OSC_Extract_HaOIII.ssf |
They are extracted from the Polaris program itself to %LOCALAPPDATA%/NINA.Polaris/siril/scripts-bundled/ on Windows or ~/.local/share/NINA.Polaris/siril/scripts-bundled/ on Linux and macOS on first use, and re-extracted on upgrade.
Your personal scripts in the standard Siril location (%APPDATA%/siril/scripts on Windows, ~/.siril/scripts on Linux and macOS) also appear in the dropdown, marked “(your script)”. If a name collides with a bundled one, your copy wins, which is the easy way to tweak a bundled recipe. You can also point Polaris at an extra scripts folder under Settings → External tools → Siril → Extra scripts folder.
Running a stack
- In STUDIO, select the light frames to stack.
- Click Stack with Siril.
- Pick a script from the dropdown.
- Enter a target name; it is used in the output path.
- Hit Start. Progress streams in real time, and the result lands at
{ImageOutputDir}/{rig}/siril/{target}/result_{timestamp}.fit.
If GraXpert is also installed, the modal offers an Inject GraXpert BGE per-frame before stacking toggle: Polaris runs GraXpert background extraction on each light first (about 10 seconds per frame) and feeds the cleaned _bge versions into the Siril script. Slower, but it produces a much cleaner master under heavy light pollution.
Troubleshooting the Siril hand-off
- “siril-cli exited with code 1”: open the work directory shown in the error toast; Polaris keeps it on failure for debugging. The Siril log in that folder usually names the issue (a missing master, a mismatched filter).
- No
result*.fitappeared: your script probably does not end with asave resultline. The bundled scripts all do; if you wrote your own, addload result_*andsave resultat the end. - Permission denied on the work directory: the account running the Polaris service needs write access to
{ImageOutputDir}/.polaris-tmp/. On Linux, ownership of the parent directory is the usual culprit.
Siril is GPLv3-licensed; Polaris invokes it strictly as an external command-line program and links or redistributes none of its code. The bundled scripts were written from scratch against the Siril command reference and carry Polaris’s own MPL-2.0 license.
20.14 Nightscape Stack
Everything else in this chapter assumes a tracked telescope. The Nightscape Stack sub-tab is for the other kind of astrophoto: a camera on a fixed tripod, the Milky Way over a landscape, where the sky moves between frames and the ground does not.
That is a contradiction no single alignment can resolve, so Polaris stacks the frame twice in one pass. The sky is registered on the stars, using the same star detector and matcher as the deep-sky path, and averaged; the foreground is averaged with no alignment at all, which is what keeps the rocks sharp. Then the two are blended along a horizon line you draw by hand on a preview of your own frame, since no algorithm knows where your skyline is as well as you do.
The result is a 16-bit composite, written as both PNG and FITS: the PNG for the print or the post, the FITS to carry on processing. A coverage check runs on the horizon mask first, so a line drawn badly enough to leave part of the frame unaccounted for is caught before the stack.
The capture side lives in AUTORUN, which gained a Nightscape guidance tab (and the Star trails capture that used to sit under VIDEO), so the sequence that shoots the frames and the workspace that stacks them are one workflow rather than two.
20.15 Handing off to GraXpert
Alongside Siril, STUDIO detects GraXpert (The GraXpert Team, n.d.) and offers a Process with GraXpert menu with three operations: Remove gradient (BGE), Deconvolution (GraXpert 3.0 or newer), and Denoise (also 3.0+). Each opens a modal with that operation’s sliders, and output lands in {rig}/bge/{target}/, {rig}/decon/{target}/, or {rig}/denoise/{target}/. The browser-side equivalents of these models, which need no host install at all, are the subject of Chapter 23. Verify or override the detected tool paths under Settings → External tools.
20.16 Common pitfalls
Rescan misses new files. The frame writer is still flushing to disk; wait a few seconds and retry.
Calibration leaves residual hot pixels. The master dark’s exposure or gain does not match the lights. Widen the auto-match tolerance or pick the master manually.
Integration takes forever. On a Raspberry Pi 4, try smaller batches (around 50 frames). The board’s memory ceiling caps the working set, and very large stacks may swap to disk.