11 Focusing
Sharp stars are the cheapest upgrade in astrophotography, and the FOCUS tab is where Polaris earns them. It combines manual focuser control; a loop-based focus aid that tracks HFR (half-flux radius, a per-star sharpness number: the lower it is, the tighter the star) and analyses Bahtinov masks (patterned covers for the front of the telescope that turn a bright star into focus-revealing spikes, explained below); and a fully automated V-curve routine, so called because star size plotted against focuser position forms a V whose bottom is best focus, with a live frame preview. The tab has two subtabs:
- Manual Assist (the default): a loop that captures a frame every few seconds, plots HFR against time, and optionally runs Bahtinov mask analysis with an overlay drawn on the preview. It works without an electronic focuser, so it covers manual and Crayford rigs (a Crayford is a common friction-driven manual focuser), and it doubles as a fine-tune aid for motorised rigs after a V-curve run.
- Auto V-curve: the classic automated sweep. It requires an electronic focuser and is disabled when none is connected.
Whenever an electronic focuser is connected, the motor stepper for manual position control sits above the subtabs, so you can drive the focuser by hand at any time regardless of which subtab is active.
11.1 Manual stepper
The big stepper at the top of the tab:
[<<] [<] [12345] [>] [>>]The single arrows < and > move one step in or out; the double arrows << and >> jump by Step Size steps in one go. The middle number is the current focuser position; click it to type a direct value. The Step Size slider sets the jump distance for the double arrows, from 1 to 500 steps, persisted per rig.
A red Stop sits at the end of the row, and the same button appears beside the nudge arrows in the PREVIEW and VIDEO panels and in the phone shell’s focus pad, so wherever you can start a move you can stop it. Unlike the arrows it stays enabled while the motor is running, which is the one moment it is worth having, and it also drops a hold-to-repeat nudge that has not committed yet: those buttons accumulate and send one absolute move on release, so stopping the motor without cancelling that would send it straight off again.
An info panel below shows Temperature, the focuser-reported temperature in degrees Celsius when the hardware supports it (this reading drives the LIVE tab’s auto-refocus temperature trigger, see Chapter 17), and a Status: MOVING indicator that flashes while the focuser is in motion. Inputs disable during a move to prevent stacked commands.
11.2 Manual Assist
The Manual Assist subtab runs a client-driven capture loop and streams the result back as live focus telemetry. It serves two audiences. If you have no electronic focuser, you turn the knob by hand and the loop tells you whether HFR is dropping (focus improving) or rising (you overshot). If you do have one, Manual Assist is the fine-tune stage: after a V-curve completes, switch here for a final visual confirmation, or to track focus drift over a long session.
The layout:
┌─ Live preview canvas (last captured frame) ┐  ┌─ Controls ─┐
│ + Bahtinov overlay when enabled            │  │ Exp (s)    │
│                                            │  │ Gain       │
│                                            │  │ Interval s │
│                                            │  │ Min stars  │
│                                            │  │ ▶ Start    │
│                                            │  │ ↻ Snap     │
│                                            │  │ Reset      │
│                                            │  │ HFR / FWHM │
│                                            │  │ Stars      │
│                                            │  │ Laplacian  │
│                                            │  │ Best HFR   │
│                                            │  │ ☐ Bahtinov │
│                                            │  │ Offset px  │
└────────────────────────────────────────────┘  └────────────┘
┌─ HFR trend chart (last 60 samples, ~2 min @ 2s) ────────────┐
│   HFR vs time, with dashed best-HFR baseline                │
└──────────────────────────────────────────────────────────────┘
Parameters
- Exposure (s): the exposure used for every loop tick. Use 2 to 3 s for a dim deep-sky field, 0.5 to 1 s for a bright Bahtinov star.
- Gain: camera gain, the same setting as in the PREVIEW tab (Chapter 13).
- Interval (s): the gap between captures, 1 to 5 s. The default of 2 s leaves enough time to turn the focuser knob and see the result.
- Min stars: the HFR sample is ignored when fewer stars are detected, so a bad frame does not poison the chart or the Best HFR marker. The default of 3 suits typical fields; bump it to 10 or more when doing Bahtinov work on a single star.
Live metrics
After each capture the sidebar updates:
- HFR (px): the median half-flux radius across detected stars. Lower is sharper. It is colour-coded green or red based on the local trend, falling versus rising.
- FWHM (px): full width at half maximum, another common star-size measure; derived here as HFR times 2.355, a Gaussian approximation (a true per-star Gaussian fit is out of scope here).
- Stars: how many stars were detected, a sanity check that exposure and gain are right.
- Laplacian: an edge-contrast sharpness score borrowed from image processing (technically, the variance of the Laplacian over the centre 256-pixel region of interest). A secondary sharpness metric that works on starless fields (the lunar surface, a single bright star) where HFR is meaningless.
- Best HFR: the lowest HFR seen since the last Reset baseline. The chart draws a horizontal dashed line at this value, so you see immediately when you have overshot focus and started getting worse.
The HFR trend chart and the manual workflow
The chart is a 60-sample scrolling time series; the X axis counts seconds back from now, with the right edge being the newest sample, and the dashed line marks Best HFR. The working rhythm:
- Click Start loop with an exposure of 2 s and an interval of 2 s.
- Watch HFR plateau; that is the focus you start with.
- Click Reset baseline so the chart starts fresh.
- Turn the focuser knob a small amount in one direction.
- After two or three ticks (about 5 s), see whether HFR went down (good, keep turning the same way) or up (wrong way, reverse).
- Repeat until HFR plateaus at a new minimum lower than before, making smaller adjustments as you approach the bottom of the V.
Bahtinov mask analysis
A Bahtinov mask is a flat cover with a pattern of angled slots, placed over the front of the telescope; the slots act as a diffraction grating, bending the incoming starlight into precise spikes. Pointed at a bright star, it turns the star’s tiny disk (the Airy disk) into three spikes forming a V plus a central crossbar. In focus, the central spike passes exactly through the V’s intersection; defocused, it sits off the intersection by an amount proportional to the focus error. Polaris analyses the pattern automatically:
- Install the mask on the front of your scope.
- Slew to a bright star, magnitude below 3 (Vega, Sirius, Polaris, Capella). The brighter the better, as long as the centre does not saturate.
- In Manual Assist, set the exposure to 0.5 to 2 s and start the loop.
- Tick Bahtinov mask analysis in the sidebar.
After each capture, Polaris finds the brightest star in the frame (or accepts manual starX / starY coordinates POSTed to /api/focus/bahtinov), crops a 200-pixel region of interest (ROI) around it, and sweeps every angle from 0 to 180 degrees in 0.5-degree steps, integrating intensity along each line through the ROI centre. It picks the three strongest peaks, enforcing a 30-degree minimum separation so a single fat spike is not counted twice, refines each line’s perpendicular offset within plus or minus 20 pixels, identifies the central spike as the one whose angle is closest to the bisector of the other two, and computes the perpendicular distance from the central spike to the V’s intersection. That distance is the focus error in pixels.
The overlay canvas draws a cross marker at the picked star, the three spike lines extended across the canvas with the central spike highlighted in the offset colour, a circle at the V’s intersection (the target for the central spike when in focus), and a “Bahtinov offset: ±N.NN px” label in the top left.
The sidebar shows the offset with a direction cue: In focus when the absolute offset is at most 0.5 px, Near focus, fine-tune up to 1.5 px, and Rotate inward / outward for larger offsets. The physical direction depends on your focuser’s orientation; learn it once for your rig by watching the sign change as you turn the knob, then map “inward” to whichever way that was. Colour coding is green in focus, amber while fine-tuning, red when far off.
Bahtinov on the live video stream
The same analysis runs on the VIDEO tab’s live stream, which is the faster way to work: you turn the knob and watch the number move at four readings a second instead of once per capture.
Start the stream, then tick On in the Bahtinov mask panel in the sidebar, below the focus sharpness bar. The panel shows the signed offset, the same direction cue as Manual Assist, and draws the spike lines, the V’s intersection and a dashed square for the analysis box over the live frame. The overlay follows the pan and zoom of the frame, so you can zoom into the star and still see the geometry.
Nothing is captured for this. A running stream owns the camera and every other capture is refused, which is exactly why the two features could not be used together before: the analysis reads the frame the stream has already delivered, at full resolution, so it costs no exposure and does not interrupt anything.
Two controls exist because they are the two things that go wrong:
- Click the star to pin it. At video signal levels on a rich field, “the brightest star in the frame” changes from frame to frame, and the reported offset jumps with it. A pinned star is measured every time. Unpin star goes back to automatic.
- Analysis box. The sweep only sees what is inside the box. At long focal length, with small pixels, or when the focuser starts far from focus, the spikes run outside the default 200 pixels and the measurement degrades without saying so. The dashed square shows where the boundary is; raise the box until the spikes fit.
On a colour camera the frame is a mosaic, so every second pixel along a line belongs to a different colour filter. Polaris averages each 2 by 2 group into one sample before the sweep, which removes that ripple at the cost of half the resolution. Offsets are still reported in frame pixels, and the panel says which grid the reading came from.
Exposure is the same trade as always: long enough for the spikes to stand out of the noise, short enough to keep the stream responsive. Between 0.1 and 0.5 s on a star of magnitude 3 or brighter is a comfortable starting point. The analysis integrates along each spike, so it tolerates a frame that looks noisy on screen far better than your eye does.
Manual Assist pitfalls
HFR does not move when I turn the knob. The loop interval is longer than you think: the default 2 s plus the exposure time means a full reading takes 3 to 4 s. Wait for at least three ticks before deciding the adjustment did nothing.
Bahtinov analysis says it could not detect three spikes. The target star is too faint, too low in the sky, or the mask is not seated cleanly on the front of the tube. Try a brighter star or re-check the mask.
The offset value oscillates wildly between ticks. The seeing (the steadiness of the air, which makes stars shimmer) is too poor for sub-pixel Bahtinov work. The mask still works as a coarse indicator; trust the visual overlay (does the central spike sit on the intersection?) over the numeric value.
No camera capture, “Start loop” disabled. Connect a camera in the RIGS tab first (Chapter 5).
11.3 Which metric to focus on
Metric, on the FOCUS panel and saved per rig, decides what each sweep point measures.
- Star HFR is the default and the right answer on a dark sky: half flux radius shrinks to a minimum at focus and the sweep fits the V-curve everybody recognises. It needs stars, and enough of them to pass the Min Stars gate.
- Contrast (Laplace) and Contrast (Sobel) measure the edge detail of the whole frame instead. There is nothing to detect and no star gate: it works in daylight on a distant object, on the Moon or a planet, and on a bright sky that drowns the stars, which is exactly where HFR has nothing to work with. Laplace is the more sensitive close to focus; Sobel is the steadier on a noisy frame. Both always fit a parabola.
Picking a contrast metric hides the star-count fields, since they no longer apply, and the readouts and the chart axis switch to contrast. Coarse focus on the Moon at dusk, then a star-HFR run when the sky is dark, is a sensible way to use both.
11.4 Auto-focus: the V-curve
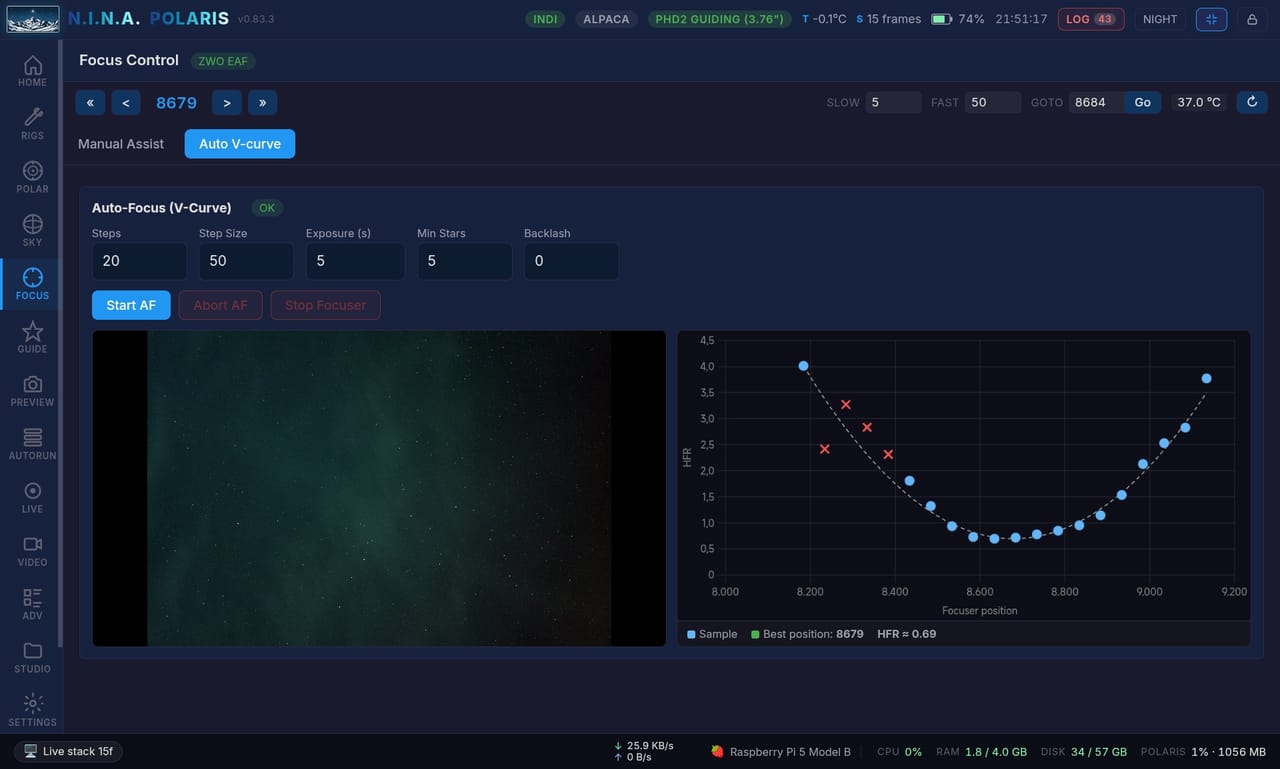
Click Start AF to run a symmetric sweep around the current position. Polaris:
- builds a list of N positions spanning the current position plus and minus half of Steps times StepSize;
- optionally applies backlash compensation (backlash is the slack in a geared focuser when it reverses direction; overshooting and coming back takes it up);
- at each position, moves the focuser, waits for it to settle, captures an exposure and measures the frame with the chosen Metric (below): the median HFR of the detected stars, dropping frames with fewer than Min Stars of them, or the contrast of the whole frame, which needs no stars at all;
- fits a parabola through the valid (position, HFR) samples;
- moves to the parabola’s vertex, the best focus;
- reverts to the start position on cancel or failure.
Parameters
- Steps (3 to 25, odd): how many sample positions in the sweep. 9 is a good default; use 5 when you are already near focus and want speed, 15 when you are far off.
- Step Size: same units as the manual stepper. It should be small enough that the V-curve has a clear shape, neither all samples at the bottom nor all lost in noise. Typical values: 50 to 200 steps for an SCT (Schmidt-Cassegrain telescope), 20 to 80 for a refractor.
- Exposure (s): long enough to register stars in the field. 3 s is fine for most deep-sky setups; planetary work uses 50 to 500 ms.
- Min Stars: the minimum star count for a valid HFR sample. 5 is sane; bump it to 20 in crowded fields where HFR gets noisy.
- Backlash: the overshoot in steps applied when reversing direction. Use 0 for belt-driven focusers, and your focuser’s published backlash for geared ones.
- Optical train: which camera and focuser pair the sweep drives: Main (imaging camera plus main focuser), Auxiliary (aux camera plus aux focuser), or Guide (guide camera plus guide focuser). The selector only appears when an aux or guide focuser is configured on the rig. The camera is always paired to the focuser, because a V-curve needs the camera that looks through the motor being moved. Guide-scope AF refuses to start while the guider is looping or guiding, since it would steal the guide camera; stop guiding first.
Live progress
While AF is running you see a progress bar with a sample counter (8 / 9), the last HFR and star count updating with each sample, and a V-curve chart at the bottom of the panel plotting (position, HFR) with the fitted parabola overlaid and a best-position marker. A live frame preview canvas shows the actual frame Polaris just captured at each sample, with a HUD chip displaying pos {N} · HFR {x.xx} · ★ {stars}. The preview arrives over the same live image stream (the /ws/image-stream channel) that LIVE and PREVIEW use, so you watch focus visually converging as the focuser steps.
Aborting
Abort AF cancels the sweep and restores the starting focuser position. Stop Focuser is enabled only while the focuser is moving outside AF; it is the emergency stop for a runaway manual command.
11.5 Focusing the aux and guide scopes
When the active rig has an auxiliary camera and focuser (a second OTA, optical tube assembly, riding the same mount) or a motorised guide scope, the FOCUS tab can target them instead of the main imaging train. Two small selectors appear in the Manual Assist controls, each shown only when the matching device is configured:
- Camera: Primary | Auxiliary | Guide: which camera the Manual Assist loop and Snap once capture from. The frame still renders on the focus canvas with the same HFR and Bahtinov tools.
- Focuser: Primary | Auxiliary | Guide: which motor the manual stepper, the GoTo box, and the focus wheel drive.
Everything in the manual jog follows the selected focuser: the position readout, the slider’s range, GoTo, and Abort all act on that motor, never the main one. If the chosen focuser does not publish a maximum travel, the absolute slider disables and you use the relative < / > nudges instead. A guide or aux focuser can be jogged even when the main imaging focuser is not connected.
For an automated V-curve on these trains, use the Optical train selector in the Auto V-curve subtab, which pairs the camera and focuser for you: picking Guide sweeps the guide focuser using the guide camera. Guide-scope focusing shares the guide camera with the guider loop, so do it while not guiding; Auto V-curve enforces this, and for the manual loop you should stop guiding first to avoid two consumers hitting the same camera.
Automatic autofocus during a session (AUTORUN or LIVE triggers) always targets the main focuser; the aux and guide trains are manual-focus only for now.
11.6 Automatic re-focus triggers
Auto-focus does not only run on demand; it can be triggered automatically in two places. The sequence engine in the AUTORUN tab can fire AF every N frames, on a temperature change, on HFR degradation, or on a filter change, configured under the sequence’s Triggers panel (Chapter 14). Live stacking in the LIVE tab evaluates the same four trigger types per integrated frame, and captures pause naturally while AF runs (Chapter 17).
11.7 Per-filter focus memory
Every filter comes to focus at a slightly different point, so a filter change normally means another full auto-focus run. Polaris shortens that. Each time auto-focus succeeds on the imaging train it records the winning position for the filter that was in the beam, per rig, together with the temperature and the focuser it ran on. Over a few filters it learns not just each absolute position but the offsets between them.
On the next filter change it uses that memory. If the stored point is still trustworthy, Polaris moves the focuser straight to it and skips the auto-focus run; on a filter you have not focused yet it applies the learned offset from one you have. This is opt-in per rig: leave the auto-move toggle off and the memory is only ever a recommendation.
The point is only reused while it is still valid. If the focuser has been swapped, or the temperature has drifted far enough that the old position no longer holds, Polaris does not silently trust a stale number: it flags the filter as needing focus and recommends a fresh auto-focus run instead of moving to a guess. The memory is held on the server per rig, so it survives reconnects and a browser refresh, and a partial rig save never wipes it.
Two habits get the most out of it: seed the memory from that night’s conditions with a real auto-focus on each filter, which the Filter offsets sub-tab below does in one pass, and keep the auto re-focus temperature trigger on (Chapter 17) so a long drift still forces a genuine pass rather than riding an increasingly stale offset.
11.8 Measuring every filter in one pass
Seeding that memory by hand is a chore: switch the filter, run auto-focus, read the position, work out the delta against the reference filter, type it into the rig, repeat. The Filter offsets sub-tab of the FOCUS tab does the whole set instead, and it is the thing to run before the night starts.
It lists the wheel’s filters with every one ticked, so you can drop a dark slot or a filter you will not use tonight. Start the run and it walks them in wheel order: switch the filter, run the same auto-focus your rig is already configured for, record where it landed. A filter whose auto-focus fails is tried once more, then recorded as failed with the reason and the run carries on, so one bad filter does not cost you the other five. The button re-runs just those afterwards. The V-curve for the filter being measured is live on the Auto V-curve sub-tab the whole time.
Nothing is written to the rig while it runs. The table fills in with each filter’s position, HFR, fit quality and focuser temperature, plus the offset it derives against the reference filter, and Apply to rig is what stores it. That is deliberate: a marginal curve should not land in your offsets table because a cloud went past. A row whose fit is worse than the quality gate is marked and left unticked, so accepting it is a decision rather than an oversight.
The reference filter matters more than it looks. Offsets are stored relative to it, and Apply saves your choice as the rig’s reference so the stored table is the one you approved. Leave it on Automatic and it uses the rig’s existing reference, a filter named L, or the first filter measured, in that order. The run also ends on that filter, at the position it measured for it, so the rig is ready to start imaging.
One caveat worth knowing before a long set: offsets are only derived between points measured at a comparable temperature. Eight filters is around half an hour, and on a cooling night the last of them can end up outside the tolerance window, in which case the offset column shows the delta with a warning triangle and Apply will not store that one. Re-run those filters rather than forcing the number in.
11.9 Common pitfalls
The offset column shows a warning triangle. That filter was measured too far from the reference filter’s temperature, so the offset will not be stored. Re-run that filter and it lands in the same thermal window as the rest.
HFR comes back as 0. No stars were detected. Increase the exposure, and check that you are actually pointed at the sky rather than a flat grey panel.
The V-curve has no clear minimum. Step Size is too small (all samples clustered at the bottom) or too large (all in noise). Try doubling or halving Step Size and retry.
AF moves to a wildly wrong position. The parabola fit was poisoned by outliers. Polaris validates that the best position falls within plus or minus 2 times StepSize times N/2 of the start, and warns outside that range. Use a Backlash value above 0 if your focuser has hysteresis (mechanical slack when it changes direction), and bump Min Stars to drop noisy samples.
The focuser stops moving mid-sweep. The driver lost its connection. Check the INDI logs (INDI is the device-driver framework Polaris uses to talk to equipment), reconnect the focuser, and restart AF.
HFR and V-curve have entries in the glossary (Appendix B).