4 Your First Night
The goal of this chapter is simple: from “I just opened Polaris in my browser” to “the first ten frames of a target are landing on disk”, in about thirty minutes if everything cooperates. It assumes Polaris is installed (Chapter 2) and you are looking at the welcome screen. Every step below gets a full chapter later in the book; here we take the shortest sensible path through them all once, so the whole workflow clicks into place.
4.1 Before you start: pick a target
Pick something easy the first time. Bright single stars like Vega, Altair, or Arcturus are great for focus and guiding tests. Bright, famous targets like M31, M42, or the Pleiades are visible to the naked eye, which makes pointing trivial to verify. Whatever you choose, keep it at 30 degrees of altitude or higher; avoid the horizon. You do not need to type any coordinates: Polaris has a built-in catalog, and you will search by name later.
4.2 Step 1: set your location
Polaris uses your location for every sky calculation: altitude, twilight times, and meridian flips (the side swap a German equatorial mount must make as a target crosses the meridian). On first run a location window should appear; fill it in with any of three methods:
- Address search: type “Brasília, Brazil” or your city and country, press Enter, and pick the matching result. The search answers from a gazetteer of some 70 000 towns embedded in Polaris itself, so it works on a field network with no internet at all, and adds online results when it can reach them.
- Pick on map: an offline world map you can pan and zoom (wheel or pinch), with town labels, where a tap places the marker. This is the one to use in the field, since it needs nothing but the host.
- Browser geolocation: click Use my location (available over HTTPS only).
- Manual entry: type latitude, longitude and altitude. The fields take a decimal comma as well as a point, and are parsed when you leave them, so a half-typed number is never read as your position.
If you dismissed that window, open SETTINGS and find Observatory location. Do not skip this: with the location wrong, the SKY tab, meridian-flip timing, and tonight’s-best altitude rankings are all garbage. The glossary entry for local sidereal time (Appendix B) explains why.
4.3 The first-run wizard
On a fresh install, and before the steps below, Polaris offers to walk you through connecting your equipment once the location and WiFi prompts are out of the way. Taking the offer is usually faster than the manual path, and the manual path is still there if you decline.
The wizard probes for what is actually attached rather than asking you to know. On Linux it starts a temporary INDI profile carrying the camera family drivers that are installed, reads back the devices that appear, resolves them against the USB devices it can see, and assigns serial-bridge mounts per port, so a mount on a CH340 adapter is offered against the port it is really on. On Windows it fans out to ASCOM and Alpaca discovery per role instead. You pick a device for each role, it connects them, and on finishing it writes a real profile with autostart and auto-connect enabled, starts it, and deletes the temporary one. Declining or aborting cleans the temporary profile up too.
It runs once: a server-side flag records that you have been through it, so it does not reappear on every browser you open.
4.4 Step 2: create a rig
Click RIGS in the sidebar. You start with a rig called “Default”; either rename it to something meaningful or create a new one:
- At the top of the RIGS tab, find the rig dropdown and the Manage rigs… button.
- Click Manage rigs…, type a name like “Backyard SCT 8"” in the New rig name input, click + New empty rig, and close the modal.
- The new rig is now active, selected in the dropdown.
A rig is a saved bundle of equipment selections and per-setup defaults; when you later move from the backyard SCT to a travel APO, you switch rigs in one click and everything follows. Chapter 5 covers the full feature surface.
4.5 Step 3: describe the telescope
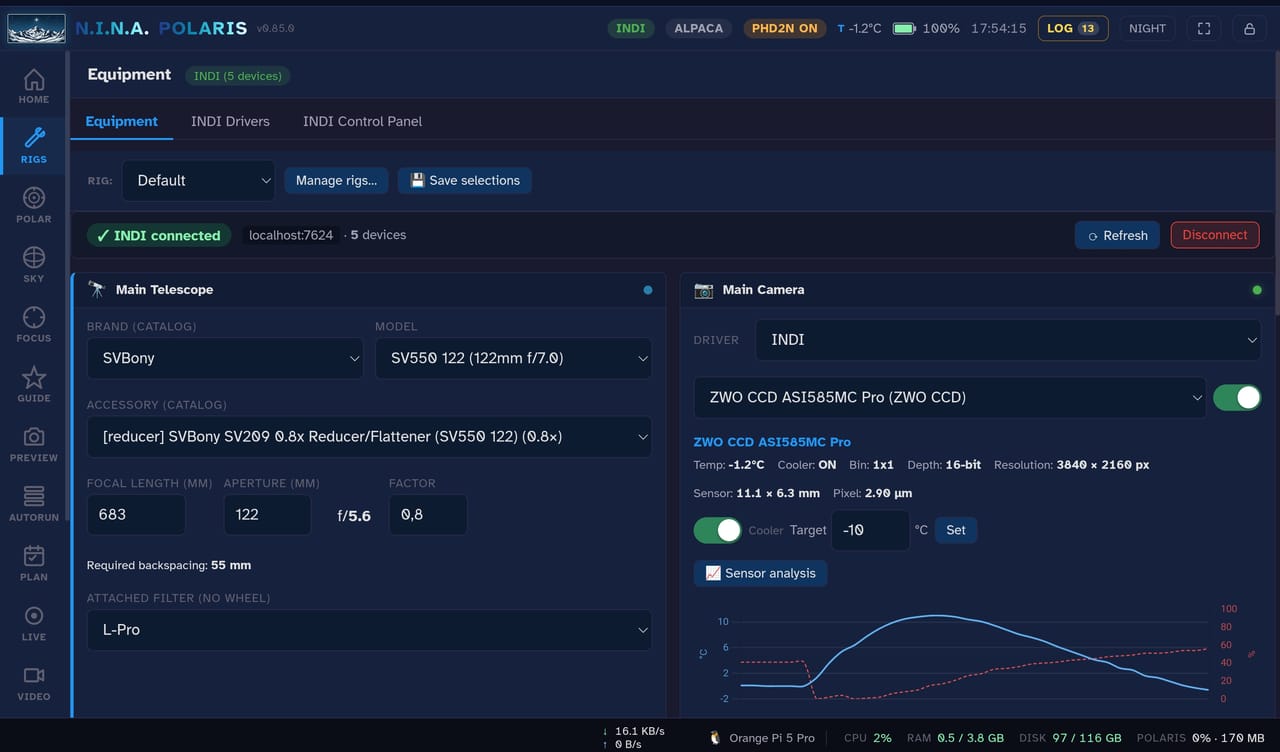
Back on the RIGS tab, the first card is Main Telescope. Pick a Brand from the dropdown (Askar, Celestron, Sky-Watcher, GSO, and others), then a Model; aperture, focal length, focal ratio, and back-focus fill in automatically. If you use a reducer or flattener, pick it under Accessory and the effective focal length recalculates. If your scope is not in the catalog, leave Brand set to Manual entry and type the focal length and aperture by hand; the catalog is a convenience, not a requirement.
4.6 Step 4: connect to your drivers
The cards below Main Telescope (Camera, Mount, Focuser, Filter Wheel, and so on) show empty dropdowns until Polaris is connected to a driver host, the program that actually talks to your hardware; on Linux that is INDI, the standard equipment-driver system for astronomy gear. At the top of the RIGS tab sits a connection strip. If an indiserver (the INDI driver host) is running on the same machine (the normal case on a .deb install, see Chapter 2):
- Stay on the INDI tab of the strip (it is the default).
- Leave Host as
localhostand Port as7624; the defaults are fine. - Click Connect INDI.
The strip turns green and reads “INDI · localhost:7624 · N devices”, and each role card’s dropdown now lists the matching INDI devices. On Windows, switch the strip to the ASCOM/Alpaca tab (ASCOM is the long-standing Windows astronomy driver standard; Alpaca is its network-based flavor) and click Discover to auto-find Alpaca Remote Servers on your LAN. If the connection refuses to come up, Appendix C has the INDI diagnostic checklist.
4.7 Step 5: pick and connect each device
For each card you actually have hardware for:
- Pick the device from the dropdown (“ZWO CCD ASI2600MC Pro”, and so on).
- Click Connect; the status dot goes green.
- For a cooled camera, set the cooler target temperature.
Cards you do not use simply stay at “Select device” and Polaris ignores them. When everything is green, click Save selections at the top to persist the picks in the active rig. You will not redo this next session; switching rigs restores everything.
4.8 Step 6: hook up PHD2 (optional)
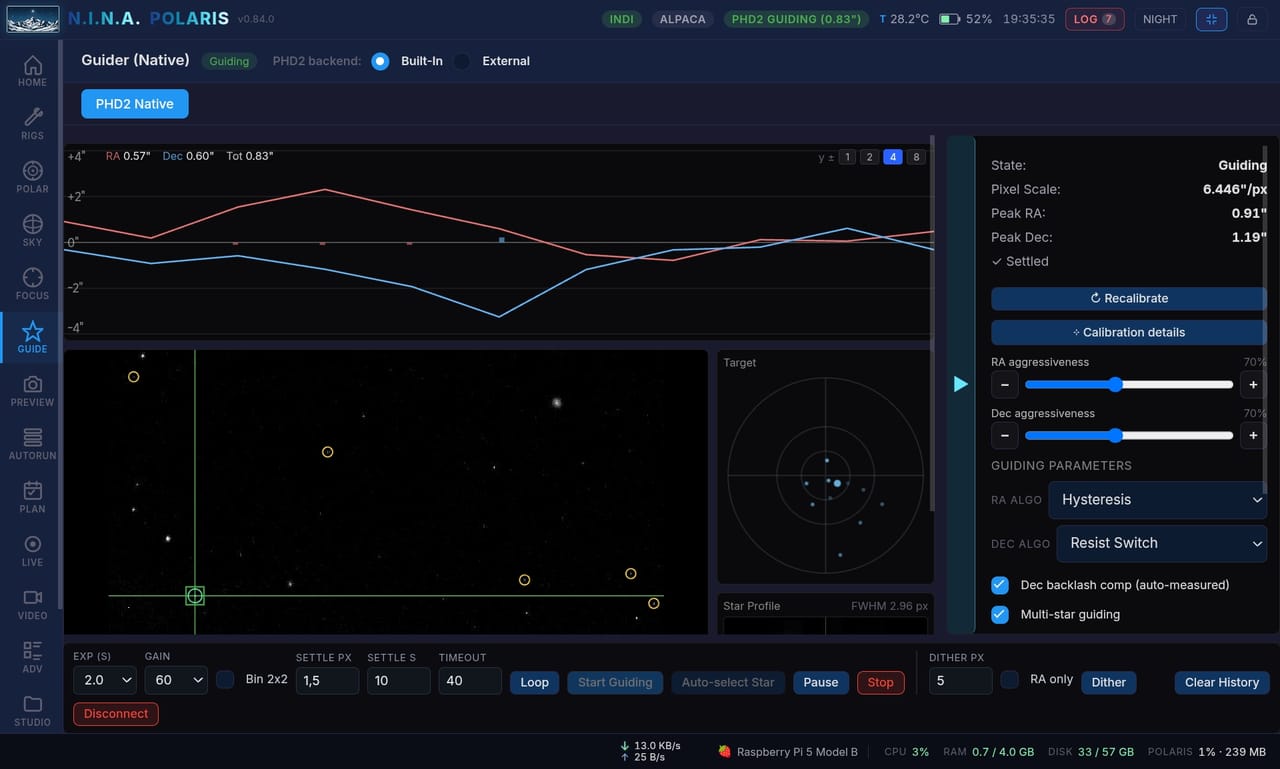
If you have a guide scope and guide camera, wire up guiding now: autoguiding uses that second camera to watch a star and continuously correct the mount’s tracking, and PHD2 is the free guiding program most amateur astrophotographers use. Otherwise skip ahead and come back another night.
- Open the GUIDE tab; the default Control sub-tab is already open.
- If PHD2 is not installed, a banner gives you the download link.
- Click Launch PHD2 if Polaris auto-detected it, or Connect if PHD2 is already running on
localhost:4400. - In PHD2 itself (or through the PHD2 GUI sub-tab on Linux), pick the profile matching your guide camera and mount.
- Click Connect equipment in Polaris; PHD2 wires up its own gear.
- Click Loop to start exposure cycling, find a star, then run Smart Calibrate if calibration has not been done yet.
For a first-time calibration, point the mount somewhere within 30 degrees of the celestial equator (declination near zero) for best results. Smart Calibrate computes the calibration step size from your pixel scale and guide rate for you. Guiding in both its PHD2 and native forms is the subject of Chapter 12.
4.9 Step 7: slew to the target
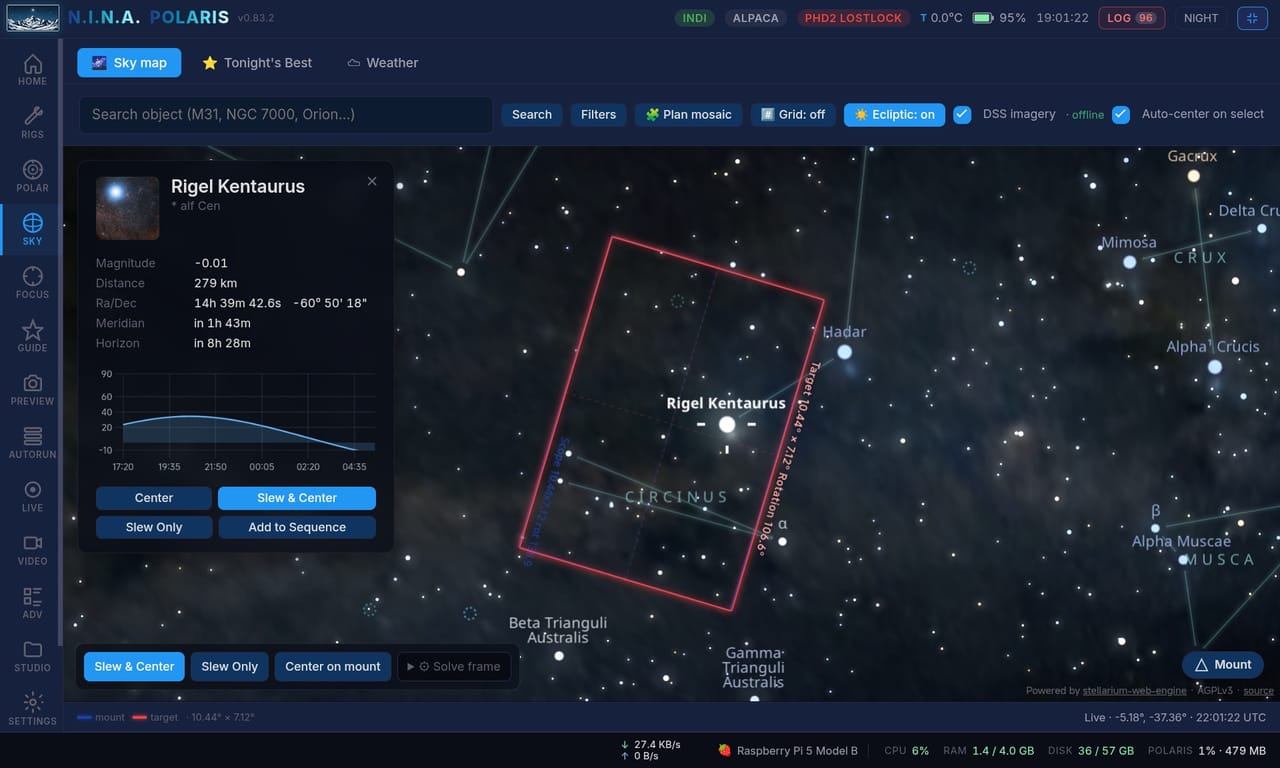
- Open the SKY tab.
- Type your target’s name (“Vega”) in the search bar at the top and press Enter.
- A result card appears; click it, and the preview shows the target on the sky map.
- Click Slew & Center. Polaris commands the mount, captures a short exposure and plate-solves it (matching its stars against a catalog to work out exactly where the telescope is pointing), computes the offset, and re-slews until the target is centered to within 30 arcseconds.
The whole flow takes 30 seconds to 2 minutes depending on how far off the mount’s initial pointing was. If Slew & Center fails, the plate solve probably could not find a match; check that focus is close enough for stars to actually exist in the frame, that the solve exposure is long enough for stars to register (try 5 to 10 seconds), and that the catalog hints on the active rig (focal length, pixel scale) are accurate. Chapter 10 covers the Sky Explorer in depth.
4.10 Step 8: a quick focus check
Before committing to a sequence, make sure the stars are tight:
- Open the FOCUS tab and set Step Size to about 20 (your focuser, your numbers).
- Take a snap from the PREVIEW tab (the round shutter button in its sidebar) to see what the field looks like.
- Back in FOCUS, manually step in and out a few times while watching the HFR value in the stats bar (HFR is a measure of star size; smaller means sharper); when it bottoms out, you are at focus.
- Better still, click Start AF in the auto-focus panel: Polaris sweeps the focuser through a range of positions, measuring star size at each one (plotted, the points form a V, hence “V-curve”), fits a parabola through them, and moves the focuser to the vertex, the bottom of the V. Watch the live frame preview as it samples each position.
Auto-focus, the Bahtinov helper (an on-screen assistant for focusing with a Bahtinov diffraction mask), and the field-analysis tools are covered in Chapter 11.
4.11 Step 9: run a test sequence
Now the actual capture:
- Open the AUTORUN tab.
- Click + Add target; it pre-fills with your current SKY-tab target.
- Set the filter (or leave it blank with a mono filter wheel), an exposure time (start with 30 seconds for a bright target), and a count of 10 to start. Binning (merging neighboring pixels for a brighter, smaller image) and gain (the camera’s amplification setting) are optional.
- Click Start sequence; captures begin.
Files land in {ImageOutputDir}/{RigName}/lights/{Target}/{Filter}/{Date}/ (see Chapter 2 for where ImageOutputDir points). While the sequence runs, watch the LIVE tab: it shows the latest frame with running statistics, and toggling Stack ON enables live integration, so the frames pile up into a single growing image (Chapter 17).
4.12 Step 10: stop and look at your work
When the sequence completes, or you click Stop:
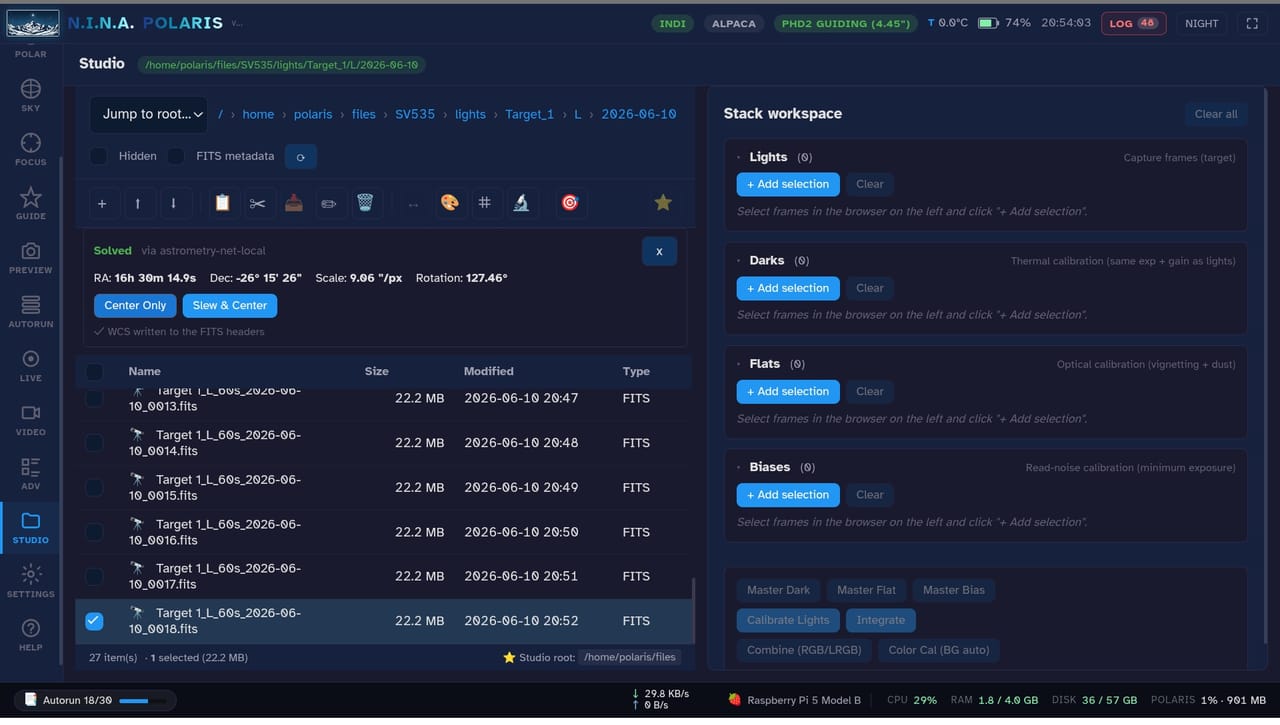
- Open the STUDIO tab and rescan; all your captures appear in the frame browser.
- Click any frame to open the full-resolution viewer with its statistics.
- From here, the post-processing flow of Chapter 20 takes over: building master calibration frames, calibrating your lights with them, and stacking the results.
4.13 What just happened
In thirty minutes you covered the full Polaris workflow, and each piece has a home you can return to:
- Location, rig, equipment on the RIGS tab: one-time setup, and it persists.
- PHD2 hook-up on the GUIDE tab: once per equipment combination, then it auto-resumes.
- Slew & Center on the SKY tab: every new target.
- Auto-focus on the FOCUS tab: once per session, and it can be auto-triggered during long stacks (Chapter 17).
- The sequence run on the AUTORUN tab: the unattended capture engine.
- Live preview and STUDIO: visual feedback tonight, processing tomorrow.
From here, dig into the chapters as your needs grow: auto-focus during sequences (Chapter 14), meridian flips and dithering, the small random nudges between frames that keep noise from stacking up in the same pixels (Chapter 12), multi-target nights (Chapter 16), planetary lucky imaging, which keeps only the sharpest of thousands of short video frames (Chapter 18), and remote access from outside your LAN (Chapter 27). Welcome aboard.