14 Simple Sequences and the Flat Wizard
Polaris ships three sequencers, sized to three kinds of night. AUTORUN, the subject of this chapter, is a simple flat list of (target, filter, exposure, count) rows: quick to set up, with no triggers and no branches. ADV is the tree-based advanced sequencer with containers, conditions, and triggers (Chapter 15). PLAN is the multi-target night planner in the style of ZWO’s ASIAIR (a popular all-in-one imaging controller), built on the same engine as ADV (Chapter 16). Use AUTORUN when the job is “100 frames of M81 in L tonight”; reach for ADV when it is “M81 in LRGB with automatic meridian flips, a dither every third frame, auto-focus on temperature change, and a safe shutdown if cloud cover exceeds 40%”. Meridian flips and dithering both get their own sections later in this chapter, so don’t worry if those words are new.
The AUTORUN panel has a tabstrip at the top that switches between two sub-tabs: Sequence, the list editor described first, and Flat Wizard, the automated flat-field tool described in the second half of this chapter.
14.1 Building a sequence
Click + Add target and a new row appears with these fields:
- Name, usually pre-filled from the last target you searched in the SKY tab
- RA / Dec, the target coordinates
- Filter, a dropdown when a filter wheel is connected
- Exposure (s), the per-frame exposure
- Count, the number of frames to capture
- Gain / Offset / Bin, optional per-row overrides
You can stack multiple targets vertically; the engine runs them in order, slewing to each one and then plate-solve-centering: it takes a short exposure, matches the star pattern against a catalog to learn exactly where the scope points, and nudges the mount until the target sits in the middle of the frame. The slew and center machinery is the same one the SKY tab uses (Chapter 10).
14.2 Running and monitoring
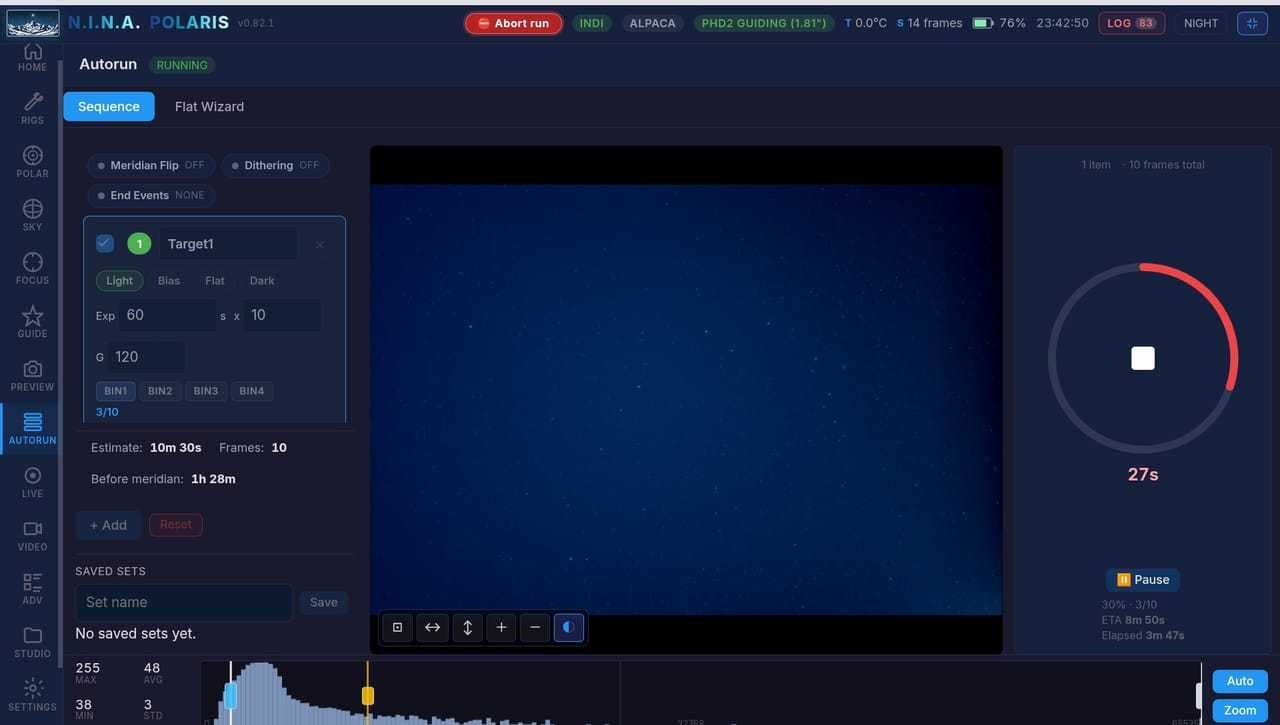
Three controls drive the run. Start sequence begins from the first row. Pause suspends the run after the current frame finishes, and Resume picks it back up. Stop aborts immediately and restores tracking to the last known good state.
While the sequence runs, the panel shows a progress bar per row (frames done out of total), total statistics at the top (elapsed time, remaining time, frames captured), a current-frame indicator with a countdown, and the last error if anything aborted.
14.3 End-of-sequence actions
A collapsible end-actions panel decides what happens when the sequence completes:
- Park mount slews to the park position and disables tracking.
- Warm camera ramps the cooler gradually back to ambient, which protects the sensor.
- Stop PHD2 gracefully disconnects equipment and stops guiding (PHD2 is the free autoguiding program most amateur astrophotographers use; guiding is covered in Chapter 12).
- Auto-GraXpert BGE runs a background extraction (BGE) on every captured light, that is, every normal exposure of your target. GraXpert is a free tool that removes sky-glow gradients from images. The extraction runs on its own without holding anything else up, and the results land under
{rig}/bge/{target}/. - Shutdown server powers the machine off after a delay by running the Linux command
systemctl poweroff. Linux only, and the Polaris user needs a sudoers entry for it (permission to run that one command as administrator without a password).
14.4 Dithering
The collapsible dithering panel shifts the mount slightly between frames so that fixed-pattern noise (hot pixels and other sensor defects that sit in the same spot on every frame) lands on different sky pixels each time. Its fields:
- Enabled, the master toggle
- Pixels, the dither amplitude (5 px is typical)
- Every N frames, the cadence (default 1, meaning every frame)
- RA only, for mounts with poor Dec correction
- Settle pixels / time / timeout, passed through to PHD2
To dither, Polaris asks PHD2 to nudge the mount and waits for PHD2 to report that the guide star has settled before the next frame starts.1 When PHD2 is not guiding, the dither is silently skipped; a toast (a small pop-up notice) warns you about the skip. Guiding itself is covered in Chapter 12.
14.5 Meridian flip
The meridian flip panel automates the pier-side swap that German equatorial mounts need as a target crosses the meridian, the imaginary north-south line overhead: to keep tracking past it, the mount has to swing the telescope over to the other side of the pier. The fields:
- Enabled, the master toggle
- Minutes after meridian, when to trigger (default 5 minutes)
- Pause before flip (s), a settle buffer
- Auto-focus after flip, an optional AF run before resuming
When the trigger fires, Polaris walks through this workflow:
- Pause guiding.
- Stop tracking (optional).
- Slew back to the target; most mounts flip when a slew crosses the meridian.
- Plate-solve and re-center.
- Run auto-focus, if enabled.
- Resume guiding, auto-recalibrating if the camera angle changed.
- Resume the sequence.
A status banner shows the phase live: “Slewing”, then “Centering”, then “Resuming”.
14.6 Sequence status over WebSocket
If you build your own dashboard or automation, the running sequence reports its state once per second (1 Hz) over Polaris’s WebSocket status stream; a WebSocket is a persistent connection that pushes live updates to browsers and scripts, and this one lives at /ws/status:
{
  "sequence": {
    "state": "running",
    "currentItemIndex": 2,
    "currentFrameInItem": 5,
    "totalFrames": 30,
    "totalFramesCompleted": 7,
    "elapsedSeconds": 410,
    "estimatedRemainingSeconds": 1380,
    "dither": { "issued": 3, "framesSinceLast": 0 }
  }
}
14.7 Troubleshooting the sequence
The sequence starts but the first frame fails. Usually the target has not risen yet or sits below 0° altitude. Check the altitude chart in the SKY tab before queuing.
Plate solve fails after the slew. See the slew-and-center troubleshooting notes in Chapter 10.
Dither does not fire. PHD2 is not guiding; check the status in the GUIDE tab. The sequence engine silently skips the dither when PHD2 is not ready, and a toast warning surfaces it.
The meridian flip hangs at “Slewing”. Your mount may not auto-flip on a slew back to the target; some mounts need an explicit pier-side command. File an issue with your mount model.
14.8 The Flat Wizard
The Flat Wizard sub-tab automates flat-field capture. For each filter you select, it hunts for the right exposure with a binary search (halving the search range on each try, like a guess-the-number game) until the median pixel value (the middle brightness: half the pixels brighter, half dimmer) lands in a tolerance band around your target ADU (Analog-to-Digital Units, the raw brightness numbers your camera reports). It then captures N flat frames at the converged exposure and remembers that “trained” exposure so the next session reuses it.
Flats are evenly illuminated calibration frames; your processing software divides your lights by them to even out vignetting (the darkening toward the corners of the frame) and dust motes. See Appendix B for the fuller story. (For a night when you forgot to shoot flats, STUDIO’s Dust motes tool can remove the mote shadows on their own, after the fact; see Section 20.9.) Two things matter when capturing them. First, the median ADU has to sit in the right place: too dim and noise dominates the division, too bright and the wells clip and the flat is garbage. The classic sweet spot is about 30000 ADU on a 16-bit camera, roughly 45% of full well (the maximum charge a pixel can hold before it saturates). Second, the exposure is tied to the filter: R, G, B, L, and Ha all transmit different amounts of light from your source, so each filter needs its own exposure. Doing that search by hand is tedious and error-prone; the wizard does the search, the capture, and the caching for you.
Pre-flight checks
The pre-flight panel at the top of the sub-tab shows three rows. The Camera must be connected (mandatory). The Filter wheel must be connected with at least one filter (also mandatory; the wizard’s whole point is per-filter exposure tuning). A Flat panel is optional: when one is connected, the brightness slider in the sidebar applies before the wizard kicks off, and when none is connected the wizard works fine with sky flats at dusk or dawn, or with a T-shirt stretched over the front of the OTA (the optical tube assembly, the telescope tube itself). If the camera or filter wheel is missing, the link in the hint takes you to the RIGS tab (Chapter 5).
Picking filters
Multi-select chips list the filters detected by the wheel. The wizard captures in the order you tick them, left to right in the chip list, and Select all and Clear buttons help when you have many filters. Pick whichever subset matches your imaging plan; there is no need to capture flats for filters you did not shoot lights in.
Settings
The settings persist per rig (stored under EquipmentProfile.FlatWizard in the rig’s profile), so switching to a different rig (a cold APO versus a warm SCT) restores that rig’s own values:
- Target ADU, default 30000. Drop to around 20000 for 14-bit sensors that clip earlier, or for narrowband filters (filters such as Ha that pass only a thin slice of the spectrum) where you want more headroom.
- Tolerance (%), default 5%. The search converges when the median lands in
[target * (1 - tol), target * (1 + tol)]. Drop to 1-2% if your pipeline is sensitive to flat-field normalization. - Frames per filter, default 20. Enough for a clean median master (the single averaged flat your processing software combines the set into) at most pixel scales; bump to 40-50 for very low-light sky flats where each frame carries more noise.
- Min / Max exposure (s), defaults 0.1 and 30.0. These set the binary-search bracket, the shortest and longest exposures the search will try. Tighten to roughly 0.5 / 10 for bright panels, or widen for sky flats at deep twilight.
- Binning, default 1. Binning combines adjacent pixels into one larger, more sensitive pixel. Trained exposures are remembered per (filter, binning) pair, so changing binning trains a separate slot. The wizard applies the binning to the camera before each search and capture pass.
- Max iterations, default 10, which covers roughly three decades of dynamic range (a factor of about 1000 in exposure). Only raise it if you have tightened tolerance below 2% and convergence stalls.
Every field saves itself about 400 ms after you stop editing it, into the active rig, so edits made mid-session stick even if you switch tabs without explicitly saving.
Panel brightness
The brightness slider appears in the sidebar only when a flat device is connected, and runs from 0 to 100. A value of 0 means “don’t touch the panel”, which is useful when you are shooting sky or T-shirt flats while a panel happens to be connected. When the value is above 0, the wizard sets the panel to your chosen brightness before starting.2 The wizard never auto-adjusts brightness during a run; if a filter needs a different exposure range than the panel is delivering, the search simply takes more iterations to converge.
Live progress
Below the shutter, the wizard reports the search live:
Filter 2/3 · G
Searching attempt 4: 2.137s → 28473 ADU
and then, after convergence:
Filter 2/3 · G
Capturing 8/20 at 2.137s
When a filter completes it moves into the Done list with its final exposure, or a “did not converge” warning. The list accumulates across the full run so you can see at a glance which filters made it.
Trained exposures
A table below the settings loads the saved values when you enter the tab3 and refreshes after each wizard run. It shows filter, binning, and exposure:
L  · 1 · 1.847s
R  · 1 · 2.341s
G  · 1 · 1.923s
B  · 1 · 3.412s
The next time you run the wizard with the same filter and binning, the trained exposure seeds the binary search, and convergence takes one or two iterations instead of five to eight. The saved values live in {AppData}/NINA.Polaris/trained-flats.json and are shared across rigs; the lookup key includes the binning, not the rig.
Output
Each captured flat is saved by the same image writer as every other frame, tagged IMAGETYP=FLAT in its header,4 so frames land in your usual {ImageOutputDir}/{rig}/Flat/... tree alongside lights, darks (exposures with the cap on, capturing the sensor’s own noise), and biases (zero-length exposures capturing the readout offset), and the STUDIO library auto-indexes them (Chapter 20).
Workflow: indoors with a flat panel
- Cap the scope or close the dome shutter to keep ambient light off the panel.
- Rest the panel against the dewshield or the front of the OTA.
- Open the AUTORUN tab and switch to the Flat Wizard sub-tab.
- Pick the filters L, R, G, and B.
- Set Target ADU 30000, Tolerance 5%, Frames 20, Min 0.1, Max 5; panels are bright, and a tight maximum keeps the search fast.
- Set brightness to 50 to start in the middle; if all filters end up needing very long or very short exposures, adjust it and re-run.
- Tap the shutter. About 5 minutes later (4 filters, roughly 30 s of search each, plus 20 frames per filter at sub-second exposures) you have material for all four masters.
Workflow: outdoors with sky flats
- Open the dome and point at the zenith (straight up), away from the sun, before the sky gets dark enough to shoot lights.
- Open the AUTORUN tab and switch to the Flat Wizard sub-tab.
- Pick the filters L, R, G, and B.
- Set brightness to 0; no panel is used even if one is connected.
- Set Min 0.1 and Max 30; deep twilight is dim, so widen the bracket.
- Tap the shutter. Sky brightness changes fast at twilight, so plan on one filter set per twilight window. A trained exposure from a sky flat run is useless five minutes later, because the sky is by then twice as bright or twice as dark.
Troubleshooting the wizard
The search never converges. The bracket may be too narrow, or the target ADU is unreachable. Widen the Min/Max exposure, and check that the panel or sky actually reaches your target ADU with a manual capture at the maximum exposure; if the median is still well below target, the light source is too dim.
“Did not converge” for one filter. The binary search collapsed without hitting the tolerance. This often happens with narrowband filters under broadband sky flats; they transmit so little light that the longest acceptable exposure still produces a median below target. Capture that filter against a panel instead.
A trained exposure gives wildly wrong ADU on the next run. The illumination changed between sessions: the panel brightness was altered, or the sky conditions differ. Run the wizard again; convergence will be fast (one or two iterations) and a new value gets cached. The wizard always trusts the live measurement over the cache.
The wizard says “no camera connected” even though one is selected in RIGS. Check the camera card’s status dot; if it is amber or red, click Connect on the card.
API
The wizard is fully scriptable. Each line below is an API endpoint, a web address your own scripts can call (see Chapter 31 for conventions):
GET /api/flatwizard/statusreturns{state, progress, lastError}.GET /api/flatwizard/trainedreturns a{filter_bin: seconds}map.POST /api/flatwizard/startwith body{filters[], framesPerFilter, targetAdu, tolerance, minExposure, maxExposure, binning, maxSearchIterations}returns 200, or 409 if a run is already active.POST /api/flatwizard/abortcancels the current run.
The same state rides on the WebSocket flatWizard sub-object every tick (one update per second):
{
  "flatWizard": {
    "state": "running",
    "lastError": null,
    "progress": {
      "startedAt": "2026-05-29T11:23:45Z",
      "totalFilters": 4,
      "currentFilterIndex": 1,
      "currentFilter": "R",
      "phase": "capturing",
      "searchAttempt": 3,
      "currentExposure": 2.341,
      "lastMedian": 30142,
      "totalFramesPerFilter": 20,
      "framesCaptured": 7,
      "filterResults": [
        { "filter": "L", "converged": true,
          "finalExposure": 1.847, "framesCaptured": 20 }
      ]
    }
  }
}
How flats fit into calibration before stacking is covered in the end-to-end workflow chapter, Chapter 26.