10 Sky Explorer and Session Planning
The SKY tab is where a session starts before any shutter opens: an offline sky map, target search against a bundled deep-sky catalog, altitude planning for the night, field-of-view framing, a mosaic planner, and the slew-and-center orchestration that puts the chosen target on the sensor. Everything essential works with no internet at the telescope; online services are used only as optional enrichments and fallbacks.
10.1 The sky map
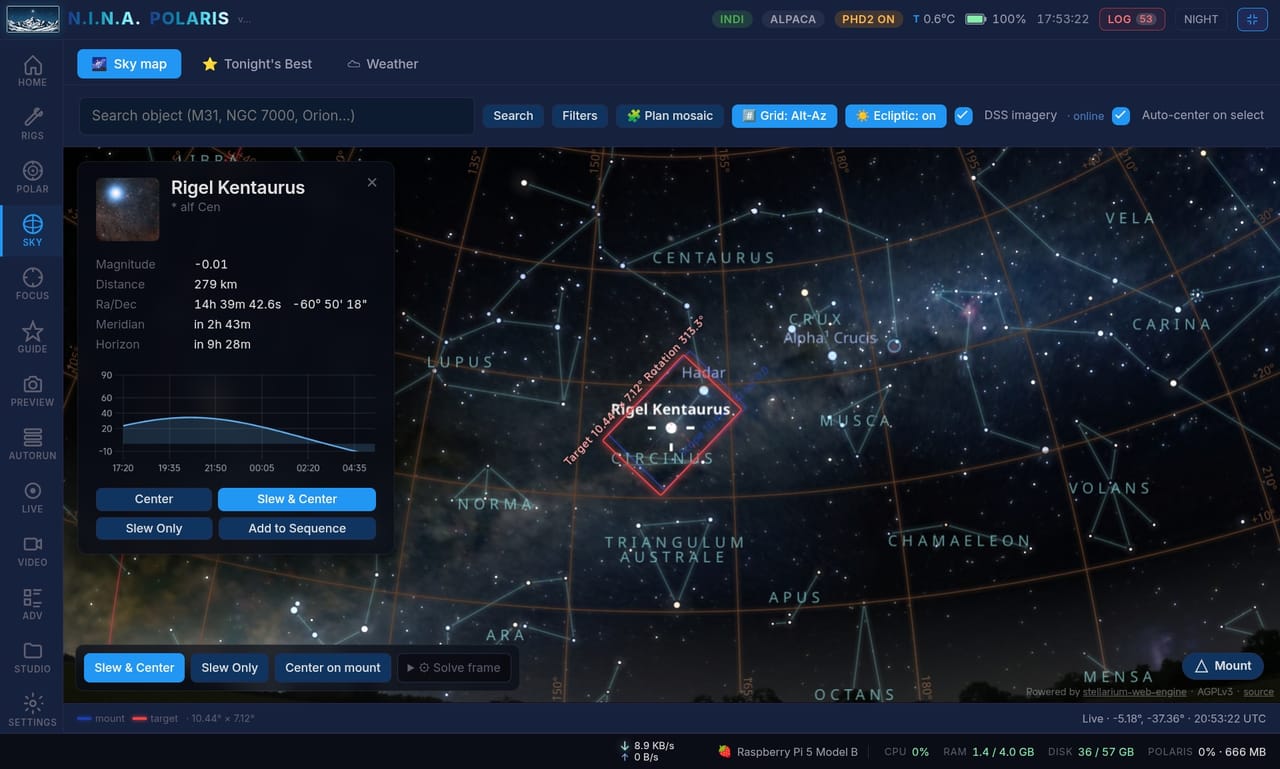
The map itself is stellarium-web-engine, the engine behind the web version of the popular Stellarium planetarium, running as its own sandboxed sub-app (served under /sky/) embedded in the page.1 Drag to pan; use the mouse wheel or a pinch gesture to zoom. The view aims wherever the host UI tells it: the mount’s current RA/Dec (right ascension and declination, the sky’s equivalent of longitude and latitude), a search hit, or the Centre on selected target buttons.
The bundled skydata/ directory (about 4.6 MB, shipped in the repo and in the publish output) covers, fully offline: stars from the Hipparcos and Tycho catalogs (the standard star catalogs from ESA’s Hipparcos mission) in the brighter naked-eye to binocular range, the NGC/IC/Messier catalog of DSOs (deep-sky objects: galaxies, nebulae, and star clusters) as labelled markers, the official IAU (International Astronomical Union) constellation lines and names (on by default), the 88 western constellation figure illustrations as toggleable artwork, a low-resolution Milky Way panorama, and the Sun, Moon, planets, asteroids, and comets.
WebGL2 is mandatory for the map; almost every desktop, laptop, and tablet browser from the last few years has it. On a host without it (for example, running Polaris’s local browser directly on a Raspberry Pi 2’s bare display), the SKY tab shows a graceful fallback banner; open Polaris from a desktop, laptop, or tablet browser instead.
10.2 Satellites and the major moons
The map is not limited to things that hold still.
Satellites. Polaris draws the ISS, Tiangong and the roughly 150 objects in CelesTrak’s “visual” group, the ones bright enough to follow by eye: Hubble, Envisat, Terra, the large spent rocket bodies. The map engine propagates the orbits itself with SGP4, the standard model these element sets are written for, from the TLE (two-line element) set the host serves. Search “ISS”, “Tiangong” or “Hubble” to find one, and clicking a satellite locks the view onto it so you can watch a pass unfold. One reading to know: a satellite shows magnitude 99 while it is below the horizon or inside the Earth’s shadow, which is the map’s way of saying “up there, but nothing to see”.
The 🚀 Satellites pill in the toolbar hides them, and the choice sticks on that browser.
Orbital elements go stale in days rather than months: a week past its epoch, the ISS is about a degree off. A snapshot ships inside each release, the host refreshes it from CelesTrak once a day when it has internet, and the Tonight’s Best tab reports the age of what the map is actually using (“Satellites: 156 from CelesTrak, orbits from today”) with an Update button beside it. In the mobile app the update also works when only the phone has internet: the app fetches the elements and hands them to the host. The map reloads after an update, because the engine reads the orbits once when it starts.
Moons. Zoom in on Jupiter and the four Galilean moons appear in their true positions, shadow transits included, labelled once the zoom is high enough not to crowd the planet; Saturn’s major moons behave the same. They are searchable by name (“Io”, “Europa”, “Ganymede”, “Callisto”, “Titan”). This is the map only: Center on body and the night planner know the planets, not their moons.
10.3 Offline deep-sky imagery (DSS)
Real deep-sky imagery, the “I can actually see the nebula” background familiar from the ASIAIR (ZWO’s all-in-one imaging controller), comes from a HiPS survey (sky images cut into small squares that load progressively as you zoom, like an online road map). DSS Color (the Digitized Sky Survey) is the default. A survey picker next to the DSS Img toggle switches the imagery layer to another full-sky survey - DSS2 red+blue, Mellinger wide-field colour, 2MASS near-infrared, or unWISE infrared - all streamed from CDS/alasky, keeping your current pan and zoom. Only DSS Colour ships an offline bundle; the others are online-only. Two modes exist for DSS Colour:
- Online (the default when no local bundle is present): tiles are streamed on demand from CDS Strasbourg (the astronomical data centre in France that hosts the survey). Needs a connection.
- Offline: provision the DSS bundle once; the bridge auto-detects it and prefers it, so the rich sky works at the telescope with no network.
The repo ships HEALPix order 3 and below as a baseline (the HEALPix order is the tile set’s zoom level; each extra order roughly quadruples the number of tiles), so the offline background works out of the box. For more detail, download a deeper tile set. Size scales roughly four times per order, so pick the ceiling that fits the memory card of your SBC (single-board computer, such as a Raspberry Pi):
| max order | tiles | approx size | look |
|---|---|---|---|
| 3 | ~1 020 | ~30 MB | big objects recognisable, soft on zoom |
| 4 | ~4 100 | ~110 MB | most DSOs recognisable (good value) |
| 5 | ~16 400 | ~400 MB | detailed, ASIAIR-like |
| 6 | ~65 500 | ~1.5 GB | overkill for framing |
The easiest route is Settings → Sky imagery (offline DSS), which downloads order 4 or 5 from inside the app. From a shell, the provisioning scripts do the same:
# Linux / macOS / Git-Bash  (args: MAX_ORDER [PARALLEL])
scripts/fetch-stellarium-dss.sh 4
# Windows
pwsh scripts/fetch-stellarium-dss.ps1 -MaxOrder 4The script is resumable: it skips tiles already present, so you can re-run it later to top up to a higher order. It writes to src/NINA.Polaris/wwwroot/sky/data/skydata/surveys/dss/, a path tracked with Git LFS2 (see .gitattributes) so the binary tiles do not bloat a working clone but still ship in dotnet publish and the installer. Contributors who fetch tiles commit them afterwards:
git add src/NINA.Polaris/wwwroot/sky/data/skydata/surveys/dss
git commit -m "skydata: bundle DSS Color HiPS (order 4)"
Attribution: DSS Color, STScI/NASA, HEALPixed by CDS Strasbourg.
10.4 DSO preview thumbnails
Search results, atlas cards, and the Tonight’s Best list each show a small DSS2 cutout of the object, an ASIAIR-style photo per target, so you can tell a galaxy from a nebula at a glance, fully offline. The repo bundles full coverage - every catalogued object with valid coordinates (about 17,700 images, roughly 215 MB, across M, C, NGC, IC, Arp, HH, LBN, LDN, Sh2, AGC, and HCG) under skydata/dso-thumbs/<SLUG>.jpg (for example M42.jpg, NGC7000.jpg, SH2279.jpg), tracked with Git LFS. The app derives each file name (the “slug”) from the result’s catalog and id, or by parsing the object name, and hides the image when none is bundled. Tonight’s Best uses these bundled cutouts first, so it works instantly and offline; the online NASA/Wikipedia lookup is only a fallback for objects with no bundled thumb, such as planets and comets.
To regenerate the set or widen coverage (--workers parallelises the fetch, ≤4 to stay polite to the shared CDS service):
python scripts/build-dso-thumbs.py --all-catalogs NGC,IC,AGC,HCG --workers 4The script is resumable and sources DSS2 Color imagery via the CDS hips2fits service (STScI/NASA imagery). It is distinct from the online /api/sky/image NASA/Wikipedia lookup, which still works as a fallback when connected.
10.5 The bundled catalogs
Search, the atlas filter, and Tonight’s Best all draw from a bundled single-file database (SQLite, with an R*tree spatial index for fast sky searches) at wwwroot/catalogs/dso/dso.db (about 2.6 MB, roughly 14 500 objects):
| Catalog | Entries | Source | License |
|---|---|---|---|
| NGC | ~7570 | OpenNGC | CC BY-SA 4.0 |
| IC | ~5000 | OpenNGC (same file) | CC BY-SA 4.0 |
| M (Messier) | 107 | OpenNGC cross-reference (M-tagged duplicates) | CC BY-SA 4.0 |
| C (Caldwell) | 104 | Embedded Caldwell to NGC/IC mapping in the build script | Public domain |
| Arp | 592 | CDS Vizier VII/192A/arplist (Arp 1966) |
Public domain |
| Sh2 | 313 | CDS Vizier VII/20/catalog (Sharpless 1959) |
Public domain |
| HCG | 100 | CDS Vizier VII/213/groups (Hickson 1982/89) |
Public domain |
| AGC | 767 | CDS Vizier VII/110A/table3 (Abell-Corwin-Olowin 1989) |
Public domain |
| HR / Star / WR | ~9400 | Bright Star Catalogue, IAU star names, Galactic Wolf-Rayet list | Public domain |
| Notable | ~150 | Hand-curated famous objects | Public domain |
Two of those rows are not deep-sky catalogues in the usual sense.
The star rows make the naked-eye sky searchable: type “Vega”, “Albireo”, “HR 7001” or a Wolf-Rayet designation and the map takes you there, which matters for focusing, collimation and for pointing checks rather than for imaging targets.
The Notable rows are the objects people ask for by name that no NGC, IC or Messier number covers: Phoenix A, TON 618, 3C 273, the Vela pulsar, Cygnus X-1, Sagittarius A*, Markarian’s Chain, the Leo Triplet, the Coma and Perseus clusters, Wolf 359, TRAPPIST-1, the Hubble Deep Fields. They are drawn whatever the magnitude cap, since most are far fainter than any sensible cap, they carry their own types (“Quasar”, “Pulsar”, “Black Hole”, “Gravitational Lens”, “Dwarf Galaxy”), and Tonight’s Best lists them under a Notable chip with no brightness gate: every one that peaks above 30 degrees tonight, ordered by score. Half of them are targets for a photograph of a position rather than of a shape, which is its own kind of observing.
The AGC entry is magnitude-trimmed at m10 < 17, keeping the brightest roughly 30% of the 2712-cluster catalog; fainter clusters require deep imaging beyond typical amateur reach. Full attribution and per-source license notes ship at wwwroot/catalogs/dso/LICENSE.txt.
To rebuild the bundle from the original sources, run:
python scripts/build-dso-catalog.pyThe output overwrites src/NINA.Polaris/wwwroot/catalogs/dso/dso.db. The script needs only the Python 3.8+ standard library (urllib and sqlite3), no external dependencies; cached downloads live in scripts/.dso-cache/ for fast re-runs.
When dso.db is missing (a development clone without the bundle), the SKY tab silently falls back to a small list of about 150 hardcoded objects (the complete Messier catalog plus a handful of popular NGC entries), so the app still works, but search hits like “NGC 7331”, “Arp 273”, or “Sh2-279” come up empty.
10.6 Searching for a target
At the top of the tab sit a text input and a Search button. Names resolve against the bundled catalog (NGC, IC, M, C, Arp, Sh2, HCG, AGC, the Notable list, bright stars by name or HR number, plus common names like “Andromeda”), satellites and the major moons of Jupiter and Saturn by name, and you can also type RA/Dec coordinates directly. Matches appear as result cards showing the name with alternate designations, RA/Dec (in J2000, the standard reference epoch for sky coordinates), magnitude and apparent size in arcminutes, an object-type badge (Galaxy, Nebula, Cluster, and so on), and the constellation. Click a result and it overlays on the map, centred and highlighted.
The Filters button toggles a panel to narrow the results:
- Catalog dropdown, restricting to a single source. Hidden when the expanded database is not loaded.
- Object type dropdown (Galaxy, Globular Cluster, HII Region, Peculiar Galaxy, Planetary Nebula, Supernova Remnant, and more); the list of types comes live from whatever is in the catalog.
- Constellation, a free-text three-letter IAU abbreviation (“Cyg”, “Ori”, “And”). Hidden when the expanded database is not loaded.
- Magnitude range, minimum and maximum inputs.
- Dec range, minimum and maximum in degrees. Useful for filtering by hemisphere: set the minimum Dec to 0 to keep only northern targets, or the maximum to 0 for southern ones.
10.7 Planning the night: altitude chart, Tonight, and weather
Once a target is selected, the bottom of the SKY tab shows its altitude against UTC time, with twilight bands (astronomical, nautical, civil), a Moon-altitude overlay, and a highlight on the best window where the target rides highest.
For picking the target in the first place, the Tonight view ranks the best objects to image for your location and date, drawing altitude curves with the twilight and night windows. The ranking also surfaces large emission and dark nebulae that carry angular size but no stellar magnitude, so photogenic targets do not vanish just because they lack a catalog brightness. Galaxies get the same treatment: the ranking reaches down to a fainter magnitude for them and gates on object type rather than a single brightness cut, so faint but worthwhile galaxies show up instead of being trimmed away with the truly out-of-reach ones. A Weather view shows current conditions and the forecast for the observing site, so you can judge whether the plan survives the clouds.
10.8 Custom horizon
Trees, roofs, and hills all cut into the sky you can actually image, and a target that looks well-placed on the altitude chart is useless if it sits behind your neighbour’s roof. Polaris lets you draw your real local horizon and then respects it everywhere.
Open SETTINGS and find Custom horizon (🌄). It is an azimuth/altitude mask: a canvas where the horizontal axis is compass azimuth and the vertical axis is altitude. Click to add a point, drag to move one, right-click to delete. Two ways to build it:
- Capture from the mount. Point the scope at the top of a real obstacle (a tree, the roofline) and click Horizon point (also on the mount controls) to record the scope’s current azimuth and altitude as a point. Walk the horizon obstacle by obstacle and you trace your true skyline.
- Import a file. Load a horizon file (
.hrz,.txt, or.csv, the common az/alt formats other planners export) with Import file, and Export to save yours back out.
Once set, the horizon is honoured across the app. It overlays on the sky map and the altitude chart so you can see at a glance where a target clears it. The Tonight ranking accounts for it, so objects that never rise above your obstructions are not recommended. And it feeds the mount’s slew-safety altitude floor (Chapter 7), so a GoTo below your horizon is refused rather than driving the tube into the trees.
10.9 Field-of-view overlays and framing
Polaris draws the camera footprints directly on the map so you can frame a composition before slewing:
- The blue rectangle is the mount FOV (field of view), the main camera’s footprint anchored where the scope is pointing. It is sized from the active rig’s focal length and the connected camera’s sensor, and rotated to the solved camera angle once a plate solve is available (plate solving matches the stars in a captured frame against a catalog to find exactly where, and at what angle, the camera is pointing).
- The red rectangle is the target framing box. While idle it is screen-anchored, so you drag the map to compose; while imaging with a recent solve it snaps to the solved sky position, so red converges on blue when you are framed correctly.
- The pink rectangle is the auxiliary camera’s FOV, shown when an Auxiliary Camera System is configured on the rig (aux focal length set, and the aux sensor reported once it connects; see Chapter 5). The aux rides the same mount, so it is anchored at the mount position.
- The yellow rectangles are the mosaic panels, described below.
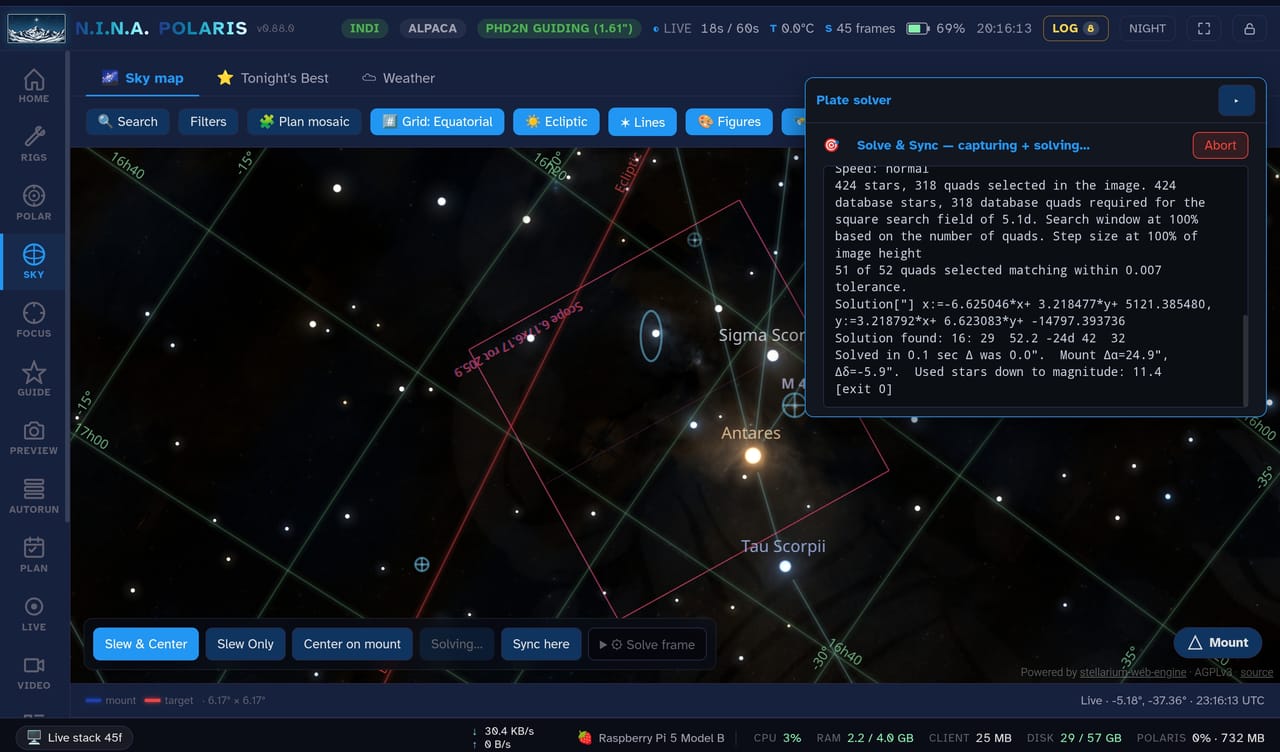
When you run a plate solve from SKY (Solve & Sync), Polaris also fires a parallel solve on the aux camera if one is connected: it captures a single aux frame with the aux exposure, gain, and binning, and solves it on its own hardware, concurrently with the main solve. The pink rectangle then snaps onto the aux camera’s real solved rotation and scale, so you know for certain the field and angle the aux photo will come out with instead of assuming it matches the mount. A toast reports the solved aux rotation.
Framing rotation
The angle on the red box is the camera’s sky position angle, 0 with north up, the same number a plate solve reports. Normally it follows the solve. To choose it instead, click Rotation in the toolbar: a slider appears beside the box and turns it live, with single-degree nudges and a field for typing an angle. Follow solve hands the angle back to the plate solver.
What happens next depends on what can turn the camera.
With a rotator on the rig (Chapter 5), the chosen angle rides along with every Slew & Center from this tab. After each solve the loop turns the rotator by the difference and solves again to confirm, until the angle is inside half a degree. Rotate now does the same without moving the mount. The rotator’s mechanical angle differs from the sky angle by an offset nobody knows in advance, so the first move can go the wrong way once; the loop notices that the error grew, reverses, and remembers the direction for the rest of the session. A difference of 180 degrees counts as arrived, because a rectangular sensor frames the same field either way up.
With a rotator you turn by hand, a camera rotator ring or a motorised one with the motor off, that loop cannot run, so you are the loop. With no rotator connected and an angle chosen, the panel offers Measure framing: take a PREVIEW exposure, press it, and Polaris solves the frame and answers with an instruction, “turn the camera 20.0 degrees clockwise”, as seen looking at the back of the camera. Turn it, press it again, and repeat until it reports the framing is within a degree.
The direction comes from the parity of the solved field: a star diagonal, or any odd number of reflections, reverses which way the sky angle runs, and the solve’s CD matrix is what reveals that. What it cannot know is which side of the camera you are standing on, so if the instruction sends you the wrong way, press Other way; the choice is stored on the rig and applies to that optical train from then on. If a turn makes the error grow, Polaris flips the direction itself and says so.
A Slew & Center with no rotator connected still reports the framing error. It centres the mount as usual and never fails over an angle nothing on the host can change.
The chosen angle is kept either way: it is the rotation stored on a PLAN target and on targets added to a sequence.
10.10 Favourites and imported target lists
The target card carries a Favourite button. A starred object goes into a list kept on the host, alongside the plans rather than in the browser, so it is there on every tablet and for every rig. Favourites then surface in three places: the Favourites chip in Tonight’s Best, which lists every starred target that peaks above 30 degrees tonight with its peak time; the Favourites button in the PLAN target picker (Chapter 16); and that panel’s Map button, which frames the object back on the sky map.
The PLAN favourites panel also takes Import CSV, for a target list exported from Telescopius or assembled in a spreadsheet. The file needs a name column and right-ascension and declination columns, in sexagesimal or decimal form; the importer recognises both tidy headers (“Catalogue Entry”, “Right Ascension”, “Declination”) and plain ones (“name”, “ra”, “dec”). Targets you have already starred, matched by name or by position, are skipped, so re-importing a list you have curated does not duplicate it.
10.11 Slew & Center
The big workflow button. With a target selected, click Slew & Center and Polaris:
- commands the mount to the target’s RA/Dec;
- captures a plate-solve frame (5 s exposure by default);
- solves it, using ASTAP (Kleijn, n.d.), the plate-solving program bundled with Polaris, as the primary solver, and falling back to PlateSolve3 or Astrometry.net (Lang et al. 2010), online or local;
- computes the offset from the intended position;
- re-slews to correct, repeating up to 5 iterations until the error is within tolerance (30 arcsec by default).
A status banner shows the phase live: “Slewing → Capturing → Solving → Centering → Centered (12 arcsec error)”.
Going to coordinates you type
Not every target has a catalogue entry: a comet from an ephemeris, a position from a paper, a spot a friend read out over the radio. GoTo coordinates, in the SKY toolbar and on the RIGS mount card, takes a pair of coordinates in whatever form you have them, sexagesimal (05:35:17 -05:23:28, 5h35m17s, 05 35 17, with degree marks) or decimal, and shows you how it parsed them before anything moves. A bare decimal right ascension is read as hours, or as degrees when it passes 24, when it carries a d, or when the unit switch says so.
From the parsed preview you can Slew & Center, Slew Only, or Show on sky map to check the field first. The SKY search box accepts the same coordinate pair as a target, so pasting one and pressing Search is the quick path.
10.12 Centering on the Sun, Moon, or a planet
Plate solving cannot lock onto solar-system objects: the Sun and Moon wash the frame out, and a planetary shot (long focal length, millisecond exposures) has no background stars to match, so Slew & Center fails on them. The Center on body picker on the map handles them with a solve-near-and-offset strategy instead:
- Pick Moon, Sun, or a planet from the dropdown and click Center on body (the mount must be connected).
- Polaris computes the object’s apparent topocentric position (where it appears from your exact spot on Earth) from its built-in ephemeris (tables of where solar-system bodies are at any given time), using your profile location and clock.
- It slews a few degrees off to a nearby star field and runs the normal plate-solve and sync there, correcting the mount’s pointing model right next to the target without ever solving the object itself.
- It re-reads the ephemeris (the Moon moves about 0.5 degrees per hour) and performs a precise GoTo (an automated slew to exact coordinates) onto the object. For the Moon and Sun it then switches the mount to lunar or solar tracking so the object stays centred.
A phase chip shows progress (Computing position → Solving nearby field → Slewing to target → Centered), and the offset-field solve streams to the SKY solver console like any other solve. The procedure needs a connected mount, a camera, and a working plate solver for the offset field; if the nearby field will not solve, raise the offset or pick a clearer patch of sky.
Selecting the Sun pops a confirmation dialog. Only proceed with a certified full-aperture solar filter fitted. An unfiltered telescope pointed at the Sun destroys the camera instantly and can cause permanent eye damage. No software can protect against this.
10.13 Mosaic planner
For targets larger than one field of view, click Plan mosaic with a target selected. Polaris overlays an N by M grid of panels on the map, drawn live as you adjust the settings: panels per axis, overlap percentage, and the total grid size. A cos(δ) correction (δ being the declination) keeps panels at high declination from stretching, and the planner shows an estimated session time computed as panels times exposure times frames.
Add to Sequence is how the plan leaves the map: it generates the AUTORUN rows for all panels, ordered in a serpentine slew pattern (back and forth, row by row, like mowing a lawn) so the mount walks the grid efficiently. From there the sequencer takes over; see Chapter 14. For multi-target scheduling across a whole night, the planner described in Chapter 16 builds on the same target selection.
10.14 Stellarium sync
If you have Stellarium (the popular free desktop planetarium program) open with its Remote Control plugin enabled, click Get from Stellarium. Polaris fetches Stellarium’s current selection over HTTP (a plain web request on your local network) and auto-populates the search box with the RA, Dec, and name.
10.15 Slew preview
While the mount is slewing and nothing is capturing, an inset card appears in the lower right showing a live camera feed, so you can watch the field sweep past during a GoTo. This is driven by SlewPreviewService, is on by default, and is polite to other camera consumers: it silently yields whenever a sequence, auto-focus, preview, or video recording grabs the camera.
10.16 Common pitfalls
Search returns nothing. The catalog is not loaded; refresh the page.
Slew & Center fails repeatedly. See the plate-solve section of Appendix C.
Mosaic panels overlap wrongly. The rig’s focal length or sensor size is wrong. Re-pick the OTA from the catalog in the RIGS tab (Chapter 5).
For the technically curious: it runs in an iframe, draws with WebGL2 (the browser’s built-in 3D graphics capability), and the host page steers it with postMessage, the standard way two web pages exchange data.↩︎
Git LFS (Large File Storage) is an extension to the Git version-control system that keeps big binary files out of the normal repository history and downloads them only when needed.↩︎